
- Support Home
- Horus updates
- FAQs
- Browsers and compatibility
- Registration
- Signing in and out
- Username and password
- Roles in Horus
- Menu options
- User management
- Foundation doctor photos
- Non-trainee grade (NTG)
- Data in Horus
- Rotations and placements
- Forms and functionality
- Creating content
- The curriculum
- Team assessment of behaviour (TAB)
- Mandatory certificates
- Personal learning log
- NHSE elearning for healthcare
- Concerns management
- Placement supervision group (PSG) feedback
- Annual review of competence progression (ARCP)
- Reporting
- Communication in Horus
- Archived HEE e-portfolio
- About Horus
- Contact us
- Blank forms
- Sitemap
- Privacy Notice
- Technical Checker
Frequently Asked Questions
We have gathered your frequently asked questions into a series of categories, which you can see in the sub-menu under the "FAQs" main menu. You can browse the questions or you can search for a particular question or key word by typing into the "Search" box at the top of this page.
We are updating and adding to these questions regularly. If there is anything further you would like to see on this page please contact us.
-
Browsers and compatibility
-
What browsers does Horus work in?
We only test Horus on the following browsers:
- Edge
- Chrome on Windows (latest versions)
- Safari on iOS (latest version)If you experience problems with Horus on older versions of Edge or Safari, you should switch to the latest versions of Chrome or Firefox. Note that Horus is not accessible in Internet Explorer, as many of the features are not compatible with out of date browsers.
--> IT departments that require you to run very old versions of Internet Explorer should be able to provide you with an alternative modern web browser.We will also support and fix queries from people using up to date browsers for the following platforms (although we don't test these platforms on a regular basis):
- Firefox on Windows
- Safari/Chrome on Mac OSX
- Chrome on Android
-
Before you register
-
Who can use the Horus ePortfolio?
You can access the Horus ePortfolio for free if you fulfill any of the criteria listed below.
- You are a foundation doctor working in England
- Note that all appointments to F1/F2 level/equivalent posts made outside of the national recruitment process will be considered to have "NTG" status in Horus (see below)
- You are a non-trainee grade (NTG) junior doctor (or other healthcare professional) working in a foundation-level (or similar) post in England
- You are a clinical, educational, academic or any other kind of supervisor to a foundation/NTG doctor in England
- You are involved in the day to day training/support of foundation doctors in England (for example, a ward pharmacist, a nurse or an allied health professional)
- You are a foundation training programme director or clinical tutor at an NHS trust in England
- You are responsible for maintaining the information in the Horus ePortfolio or for monitoring the progress of foundation doctors in England as an administrator (for example an NHS trust postgraduate centre administrator or a foundation school administrator)
- You are a foundation school manager or foundation school director in England
- You are an ARCP (annual review of competence progression) reviewer or panel chair
If you fit into any of the categories listed above and would like to access Horus, please contact your local e-portfolio administrator - either in your local postgraduate centre or foundation school.
Learn more about registering.
- You are a foundation doctor working in England
-
Do I have to pay to use the Horus ePortfolio?
You can access the Horus ePortfolio for free if you fulfill any of the criteria listed in the "Who can use the Horus ePortfolio" section.
It is not possible to pay to use the Horus ePortfolio. If you do not fit into any of the listed categories, you will not be able to use Horus.
-
What do I need in order to access the Horus ePortfolio?
In order to access the Horus ePortfolio you will need an internet connection, an email address and a password. You can get login details by registering for an account.
-
Registering
-
How do I register?
To register, please contact your local Horus ePortfolio administrator (this will usually be your local postgraduate centre team or your foundation school administrator). They will be able to create an account for you.
Please note that the Horus helpdesk team is not able to create accounts for individual users.
If you are an administrator, learn more about how to create a new user account.
-
Problems with registration
-
Why have I not received my activation email yet?
Ensure you have checked the inbox and junk/spam folder of the email account you have been registered with, as your account activation details will have been sent to that email address. The email may take a few minutes to arrive.
Sometimes our emails can be wrongly identified as junk mail so please check your junk mail or spam folder carefully.
Learn more about the activation email.
If you have checked your email account and still haven’t received your activation email (or your activation link has expired), you should first take the steps described in the resetting your password section.
If you still don't receive your activation email, contact your local Horus ePortfolio administrator (this will usually be your local postgraduate centre administrator or foundation school administrator), who will be able to verify your account details or create a new account for you if appropriate.
Learn more about how to register for a Horus account.
If you are an administrator, learn more about sending activation emails and creating new user accounts.
-
I think I already have an account - how do I find out my registered email address and password?
If you think you have an account, then you should try to sign in.
If you think you have an account but cannot remember your registered email address, learn more about your registered email address.
If you are unsure of your password but do know your registered email address, try to reset your password.
If you are unsure about whether or not you have an account, you should try to log in (see steps above). If, after following the steps above, you are not able to log in, contact your local Horus ePortfolio administrator (this will usually be your local postgraduate centre administrator or foundation school administrator).
-
Signing in basics
-
How do I sign in to my account?
Once you have been registered on Horus, follow these steps to sign in:
- Go to the Horus ePortfolio website by typing https://horus.hee.nhs.uk into your browser (or by clicking the link)
- Enter your email address and password
- Select the 'Sign in' button.
-
How do I access my account for the first time?
When an account is created for you, you should receive an activation email with a link to a page where you can set up your password.
You can activate your account without the activation email by following the resetting your password process.
-
What will my activation email look like?
Your Horus ePortfolio activation email will look like this:
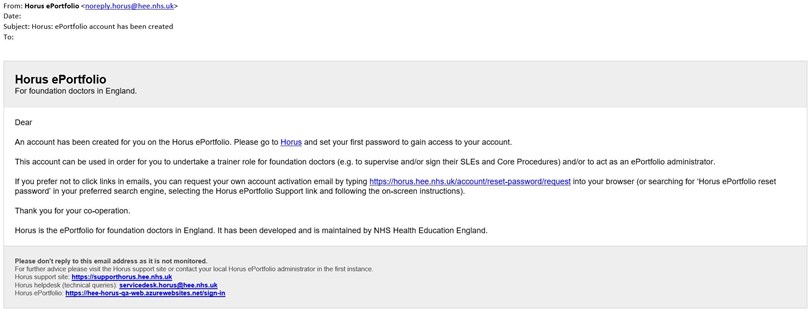
Learn more about what to do if you have not received your activation email yet.
-
What do I do if the link in my activation email has expired?
1. Select the account activation link in the activation email
2. Land on the “this link has expired” message
3. Select the “Login page” link on that page
4. Select the “Unable to sign in?” link on the sign in page
5. Enter email address
6. Select "Recover password"
7. Find the email in your email account and select the new link to set up your new password
More detailed instructions in how do I reset my password?
-
Problems with signing in
-
What should I do if I can't sign in to my account?
Ensure:
1. you are attempting to sign in to the correct version of Horus
- The NHS England version (used from August 2017 onwards) is at https://horus.hee.nhs.uk.
2. you are using the correct email address and password.
Learn more about what to do if you
- have forgotten the email address with which you're registered on Horus
- can't access to the email address with which you're registered on Horus
--> If you are unsure of your password, but do know your registered email address, then reset your password.
-
Signing out
-
How do I sign out of Horus?
The 'Sign out' link is in the top right corner of the page and it is accessible from every page of Horus ePortfolio.
-
Why do I need to sign out?
In order to protect your account and your e-portfolio contents, you should always sign out of the system when you have finished working. This is particularly important if you are working on a shared computer (e.g. in a hospital computer room).
Your Horus session will expire and you will be logged out if you are inactive for 3 hours.
-
Two factor authentication
-
What is two factor authentication (2FA)?
Two factor authentication (2FA), is a security process that requires two different forms of identification to access an account or system. This extra layer of security helps protect accounts from unauthorised access.
-
Why have extra security measures been added to Horus ePortfolio and can I 'opt out' of them?
Two factor authentication is being rolled out across all NHS England systems and Horus ePortfolio is no exception. Two factor authentication does not only protect Horus ePortfolio accounts from unauthorised access, it protect NHS servers and vital digital infrastructure which is why it is being introduced.
Horus ePortfolio users do not have the option to 'opt out' of these security changes.
-
Are Horus ePortfolio users required to use two factor authentication (2FA)?
All users of Horus ePortfolio are required to use a form of two factor authentication to protect their account. Which form of 2FA they need to use firstly depends on their level of permissions.
Learn more here about what types of 2FA Horus ePortfolio will be using.
-
What are the types of two factor authentication (2FA) that Horus uses?
Horus ePortfolio will be using two different types of two factor authentication.
Firstly all users will be required to use email code verification 2FA which is where a 6-digit code is emailed to the user upon each login. The user is then required to enter the 6-digit code on Horus to access their account.
Secondly all users with Foundation School level permissions and higher will be required to use an authenticator app to access their account. This is where the users Horus ePortfolio account is linked to an authenticator app and a 6-digit code is required upon each login. The user is required to access their authenticator app and input the 6-digit code which is displayed into Horus to access their account.
Please note all users will have the option to use an authenticator app instead of email code verification 2FA if they wish to do so.
Click here to learn how to set up the email code verification 2FA or click here to learn how to set up your authenticator app and link it to Horus.
-
Do I have the option to use the Authenticator app even if my level of permissions levels do not require it?
Yes, all users have the option to use an authenticator app instead of email code verification two factor authentication (2FA) if the choose to.
Learn how to set up authenticator app two factor authentication (2FA) here.
-
How do I set up email code verification two factor authentication (2FA) for my Horus ePortfolio account?
- Email code verification 2FA does not need to be set up. It will automatically be activated for all Horus ePortfolio accounts. When you log into your Horus ePortfolio account you will be prompted to input a 6-digit verification code that has been emailed to your registered email address. You need to:
- Access your email account and locate the email 'Horus authentication code'
- Input the 6-digit verification code from your email notification into Horus and select the 'Continue' button
-
I did not received my email code verification notification email in my inbox. What do I do?
If you are unable to locate the 'Horus authentication code' email in your inbox you should firstly check your spam/junk folders in your email account.
If you are still unable to locate the email you can request a new 6-digit verification code by selecting the 'Resend the code' link.
Please note, once a new 6-digit verification code is requested, any previous 6-digit codes can no longer be used.
-
How do I set up authentication app two factor authentication (2FA) for my Horus ePortfolio account?
- Setting up and linking an authenticator app to Horus ePortfolio is an easy process but is made easier if the user uses the authenticator app on their mobile and is signed into Horus ePortfolio on a desktop/laptop computer.To set up an authenticator app and link to Horus ePortfolio users should:
- Access the app store and download & install the authenticator app (Microsoft Authenticator, Google Authenticator etc.)
- Log into your Horus ePortfolio account on a desktop/laptop computer
- Select your name in the top right corner to access the 'my account' page
- Select 'Two factor authentication'
- Open the authenticator app and scan the QR code.
- If you are unable to scan the QR code you can select 'Set up manually' on Horus and input the 52-digit code into your authenticator app
- Select the account on the authenticator app and input the 6-digit code (in the required 30 seconds) into Horus ePortfolio
- Select 'Confirm verification code'
-
I do not have access to a work mobile phone to use an authenticator app. Are there any alternative solutions?
A mobile phone is not required to use an authenticator app. Desktop versions of authenticator apps exist and can be used to link to Horus ePortfolio accounts.
-
How do I switch to using the authenticator app instead of email code verification?
User have the option to use the authenticator app instead of email code verification even if their level of permissions doesn't require it.
The authenticator app can be set up by following the guidance here.
-
How do I disable using the authenticator app if my level of permissions do not require me to use it?
If a user is not required to use the authentication app for Horus ePortfolio but has set it up anyway, they can disable it and use the email code verification two factor authentication by:
- Log into Horus ePortfolio
- Select your name in the top right corner of the page to access the 'My account' page
- Select the 'Disable two factor authentication' link
- Enter your password and select the 'Disable two factor authentication' button
Please note: Some authenticator apps do not automatically remove accounts. After following the above steps to disable the use of the authenticator app you may need to manually remove/delete the account from the authenticator app.
-
As an Administrator can I switch a user back to email code verification two factor authentication instead of using an authenticator app?
Yes, an administrator can disable a user from using an authenticator app. They can do this by:
- Search for the users account via Admin menu > Foundation doctors/NTG
- Select 'Account' against the appropriate user
- Select the 'Disable two factor' button
- Read the pop-up warning and select 'Disable two factor authentication' button
-
I remember my Horus password but no longer have access to my registered email address. Can I still log into Horus ePortfolio?
No, users will need both their password and access to their registered email address to log into Horus ePortfolio. This is because each time you log in, a 6-digit verification code will be emailed to you.
If you no longer have access to your registered email address your will need to contact your local Horus ePortfolio administrator (this will be your local postgraduate centre administrator) and they will be able to update your account details.
-
Username and password basics
-
What is my username?
Your username is the email address with which you are registered on Horus.
Learn more about retrieving your registered email address.
Learn more about changing your username.
-
What is my password?
When your account is created, you will receive an automatic activation email. When you select the link in this email, you will be asked to set up a password - this will be your password for Horus until you change it.
Learn more about resetting your password.
-
Username
-
I have forgotten the email address with which I am registered on Horus
If you don't know with which email address you are registered on Horus, contact your local Horus ePortfolio administrator (this will usually be your local postgraduate centre administrator or foundation school administrator). They can remind you of the email address held for you on Horus once they have confirmed your identity.
If you can't access the email address with which you are registered on Horus or it is incorrect, learn more about what to do next.
-
I can't access the email address with which I'm registered on Horus
If you can't access the email address with which you are registered on Horus, contact your local Horus ePortfolio administrator (this will usually be your local postgraduate centre team). They will be able to change your email address for you.
If you are an administrator, learn more about how to change another user's email address.
-
How do I change my username?
Horus does not use usernames. You sign in to Horus with your email address.
Learn how to change your email address.
-
How do I change my email address on Horus?
If you know your Horus login details, you can change your email address when you are logged in to Horus.
- Sign in to Horus ePortfolio
- Select your name in the top right hand corner (next to 'Sign out')
- Select the 'Edit account information' link
- In the 'Email' field, delete the email address and type your new email address
- Enter your current password (for security)
- Select 'Save Changes'.
If you don't know the email address with which you are registered on Horus, learn more about retrieving your registered email address.
-
As an administrator, how do I change another user's email address?
- In the 'Admin menu', select either 'Foundation Doctors/NTGs' or 'Users', depending on which user you need to change an email address for
- Search for the relevant user using the available filters
- Select 'Account' next to the relevant user
- In the "Email" field, delete the email address and type or paste in the new email address
- Select "Save Changes"
If the user has not logged in to Horus before, they will need to use this new email address to set their password.
-
Password
-
How do I reset my password for Horus
- Go to the Horus sign in page
- Select the 'Unable to sign in?' link
- Enter your email address in the box
- Select the 'Recover password' button
- Wait for an automatic email to arrive in your mailbox from noreply.horus@hee.nhs.uk (remember to check your junk mail)
- Select the link in the email (the link will only be active for 24 hours)
- Enter your new password in the two boxes
- Select the 'Save' button.
Learn more about what your password reset email will look like.
Learn more about what to do if you do not receive your password reset email.
-
What will my password reset email look like?
Your Horus ePortfolio password reset email will look like this:
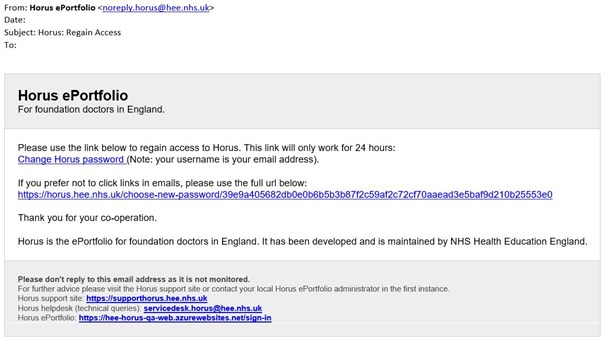
Learn more about how to reset your password.
-
I have forgotten my password
Use the reset password facility to reset it.
-
How do I change my password?
If you know your password and would like to change it, you can do this when you are logged in to Horus.
- Sign in to Horus
- Select your name in the top right hand corner (next to 'Sign out')
- Select 'Change password'
- Enter your current password and then your new password in the next two boxes
- Select 'Change password'.
If you don't know your password, you should use the reset password process.
-
What are the password rules for Horus?
The following rule is enforced:
- At least 8 characters
- The most commonly used passwords will also be blocked (eg. Password)
In addition, we recommend you follow the rules below for your own security:- Use at least one number and one upper case letter
- Use at least on symbol (!"£$%^&*)
- Avoid familiar names and common words, including your own name or email address
Make sure you have strong and unique passwords for all your online accounts. Advice can be found on the government's Cyber Aware website.
-
North West of England Foundation School (NWoEFS) users
-
I used the Horus ePortfolio before the 2017-18 training year. Can I use the same login details for the 2017-18 version of Horus?
You can use the same email address but will need to set up a new password.
All user account information (except passwords) from previous versions of Horus have been transferred to the new version of Horus.
-
Roles in Horus
-
What user roles are there in Horus?
User types
There are two types of user roles in Horus:
1. Foundation doctor (FD) (or NTG, who uses Horus to record their own competences)
2. Any other doctor (for example, a doctor who is a trainer) or other user (for example, a nurse or a postgraduate centre manager)Access types
Type 1 users have access to their own portfolio only.
Type 2 users can have the following types of permission (depending on where they work):
- Foundation School Director (FSD)
- Foundation School Manager (FSM)
- Foundation Programme Director (FPD)
- Administrator
- Trainer
- ARCP Panel MemberFSDs, FSMs, FPDs and admins have access to the portfolio of any FD/NTG who has placements at their location.
Trainers and ARCP panel members have access to the portfolio of any FD/NTG to whom they have been assigned as a supervisor/ARCP panel member.
Supervisor types
Type 2 users can be assigned to FDs/NTGs as any of four types of supervisor:
1. Academic supervisor
2. Clinical supervisor
3. Educational supervisor
4. Other supervisor (explain in free-text)Guidance on managing these roles is available in the "User management" section.
-
What does it mean to be a "trainer" in Horus?
A "trainer" in Horus is a type of user permission that allows the user:
- to be assigned to foundation doctors/NTGs as a supervisor
- to be asked by foundation doctors/NTGs to sign supervised learning events (SLEs) and core procedures
- This means that doctors more senior than F2, nurses, pharmacists, allied health professionals and other types of healthcare staff will be assigned the "trainer" permission in Horus
- to keep records of any forms they sign for foundation doctors/NTGs
This permission-type should not be confused with the "GP Trainer" accreditation, which is official terminology used in the GP Educator pathway facilitated by NHSE local offices and NHS trusts.
-
UK Foundation Programme roles and responsibilities
-
What is a foundation doctor expected to do in the e-portfolio?
The Foundation Guide states that:
- Foundation doctors are expected to take control of their own learning and become fully involved in the educational, supervised learning and assessment processes of their foundation training.
Their responsibilities include:
- becoming familiar with the requirements for satisfactory completion of F1 and the foundation programme
- becoming fully involved in the educational, supervised learning and assessment processes, including attending core generic training sessions, meeting regularly with their educational and clinical supervisor and maintaining an up-to-date e-portfolio
-
What is an academic supervisor expected to do in the e-portfolio?
The Foundation Guide states that:
- Foundation doctors in an academic foundation programme should also have an academic supervisor. The academic supervisor is responsible for overseeing a specified foundation doctor’s academic work and providing constructive feedback during an academic or related placement.
On entry to the AFP, the named academic supervisor should devise a research plan with the trainee as the context against which to assess their academic progress. The educational supervisor and named academic supervisor should work together to ensure that clinical and academic objectives are complementary. Both supervisors and the trainee should be aware of the trainee’s overall clinical and academic requirements.
The academic supervisor should submit a report to the Educational supervisor at the end of the academic placement, highlighting the AFP trainee’s achievements, strengths and areas for development. The Educational supervisor should use this report as evidence for their end of year report about the trainee, which will be used by the ARCP panel to recommend an outcome.
-
What is a clinical supervisor expected to do in the e-portfolio?
The Foundation Guide states that:
- The named clinical supervisor is responsible for collating evidence of the performance of a trainee whilst in a training placement, providing feedback to the trainee and working with the trainee and the educational supervisor to agree action plans to ameliorate any concerns or issues identified.
- The educational supervisor and/or named clinical supervisor and trainee should discuss and be clear about the use of an e-portfolio. Regular help and advice should be available to the trainee to ensure that the portfolio is developed to support professional learning.
- Records should be made on the trainee’s e-portfolio of these regular meetings, and these must be shared between trainee and educational supervisor or named clinical supervisor.
-
What is an educational supervisor expected to do in the e-portfolio?
The Foundation Guide states that:
- The educational supervisor is responsible for collating evidence of the performance of a trainee whilst in a training programme, providing feedback to the trainee and agreeing action plans to ameliorate any concerns or issues identified.
- The educational supervisor and/or named clinical supervisor and trainee should discuss and be clear about the use of an e-portfolio. Regular help and advice should be available to the trainee to ensure that the portfolio is developed to support professional learning.
- Records should be made on the trainee’s e-portfolio of these regular meetings, and these must be shared between trainee and educational supervisor or named clinical supervisor.
-
Menu basics
-
What are the menu options in Horus?
Different user types see different menu options. These are available at the top of the screen at all times.
- Administrators (administrators, FPDs, FSMs, FSDs)
- Home
- Admin menu
- Trainer menu (FPD, FSM and FSD only)
- Forms (start new)
- ARCP panels
- Help
- Personal details ('Your name')
- Sign out

- Trainers
- Home
- Trainer menu
- Forms (start new)
- ARCP panels
- Help
- Personal details ('Your name')
- Sign out

- Foundation / NTG doctors
- Home
- Portfolio
- Forms (start new)
- Help
- Personal details ("Your name")
- Sign out

- Administrators (administrators, FPDs, FSMs, FSDs)
-
The trainer menu
-
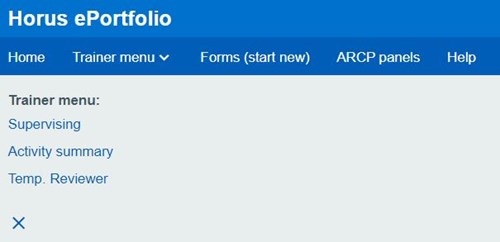
What is in the trainer menu?
There are three options in the trainer menu:
To see these options, select "Trainer menu" from the main menu. To close the menu, select the "X" in the bottom left corner.
-
How does a supervisor see the doctors they're supervising?
- Trainer menu > Supervising
- 'Previous', 'Current' and 'Future' supervised foundation doctors/NTGs will appear in three tabs.
These groups are calculated using a FD's/NTG's active rotation. This means that supervised FDs/NTGs will not move from 'Current' to 'Previous' the day after the end of the supervised placement.
You can
- See a FD's/NTG's portfolio by selecting the 'Open portfolio' link
- Create new forms by selecting one of the quick access links in the grey box on the right
-
What is the trainer ‘Activity Summary’?
Users with a "trainer" permission on Horus can view a list of forms they have completed (that is, signed for foundation doctors/NTGs).
1. Trainer menu > Activity Summary
2. Select 'Advanced filters' to see all the below filters.
- Dates from/to forms were completed
- GMC Number
- First name
- Last name
- Email address
- Portfolio item type (that is, form name - see a list on the Blank Forms page)3. Select 'Filter' to search.
You can view 10, 25 or 50 records at a time.
You can view the completed form directly from this page by selecting 'Open' next to the relevant form.
If required, you can download the page as PDF by using the browsers "Print to PDF" option. Print the page as normal within your browser, then choose "Save as PDF" as the printer output. Exact instructions will vary between browsers, but all popular Desktop browsers support this.
-
The portfolio menu
-
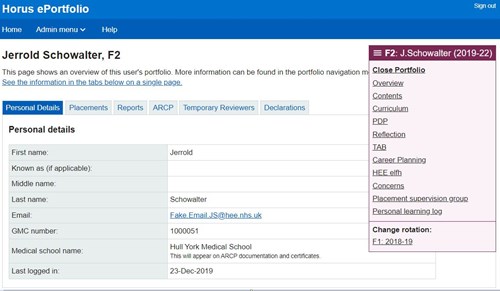
Where is the portfolio menu?
The portfolio menu is in a different place depending on the type of user you are.
Foundation doctor (or an NTG using Horus to record your own competences):
- 'Portfolio' will be your second main menu item:

Supervisor
- select the relevant foundation doctor from your "Supervising" main menu item.
Administrator
- select the relevant foundation doctor from your "Admin menu" main menu item, "Foundation Doctors" sub-menu.
For both supervisors and administrators, the portfolio menu will be on the right hand side, below your main menu bar.
Select the pink bar showing the foundation doctor's rotation details to open the portfolio menu:
-
What are the portfolio menu items?
Each foundation doctor has access to a set of menu items. All other users who have access to a foundation doctor's portfolio have access these menu items as well.
- Overview
- Contents
- Curriculum
- Download Portfolio (FD/NTG only)
- PDP
- Reflection
- TAB
- Career Planning
- elfh
- Concerns
- Personal learning log
Learn more about where the portfolio menu is.
-
Creating users
-
How do I create a new user account?
To create a new user account in Horus, you have to have an administrator-style permission assigned to your own account. This means you need to have one of the following permissions:
- Foundation School Director
- Foundation School Manager
- Foundation Programme Director
- AdministratorIf you don't have the correct permission, you need to request this from a colleague who does (note that foundation doctors/NTGs and trainers are not likely to have/need administrator permission). All NHSE foundation school teams have relevant permissions, so contact your local NHSE foundation team if you have any queries.
See below the steps to add a new user to Horus.
1. Admin menu > Add new user menu
2. Select the type of user you would like to create
- ePortfolio owner (this can be a Foundation doctor, NTG, MSW or any other user who will use Horus to record their own competences)
- Any other user type (This can be an administrator, supervisor, SLE assessor etc)3. Answer the question ' Is this user on the medical register (GMC register) with a license to practise?', read any applicable guidance and select the corresponding create button
Adding an 'ePortfolio Owner'
4a. If adding an 'ePortfolio owner' with a GMC number, enter the GMC number and select search, check the details are correct and select 'Add to Horus'. Complete the remaining details and select 'Save changes'
If adding an 'ePortfolio owner' without a GMC number, complete the details and select 'Save changes'
5a. Select 'Create new rotation' and add the rotation as per this guidance (step 4 onwards)
Adding an 'Any other user'
4b. If adding an 'any other user' with a GMC number, enter the GMC number and select search, check the details are correct and select 'Add to Horus'. Complete the remaining details and select 'Save changes'
If adding an 'any other user' without a GMC number, complete the details and select 'Save changes'
5b. Add permissions by typing in the name of the organisation or selecting from the available organisations
6b. Select the permissions to add
7b Select 'Save changes'
-
How do I create an account for a foundation doctor whose GMC number is not yet live on the register?
Introduction
Near the start of a new training year Horus administrators at NHS trusts or foundation schools may need to create accounts for foundation doctor whose GMC number is not yet live on the register. These doctors will most likely have been recruited after the main recruitment round (in later batch or stand-alone allocations, for example) and will not have been included in the bulk import performed by the Horus team during May/June 2019.
Horus is linked to the GMC's open-access List of Registered Medical Practitioners (LRMP). For doctors (whether in the foundation programme or training/supervising those in the foundation programme), the GMC number, first name, middle name and last name that is shown on Horus comes directly from the LRMP. This means that doctors being added before their registration is live can't be linked directly in the first instance.
Instructions
To create an account for a foundation doctor whose GMC number is not yet live on the register:
- Admin menu > Add new user menu
- Select 'ePortfolio owner'
- Select 'No' for the question 'Is this user on the medical register (GMC register) with a license to practise?'
- Enter their details. The GMC number field should be completed accurately whenever possible, but in exceptional circumstances you may choose to leave this field blank.
- Save Changes
- If you have entered a correct GMC, Horus will automatically synchronise the foundation doctor's details with the information on the register once the relevant GMC number is live.
- If you have not entered a GMC, you can enter it later by finding the doctor in the "Foundation Doctors" list, selecting "Account" and then the "Provide valid GMC number" link.
- If you have entered an invalid or incorrect GMC number, follow the guidance here.
-
How do I add a GMC number to a foundation doctor's account?
Administrators can add an GMC number to a foundation doctors account by:
1. Admin menu > Foundation doctors/NTGs
2. Search for the FDs account
3. Select 'Account'
4. Select the 'Provide valid GMC number' link
5. Enter the GMC number and select 'Search'
6. Check the details from the GMC register match those of the account and select 'Update'
Please note, once a GMC number has been added to an account it cannot be removed or changed by those with administrator permissions.
-
As a foundation doctor/NTG, how can I add a trainer or assessor to Horus?
As a foundation doctor/NTG, you can create accounts for trainers or assessors in your area who don't appear in your search results when you're adding a trainer/assessor to a form. See the steps below:
1. If you cannot find the trainer/assessor you’re looking for while you're creating an SLE/Core Procedure, select “Save (and leave as draft)” at the end of the form
2. Select the “Forms (start new)” main menu
3. Select the “Add new Doctor" or "Add new Nurse/AHP" link (as appropriate) in the top right hand corner
4. If adding a new doctor
1) Enter their GMC number into the search box and select "Search"
2) If they are already on Horus, you will see in the search results "Account already exists in Horus" and at which organisation they have been listed.
- If this is not your organisation, select the "Add to your site" button. On the next page, select your current site from the list (this may be the only option you have) and select "Save changes".
- If this is your organisation, you may have written their name differently when you searched for them in your form. Note how their name is spelled and go to step 6.
3) If they are not on Horus, you will see in the search results "No doctors registered on Horus matched this search." and the option to "Add to Horus".
- Select "Add to Horus"
- Enter their email address, select "Yes" in 'Send activation email' and select "Save changes"
- Select your current site from the list (this may be the only option you have) and select "Save changes".
5. If adding a nurse/AHP/other type of user
1) Complete their details
2) Select "Yes" in 'Send activation email'
3) Select "Save changes"
- If a user with the email address you entered already has an account on Horus, you will see this confirmed on the next page.
- Select "Set up permissions" to add them to your organisation
4) Select your current site from the list (this may be the only option you have) and select "Save changes".
6. Once you've completed either step 4. or 5., return to your draft form (which you can access from your home page "Forms in draft" list) and search for the trainer or assessor again. As long as you spell their first/last name / type their GMC number exactly as it appears in Horus they will come up in your form.
- If you miss out the step to assign the new user to your organisation (if for example you're interrupted during the process), simply repeat the steps above.
Note that you only need to complete this process once for each trainer/assessor who is not already on Horus. You and your colleagues will then find the individual in the trainer/assessor search in the relevant form the next time you want to ask them to sign for you.
Learn more about
- what to do if you enter your trainer or assessor's email address incorrectly
-
What do I do if a trainer or assessor has been set up with an incorrect email address?
If the email address for a trainer or assessor is incorrect, you should contact your local postgraduate centre administrator and ask them to update the email address.
If you are an administrator, learn more about how administrators can update user account information.
If your own email address is incorrect but you can log in to Horus, you can update the email address yourself.
-
Why do trainers and assessors who are not educational or clinical supervisors need to have a Horus account?
Trainers and assessors who are not educational or clinical supervisors need to have a Horus account for a number of reasons:
- to standardise the way trainers' and assessors' details are recorded in supervised learning event and core procedure forms
- to speed up the adding of trainers and assessors to forms (each trainer/assessor only needs to be added to a location once - subsequently they will appear in FD trainer/assessor searches)
- to allow trusts to more easily audit who is completing SLEs and assessments for their foundation doctors
- to allow trainers and assessors to have access to the forms they have filled for foundation doctors for their own records (for example for reference writing or their own CPD)
Note that TAB raters and PSG members do not need to have a Horus account to be able to provide feedback about a foundation doctor.
Learn more about how a foundation doctor can add a trainer or assessor to Horus.
-
I have created a new foundation doctor account but didn't create their placements. How do I find them again in the system?
The process to create a foundation doctor is a holistic one – you need to do all the steps for them to appear on your list of foundation doctors.
Summary of steps (detailed in the link above):
1. Admin menu > Add foundation doctor
2. Search GMC number
3. Select Add to Horus
4. Enter email address and medical school
5. Save changes
6. Configure rotations
7. Save changesWithout doing steps 6-7 the newly added foundation doctor has no location and so won’t show up in any location's list.
To correct this, the administrator needs to essentially repeat the above process. If steps 1-5 were completed, the details entered in step 4 will be saved and you will see the option to "Add rotations" when you search for their GMC number in "Add foundation doctor".
-
I have created a new trainer or administrator account but didn't assign them any permissions. How do I find them again in the system?
The process to create a user is a holistic one – you need to do all the steps for them to appear on your list of local users.
Summary of steps (detailed in the link above):
1. Admin menu > Add new user menu
2a. If doctor - select 'Add doctor' and search GMC number > Select Add to Horus
2b. If nurse/AHP/other - select 'Add other user' and enter details
3. Enter email address
4. Save changes
5. Assign permission(s) to locations and roles
6. Save changesWithout doing steps 5-6 the newly added trainer or administrator has no location and so won’t show up in any location's list or have access to any Horus tools.
To correct this, an administrator with access to Horus and the location required for the new user needs to take the following steps:
1. Admin menu > Users
2. Scroll to the bottom of the page > select 'Can't find your user? Search across all organisations'
3. Search for the user by their name or email address or look for them in the list
4. Select 'Permissions' next to the relevant user's name
5. Assign permissions as usual, remembering to 'Save changes'
-
How do I add permissions to my organisation to an existing user at another organisation?
NOTE: This process does not apply to foundation doctor/NTG accounts. See what to do if the foundation doctor is transferring from another trust within your foundation school or from a trust in another foundation school.
If you have a new member of medical staff who has already used Horus at another trust, you will not be able to create a new account for them (this is to make sure there are as few duplicate accounts as possible on Horus). A GMC number can only be used on one Horus account at a time.
To give the doctor permission to their new organisation, an administrator with access to Horus (and the organisation required for the doctor) needs to take the following steps:
1. Admin menu > User list
2. Scroll to the bottom of the page > select 'Can't find your user? Search across all organisations'
3. Search for the user by their GMC number
4. Select 'Permissions' next to the relevant user's name
5. Assign permissions as usual, remembering to 'Save changes'
-
How are Foundation Programme Directors (FPDs) set up in Horus?
FPDs are set up as administrator-style users on Horus. They are able to do everything an administrator can. You do not assign FPDs to foundation doctor placements - they have access to the portfolios of all foundation doctors in their assigned location(s).
Once you've created a user account for the relevant FPD, you should assign them the "Foundation Programme Director" permission at the required trust or site.
-
How do I send an account activation email to a user?
All registered users are able to activate their own account by following the password recovery process. However, administrators may wish to notify users that their account is ready for activation by using the “Account activation” process within Horus. Here, administrators are able to send an email from Horus to relevant users that contains a link for them to click, where they will be asked to set up their password for Horus.
1. Click on 'Admin menu'
2. Select either 'Foundation Doctors/NTGs' or 'Users' from the 'Account activation' sub menu
3. Select the required organisation at the top of the page
- This can only be at either trust or site level (that is, not at foundation school or NHSE local office level)
4. Select your filters, if required
- Foundation doctors can be filtered by grade (All/F1/F2) and training year ('2019-20' etc)
- Users can be filtered by type (Admins/Trainers)
5. You can select all users, one specific user or as many users as required
- Select all users by clicking the 'Select/Deselect All' link at the bottom of the list
- Select a specific user/s from the list by ticking the box next to their name/s in the 'Send activation email' column
- You can use the search box to filter for a specific user (found by selecting 'Advanced filters' on the Foundation Doctors screen)
6. To send activation emails, tick as many boxes in the 'Send activation email' column as required and then select 'Send activation emails'
7. Selected users will receive an account activation email from noreply.horus@hee.nhs.uk. The link in the email will be active for 7 days.
Account activation emails can also be sent when you create a user manually, by selecting ‘Yes’ for the 'Send activation email' field at the bottom of the add user screen
Guidance on how to activate your account and set or reset/recover a password:
- How do I access my account for the first time?
- What will my activation email look like?
- Why have I not received my activation email yet?
-
What does the DUAL label indicate on Horus ePortfolio?
As of January 2023, Horus ePortfolio have introduced a 'DUAL' label. The 'DUAL' label is used to indicate which accounts have dual permissions. This means any accounts showing a 'DUAL' label have a Foundation doctor/NTG mode and a trainer mode associated with it.
The 'DUAL' label will shows on menus and list pages throughout Horus ePortfolio. Example below.

-
Removing users
-
Who can revoke/remove user permissions?
Administrators and FPDs are able to revoke/remove permissions for anyone (this includes admins and FPDs) at their own location level and below their own location level within the location tree.
It is the responsibility of administrators (inc FPDs) within each location to keep the list of users who can access foundation doctor e-portfolios in that location up to date.
-
I have a foundation doctor who was allocated and set up on Horus, but has now withdrawn from the Foundation Programme. Can I delete their account?
Yes - you can delete a foundation doctor's account, as long as:
- their e-portfolio is empty (that is, they have not completed any forms/had any forms completed for them - this includes signed declarations)
- they have placements at one of the locations you have permission to (or have no placements at all)
- you have an administrator-style permission.
See below the steps to delete a foundation doctor's account.
1. Admin menu > Delete Foundation Doctors
2. Enter their GMC number and select 'Search'. If the doctor doesn't have a GMC number linked to their account select 'Search by email address', enter the doctors email address and select 'Search'.
3. Check the details that appears on the screen to ensure that the correct foundation doctor's account has been found. If so, select 'Delete'.
Learn more about what the 'Delete Foundation Doctors' functionality is for.
-
What is the "Delete Foundation Doctors" functionality for?
The "Delete Foundation Doctors" functionality (available in the Horus Admin menu) is only for foundation doctors (FDs) who were allocated but didn't start the foundation programme. It is not intended to be used for FDs who started the foundation programme but left after a short time.
Any FDs who left after a short time should have their rotation/placement end dates updates to reflect the short time they were in the programme - the minimum is 2 days (e.g. 2 August 2017 to 3 August 2017) and any further placements (e.g. December - April and April - August) should be deleted.
Learn more about how to delete a foundation doctor.
-
How long after creation will an inactive (never logged into) FD/NTG account be deleted?
If an account has not been logged into and used 3 months after the creation date it will be deleted from the Horus system.
-
A member of staff has left the trust - can I delete their account?
Employee-type users (supervisors, trainers, admins) cannot be deleted. If they no longer need access to Horus simply revoke all their current permissions and they'll no longer be able to perform any actions on the system.
Learn more about how to revoke staff permissions.
-
A member of staff has left the organisation - whose responsibility is it to remove their permission(s)?
When a member of staff leaves an organisation where they had access to Horus, it is the responsibility of the administrative staff at that organisation to remove their permission(s). For good information governance it is important that these permission updates are made as soon as someone no longer needs access to Horus.
-
A member of staff has left the trust - how do I revoke/remove their permission(s)?
1. Admin menu > Users
2. Search for the user account and select 'Permissions'
3. Search for the organisation where the permission is at (use the permissions table above this field for reference)
4a. For FSD/FSM/FPD/admin permissions select 'Revoke permission' and select 'Save changes'
4b. For Trainer/ARCP panel member/Temporary portfolio reviewer permissions un-tick the permission/s you want to remove and select 'Save changes'
If you have made a mistake you can use this same screen to re-assign required permissions.
-
Updating account information
-
As an administrator, how do I update account information for another user?
Foundation Doctor/NTG:
1. Admin menu > Foundation doctors/NTGs
2. Select from the list or search for the relevant foundation doctor/NTG
3. Select 'Account' for the relevant foundation doctor/NTG
4. Over-write or add the relevant details into the free text boxes / drop-down list
5. Select 'Save Changes'.
Any other user:
1. Admin menu > Users
2. Select from the list or search for the relevant user
3. Select 'Account' for the relevant user
4. Over-write or add the relevant details into the free text boxes / drop-down list
5. Select 'Save Changes'.
-
Why can't a doctor's GMC number and name be edited on Horus?
Horus is linked to the GMC's open-access List of Registered Medical Practitioners (LRMP). The GMC number, first name, middle name and last name that is shown on Horus comes directly from the LRMP.
Name: If any changes are required (for example when a doctor changes their name), this change should be made directly with the GMC. The change will then automatically be picked up by Horus.
It is not possible to update the name of a doctor directly in Horus. Please contact the GMC to update your name on the LRMP.
GMC number: If you have recently started FY1 or FY2 and your GMC number in Horus is incorrect, contact the Horus Helpdesk. The Horus team will correct your GMC number in the Horus database.
-
What do I do if my GMC number is missing from my Horus account?
If your GMC number is not linked to your Horus account you should contact your local Horus ePortfolio administrator (this is usually your local postgraduate centre administrator) and they will be able to link it to your Horus account.
-
How do I change an “any other user” to a "doctor" on the system?
There are three types of accounts on Horus:
- Foundation doctor/NTG
- Any other doctor (that is, a trainer, FPD or FSD who is a doctor)
- Any other user (that is, a trainer or administrator who is not a doctor)If you have set up a new user as 'any other user' but they are actually a doctor, you can convert their account to a doctor account:
- Admin menu > Users
- Search for the users account and select 'Account'
- Select the 'Convert user to Doctor (add GMC number)' link which is located towards the end of the page.
- Enter the doctor's GMC number into the field and select 'Search'
- The search will show the doctor's name as it appears on the register - to convert the account the original account name will be over-written by this. Check that the name that appears is for the correct doctor. If not, select 'Try different search'.
- Select 'Convert to Doctor'
-
I am a newly registered doctor on Horus and have just logged into my account. Why are you not able to synchronise my details with the GMC register?
GMC numbers are granted to medical students while they are still at medical school. However, the GMC does not make these numbers available on the open-access List of Registered Medical Practitioners (LRMP) until provisional registration is set to officially start.
Horus is linked to the GMC's LRMP. Therefore, even if you have a GMC number already, if it is not yet live on the LRMP Horus will not recognise it and you will see the following message on your account:
We are currently unable to synchronise this Doctor with the GMC register. Please check their GMC number is correct.
Horus will pick up a GMC number the day after it goes live on the LRMP. So, for example, if you have asked for GMC registration to go live on 29 July 2019, then when you log in on 30 July 2019 you will no longer see that message.
If you still see the above message the day after you've asked for your GMC number to go live (check that you're able to find yourself on the GMC's LRMP first to ensure that it has gone live) or you think your GMC number has been entered incorrectly, please contact your local e-portfolio administrator for support.
Meanwhile, you do not need to do anything.
-
What is the “Known as” field in “Account details” for?
This field can be used by any Horus user who uses a different name on a day to day basis from their official/GMC registered name. The “known as” field will help foundation doctors, trainers and assessors identify each other when sending/receiving signature requests.
It is displayed in all search results and lists (although can’t be searched for) and on signature request emails (for example for SLEs). It is not displayed in submitted forms, including Form R and the ARCP outcome form – only the official/GMC registered name is displayed on these.

Learn more about how to add a “known as” name to your account.
-
How do I add a “Known as” name to my account?
- Sign in to Horus.
- Select your name in the top right corner (next to 'sign out').
- Select 'Edit account information'.
- Add the name into the 'Known as' field.
- Enter your current password (for security).
- Select 'Save changes'.
Learn more about what the “Known as” field is for.
-
As an administrator, how do I add a “Known as” name to a user's account?
- In the 'Admin menu', select either 'Foundation Doctors' or 'Users', depending on which user you need to add a “Known as” name to
- Search for the relevant user account
- Select 'Account' for the relevant user
- Add the name into the “Known as” field.
- Select 'Save changes'.
Please note that the “Known as” field is not currently searchable on the system.
Learn more about what the “Known as” field is for.
-
Organisation permissions
-
As an administrator, how do I change a user's permission from site level to trust level or trust level to site level?
To change an administrator or trainer’s permissions, you need to have permissions for all the locations in question. This means that if you have administrator permission only at site level (for example to Hospital ABCD), you will not be able to make any changes to the existing permission(s) of an administrator or trainer at trust level (for example at Trust ABC). An administrator colleague at the relevant trust level will need to make the required changes.
There are two ways to amend a user’s permissions. Both ways require you to first ‘revoke’ the permission for the existing location level and then add the permission for the required location level. This is because Horus does not allow ‘overlapping’ permissions.
Via ‘Manage permissions’
- Admin menu > Manage permissions
- Choose location: You will see the currently selected location near the top of your screen. If not already selected, select the location from which you need to revoke the permission for the user.
- Choose user: Find the user by typing the first few letters of their first name, last name or GMC number (if applicable) into the “Choose user” box, just under where you selected the location, and selecting from the drop-down list that appears.
- Choose permissions: Once the user has been selected, a list of permissions will appear in the “Choose permissions” column, to the right of the “Choose user” column.
- If the permission you want to change is foundation programme director or administrator, select the “Revoke permission” option.
- If the permission you want to change is trainer/ARCP panel member/temporary portfolio reviewer, uncheck the “Trainer/ARCP panel member/temporary portfolio reviewer” box.
- Select “Save changes”.
- Choose location: Now, select the location to which you need to add permission for the user.
- Choose user: Again, find the user by typing the first few letters of their first name, last name or GMC number (if applicable) into the “Choose user” box and selecting from the drop-down list that appears.
- Choose permissions: Once the user has been selected, a list of permissions will appear in the “Choose permissions” column, to the right of the “Choose user” column.
- Select the required permission(s).
- Select “Save changes”.
Via ‘Users’
- Admin menu > Users
- Choose location: You will see the currently selected location near the top of your screen, just under the grey and orange menu bar. If not already selected, select the location to which the user currently has permission.
- Choose user: Find the user by selecting from the list or using the filter fields above the list (remember to select “Filter” to narrow down your list of users).
- Select the “Edit” button in the ‘Permissions’ column of the search results next to the relevant user.
- Remove permissions: Once the user has been selected, a list of their assigned permissions will appear. Below this is the option to “Add permissions to [User]”.
- In the “Organisation name” text box, start typing the name of the location from which you need to revoke the permission for the user and select the relevant option from the drop-down list. A list of permissions will appear.
- If the permission you want to change is foundation programme director or administrator, select the “Revoke permission” option.
- If the permission you want to change is trainer/ARCP panel member/temporary portfolio reviewer, uncheck the “Trainer/ARCP panel member/temporary portfolio reviewer” box.
- Select “Save changes”.
- A confirmation banner will appear at the top of the page confirming that the permission has been successfully updated. The permission you have just revoked will no longer be listed on the page.
- Add permissions:
- Now, in the “Organisation name” text box, start typing the name of the location to which you need to add permission for the user and select the relevant option from the drop-down list. A list of permissions will appear.
- Select the required permission(s).
- Select “Save changes”.
- A confirmation banner will appear at the top of the page confirming that the permission has been successfully updated. The permission you have just added will be listed on the page.
-
How do I check my own organisation permissions?
- Foundation doctors/NTGs: you only have permission to the organisation(s) at which you have been assigned placements.
- Administrators, trainers and other users:
1. Open the 'Mt account' page by selecting your name in the top right hand corner of the menu bar (next to "Sign out")
2. Scroll down to the "My permissions" section of this page (under the "Edit account information" and "Change password" buttons) - your permission(s) will be listed here.
• Organisations from which you've had your permissions removed or changed have a grey "EXPIRED" label.
3. If you believe that the information held in this table is incorrect, please contact your local Horus ePortfolio administrator, who will be able to add or remove you from their organisation.
-
Can I select a default organisation if I have administrator/trainer permissions at multiple organisations?
Yes, administrators/trainers who have permissions at multiple organisations can select a default location. This is meant for people who have admin/trainer permission to multiple organisations but have one that they use significantly more frequently than the others.
To set a default organisation:
1. Select your name to access the 'My account' page
2. Select the 'Choose default organisation' button
3. Choose the organisation you wish to select as your default and select the 'Select organisation' button
-
What do I do if a foundation doctor transfers into my trust from another trust within the foundation school?
Guidance regarding account transfers can be found here.
Learn about what to do if the foundation doctor has transferred from a trust in another foundation school.
-
What do I do if a foundation doctor transfers into my trust from another trust in another foundation school?
Local administrators should first contact their local NHSE foundation school team to confirm if the inter-foundation school transfer (IFST) has been approved. Only then should the the account transfer process be followed. Please note if the IFST is taking place mid rotation then the account transfer process above should now be followed. Please contact the Horus ePortfolio ServiceDesk for guidance).
Learn about what to do if the foundation doctor has transferred from a trust within your foundation school.
-
Foundation doctor/NTG account transfers (from one organisation to another)
-
Foundation doctor/NTG account transfers (from one organisation to another)
Foundation Doctors
1. If a Foundation doctor is moving between organisations mid rotation (as an IFST for example) the local administrator at the doctors new organisation should:
-
- Contact their local NHSE foundation school team if the doctor is moving from another organisation within the same foundation school to get the account transferred.
- Contact the Horus ServiceDesk if the doctor is moving from an organisation outside of their foundation school to get the account transferred.
2. If a foundation doctor is moving between organisations to start a new rotation the foundation doctor and local administrator should follow this guidance to make and accept a transfer request.
Non-Trainee Grade Users (NTGs)
1. If an NTG is moving from one organisation to another they and their local administrator should follow this guidance to make and accept a transfer request.
-
-
How do I initiate a transfer (from one organisation to another) request?
Account transfers are a two-step process with the FD/NTG making a transfer request and the local administrator at the new organisation either accepting or rejecting the request.
Once a FD/NTG makes a request they cannot make another request for 1 week unless the initial request is accepted or rejected.
Please note: If this transfer is for an NTG doctor, before initiating a transfer request, the NTG should first contact their employing trust as per this guidance.
For those users with a dual account (FD/NTG permissions and trainer permissions), transfers can only be initiated from the FD/NTG mode of your account.
To initiate a transfer the FD/NTG should:
1. Select their name to access the ‘My account’ page
2. Select ‘FD/NTG transfer request’
3. Select the appropriate transfer request button:
a) Foundation doctor's should select 'Foundation doctor transfer request'
b) NTG's should select 'NTG transfer request'
4. Start typing the name of the organisation and select it from the list of suggestions. If the name of the organisation you are looking for does not appear you should contact the local Horus administrators and they will be able to advise
5. Select ‘Request transfer’
After a request has been accepted/rejected the status of the request will be updated accordingly.
If the transfer request expires before it is accepted or rejected, a new transfer request needs to be made.
Once the FD/NTG has made their transfer request the local Horus administrators at the selected organisation will be able to accept or reject the transfer request.
Learn more about accepting transfers and rejecting transfers.
Please note: it is not the responsibility of the Horus ServiceDesk team to accept or reject account transfer requests.
-
As an administrator, how do I accept a transfer request?
To accept a transfer request the local administrator at the new organisation should:
1. Select 'Admin menu > Manage FD/NTG transfers'
2. Select ‘Create rotation’ against the appropriate request
3. Add the rotation in the usual way (guidance here (step 3 onwards)).
If a rotation cannot be added because of overlapping dates with a previous rotation, the NTG doctor will need to contact the local Horus ePortfolio administrator at the previous organisation and request that their rotation and placement details be updated accordingly.
After the rotation has been added the request will be removed from the ‘Manage FD/NTG transfers’ page.
Please note: Any requests that are not accepted within 1 week will expire and disappear from the ‘Manage FD/NTG transfers’ page.
-
As an administrator, how do I reject a transfer request?
To reject a transfer the local administrator at the new organisation should:
1. Select 'Admin menu > Manage FD/NTG transfers'
2. Select 'Reject request'
3. Read the pop up warning and select 'Reject request'
Please note: Any requests that are not accepted within 1 week will expire and disappear from the ‘Manage FD/NTG transfers’ page.
-
Foundation doctor photos
-
Can a photo be added to a foundation doctor's account?
Yes, foundation doctors can upload a photo to their Horus account. Administrators can also upload photos on behalf of foundation doctors.
The photo you upload into Horus will be visible to anyone who uses/views any of your ePortfolio contents (including supervisors, administrators, trainers and TAB assessors).
The purpose of the photo is to help other users of the ePortfolio to quickly identify you.
Learn more about how to add a photo to your account.
-
How do I add a photo to a foundation doctor's account?
To add or change a foundation doctor’s photo:
As an administrator
- Admin Menu > Foundation Doctors
- Select 'Account' for the relevant foundation doctor/NTG account
- Scroll to the 'Foundation doctor photo' section and select 'Upload photo'
- Read the uploads guidance and then select the 'Choose file' button
- Select the relevant file from your computer
- Select 'Save changes'
As a foundation doctor
- Select your name which is located towards the top right corner of the page (next to 'Sign out')
- Select the “Edit Account Information” link
- Scroll to the 'Foundation doctor photo' section and select 'Upload photo'
- Read the uploads guidance and then select the 'Choose file' button
- Select the relevant file from your computer
- Select 'Save changes'
Learn more about the purpose of adding a photo to your account.
-
What do I need to be aware of before adding a photo to my account?
- The photo you upload here will be visible to anyone who uses/views any of your ePortfolio contents (including supervisors, administrators, trainers and TAB assessors).
- The purpose of the photo is to help other users of the ePortfolio to quickly identify you.
- A passport 'style' photo will work best.
- Make sure the image is primarily a face close up. The image will be reduced to 100 pixels square (small).
- Make sure the face is mostly central, anything on the very edges may be lost when the image is squared.
- Check the image on the photo upload page, after you've uploaded it.
- Images must be gif, jpeg or png and under 3MB.
-
NTG basics
-
What is an "NTG"?
In the context of the Horus ePortfolio, an "NTG" is a non-trainee grade junior doctor/other healthcare professional working in a foundation-level (or similar) post but not a member of the UK Foundation Programme.
NTGs
- do not have a connection to NHS England (NHSE) and their responsible officer is not the local NHSE postgraduate dean (instead, their responsible officer is usually the Medical Director of the employing organisation or their representative)
- do not belong to a Foundation School
- are not on a training programme
Examples include- LAS: locum appointment for service (LAS) doctors covering F1 or F2 posts that have not been allocated to a foundation doctor
- Trust grade: trust grade doctors working in posts that are at a similar level to F1 or F2 posts (eg "trust SHO")
- Pre-specialty:
- junior doctors who have completed the Foundation Programme but have not yet commenced a specialty training programme, working in posts at a similar level to F2 posts (sometimes known as "pre-specialty" or "F3" junior doctors)
- doctors on the Widening Access to Specialty Training (WAST) programme
- Other: other types of NTGs may also be possible which includes those not currently working in an organisation (within England) who employs foundation doctors and already have access to Horus ePortfolio.
NHSE foundation programme colleagues have produced generic guidance for NTG doctors working in England.
Learn more about
- what NTGs can't use Horus for
- how NTGs can register to use Horus
It is important to note that the above information is not intended as employment guidance and all doctors/other healthcare professionals should seek relevant guidance from for example their employer and/or the General Medical Council (GMC)/their relevant regulator. Additional information can be found by following the links on the Useful links page.
The Horus ePortfolio team is not able to provide guidance regarding employment, assessment or training requirements.
-
What can NTGs use the Horus ePortfolio for?
NTGs based at a trust can use the Horus ePortfolio to record:
- reflections and personal development plans
- meetings with supervisors
- supervised learning events (and have these validated by local trainers)
- 360° feedback (TAB)
- additional evidence of achievement of competences
- how their achieved competences map to the FP Curriculum (2021)
Generic NTGs (those not based in an organisation which have access to Horus ePortfolio) can use Horus ePortfolio to record:
- reflections and personal development plans
- additional evidence of achievement of competences
- how their achieved competences map to the FP Curriculum (2021)
Learn more about what NTGs cannot use Horus for.
It is important to note that the above information is not intended as employment guidance and all doctors/other healthcare professionals should seek relevant guidance from for example their employer and/or the General Medical Council (GMC)/their relevant regulator.
The Horus ePortfolio team is not able to provide guidance regarding employment, assessment or training requirements.
-
What can NTGs NOT use the Horus ePortfolio for?
NTGs based at a trust cannot:
- use Horus as an assessment tool
- sign any health or probity declarations on Horus (these should be provided instead by their employer)
- complete their Form R (revalidation self-declaration) through Horus
- have an annual review of competence progression (ARCP) recorded in Horus
- receive a Foundation Year 1 Certificate of Completion (F1CC) or Foundation Programme Certificate of Completion (FPCC)
- receive a Certificate of Readiness to Enter Specialty Training (CREST) (previously known as the Alternative Certificate of Foundation Competence) through Horus
Generic NTGs cannot:
- use Horus as an assessment tool
- complete meeting with supervisor forms
- complete supervised learning events (and have these validated by local trainers)
- complete 360° feedback (TAB)
- sign any health or probity declarations on Horus (these should be provided instead by their employer)
- complete their Form R (revalidation self-declaration) through Horus
- have an annual review of competence progression (ARCP) recorded in Horus
- receive a Foundation Year 1 Certificate of Completion (F1CC) or Foundation Programme Certificate of Completion (FPCC)
- receive a Certificate of Readiness to Enter Specialty Training (CREST) (previously known as the Alternative Certificate of Foundation Competence) through Horus
The contents of Horus is aimed at junior doctors in the UK foundation programme and those in equivalent/similar level posts (that is NTGs). Junior doctors in higher level posts/other healthcare professionals should, where possible, use the e-portfolio of their relevant medical royal college, system(s) provided by their employer or other commercial products to record their own continuing professional development, as the tools available in these will be more relevant to them.
Learn more about
- what NTGs who are also trainers of foundation doctors can use Horus for
It is important to note that the above information is not intended as employment guidance and all doctors/other healthcare professionals should seek relevant guidance from for example their employer and/or the General Medical Council (GMC)/their relevant regulator.The Horus ePortfolio team is not able to provide guidance regarding employment, assessment or training requirements.
-
How can NTGs register to use the Horus ePortfolio?
Allowing NTGs to access the Horus ePortfolio is a matter local discretion at the relevant employing NHS trust. Some employing trusts will have legitimate reasons for not allowing their NTGs to access Horus and NTGs should respect these. It is worth having a discussion with your local trust postgraduate centre administrator to understand the local policy.
If your employing trust allows NTGs to access the Horus ePortfolio, you can learn more about registering for Horus or transferring your account if you are already registered on Horus ePortfolio.
If your employing trust does not allow NTGs to use Horus ePortfolio or if you are employed at an organisation within England which does not use Horus ePortfolio then it may still be possible to use Horus ePortfolio as an Generic NTG. To learn more about Generic NTGs please see here. Please note, to be eligible to use Horus ePortfolio as a generic NTG you must already have an FD/NTG account on the system.
All NTG administration is managed by the employing trust. The Horus team will not add any new NTGs to the system or update rotations for NTGs.
It is important to note that the above information is not intended as employment guidance and all doctors/other healthcare professionals should seek relevant guidance from for example their employer and/or the General Medical Council (GMC)/their relevant regulator.
The Horus ePortfolio team is not able to provide guidance regarding employment, assessment or training requirements.
-
Can NTGs in any NHS trust in England use Horus ePortfolio?
NTGs working in organisations that do not use or do not have access to Horus ePortfolio may still be eligible to use Horus ePortfolio as a Generic NTG. To learn more about Generic NTGs see here.
-
Who has access to view information in an NTG doctor's Horus account?
Access to NTG Horus accounts is the same as to foundation doctor Horus accounts. Learn more about who can view the data in Horus.
-
NTG account management
-
How do I set an NTG doctor up on Horus?
1. Admin menu > Add new user menu
2. Select 'ePortfolio owner'
3. Answer the question 'Is this user on the medical register (GMC register) with a license to practise?'
4. Select the create account button
5. Enter the doctor's GMC number and select 'Search'
- If adding a user without a GMC number, enter the details of the doctor manually and select 'Save changes'
4. Horus will search the GMC register and if the number is correct, you will be able to select 'Add to Horus'.
5. Add their email address and select 'Save changes'
6. Create their rotation and placement(s) by selecting the 'Create new rotation' link. Learn more about what to do if you miss this step.
7. Select 'NTG'
8. Select the appropriate grade, 'F1' or 'F2'
9. Select the 'Configure button
10. The process from this point onwards is the same as creating a standard F1 or F2 rotation, with just one extra step - you need to select what type of NTG the doctor is:
- LAS
- Trust grade
- Pre-specialty
- Other (specify in the free-text box)
Learn more about what NTG types are.
11. Configure the rotation and placements and select 'Save changes'
Learn about what to do if the user is already on Horus as a trainer.
-
How do I add an NTG rotation to a former foundation doctor's portfolio?
If the doctor did not undertake their foundation training at your trust:
Follow the guidance about account transfers
How are foundation doctor/NTG accounts transferred from one organisation to another?
If the doctor did undertake their foundation training at your trust:
1. Admin menu > Foundation Doctors
2. Search for the doctor (remembering to check the academic year filter - maybe they were a foundation doctor with you in a previous training year)
3. Select 'Rotations' next to their name
4. Scroll to the end of the page (under their existing rotations) and select the 'Create new rotation' link
5. Follow the guidance on how to create a new rotation. with an extra step, you need to select what type of NTG the doctor is:
LAS
Trust grade
Pre-specialty
Other (specify in the free-text box)Learn more about what NTG types are.
Learn about what to do if the user is already on Horus as a trainer.
-
Can someone with an NTG account also be listed as a trainer for foundation doctors?
Yes - NTGs can be trainers and trainers can be NTGs on Horus. An administrator needs to add 'Trainer' permission to the NTG's account or add NTG permission to the trainer's account.
A user with both an NTG (or foundation doctor) account AND a trainer account will still only have one login to Horus. When they log in, they will have the option to "Switch mode" between Foundation doctor/NTG and trainer. Switching mode will change the main menu options the user has access to.
-
How do I give trainer permission to an NTG?
- Admin menu > Add new user menu
- Select 'Any other user type'
- Select 'Yes'
- Select 'Create account using GMC number'
- Enter the doctor's GMC number and select 'Search'
- If this user is already on Horus as an NTG, Select 'Add trainer/other permissions to user'. Please note if they aren't on Horus or already have trainer permissions, you will not have this option
- Start typing the name of the organisation and select it from the list of suggestions that appear underneath the field.
- Select the permission(s) to add and select 'Save changes'
Learn more about what an NTG is.
-
How do I give NTG permission to a trainer?
- Admin menu > Add new user menu
- Select 'ePortfolio owner'
- Select 'Yes'
- Select 'Create account using GMC number'
- Enter the doctor's GMC number and select 'Search'
- If this user is already on Horus as a trainer, Select 'Add FD/NTG permissions to user'. Please note if they aren't on Horus or already have NTG permission(s), you will not have this option
- Add the medical school information and select 'Save changes'
- Add the NTG rotation in the usual way (steps 6 onwards of this guidance)
Learn more about what an NTG is.
-
How do I identify if a Horus user is a foundation doctor or an NTG?
All users
A doctor/other healthcare professional with a current non-training grade rotation (an "NTG") has "[NTG]" displayed after their name, in red, on all their portfolio pages. Any user with access to that user's portfolio (that is, an administrator in the relevant location, the user's assigned supervisor(s) and the user themselves) sees this label.

Administrators
Administrators also see the "[NTG]" label after relevant doctors' names on
- all the admin list / report and overview pages

- the doctor's rotation management page
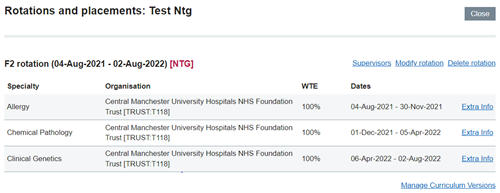
Any user with a portfolio without this label is a foundation doctor (FD).
Learn more about how to
-
My rotation on Horus ePortfolio shows as F2 NTG but it should be higher than this. Can it be updated to reflect my actual grade?
Horus ePortfolio is primarily a foundation e-portfolio and therefore can only display rotations at this level (F1 and F2). Any users working at a higher grade than F2 and still wants to use Horus ePortfolio as an NTG will have their rotation listed as F2 NTG.
-
WAST doctors
-
What is a WAST doctor?
A WAST doctor is someone working on the Widening Access to Specialty Training (WAST) programme. The WAST programme is an opportunity to work for a year in England while receiving regular teaching and clinical exposure that will help to improve the skills and competences required for admission to specialty training through the national selection processes.
For further information and for all enquiries about the WAST programme, see NHSE's dedicated WAST web page.
Learn more about
- who is responsible for the administration of WAST doctors on Horus
- how to set a WAST doctor up on Horus
- what to do if you're a host trust administrator but don't have access to Horus
-
Who is responsible for the administration of WAST doctors on Horus?
The host (employing) trust is responsible for the administration of WAST doctors on Horus.
For further information and for all enquiries about the WAST programme, see NHSE's dedicated WAST web page.
Learn more about
- how to set a WAST doctor up on Horus
- what to do if you're a host trust administrator but don't have access to Horus
-
How do I set a WAST doctor up on Horus?
Follow the steps in How do I set an NTG doctor up on Horus?
In step 7, select "Pre-specialty" for the 'NTG Type' field.
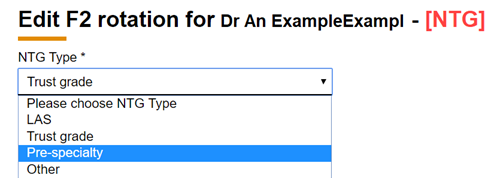
Learn more about
- who is responsible for the administration of WAST doctors on Horus
- what to do if you're a host trust administrator but don't have access to Horus
-
My trust hosts WAST doctors but we don't have access to Horus - what should I do?
The Horus team worked with the NHSE WAST team during 2018 to give all trusts who are hosting WAST doctors access to Horus. If you think that your trust may have been missed, please contact your local foundation team in the first instance. If you don't know who that is, contact the WAST team.
Learn more about
- who is responsible for the administration of WAST doctors on Horus
-
Medical Support Worker (MSW)
-
What is a Medical Support Worker (MSW)?
The Medical Support Worker (MSW) role was created as part of a national initiative during the Covid-19 pandemic. MSWs are medically qualified doctors who have either qualified abroad and are currently applying for their GMC registration in the UK or have been out of clinical practice for over a year.
The MSW role requires clinical supervision and their practice to be aligned within the scope of the GMC guidance. MSW placements are between 6 months to a year duration. Once the MSW has gained their GMC registration, they can join the NHS doctor workforce or continue practicing as an MSW until their contract is completed.
For more information visit the NHS England website or email msw.centralteam@nhs.net.
-
Which areas of Horus should MSWs use?
The Horus ePortfolio is an opportunity to record reflections, meetings with supervisors, any supervised learning events (SLEs) or 360 feedback.
The MSW programme recommends the use of the following:
- Induction meeting with clinical supervisor
- Clinical supervisors end of placement reports
- Direct observation of procedural skills (DOPS)
- Case Based discussion (CBD)
- Mini clinical Evaluation Exercise (Mini-CEX)
- Learning encounter and reflection note (LEARN)
- TAB
Other areas of Horus ePortfolio can be utilised (Personal development plans, the additional achievements forms, Other meetings forms) at the discretion of the clinical supervisor.
-
How can MSWs register on Horus?
If your employing organisation is able to facilitate Horus ePortfolio, please contact your local postgraduate centre administrator or medical education centre.
If your employing trust does not facilitate Horus please ask for local advice on an alternative to Horus ePortfolio.
To learn more about access to Horus ePortfolio as an NTG please follow this guidance.
-
How can administrators register an MSW?
Horus ePortfolio administrators can create an account for an MSW by:
- Follow steps 1-5 of this guidance to create the MSWs account
- Follow steps 6-7 of this guidance to create the MSWs rotation and placement.
Please note, when prompted to select what NTG type the user is, 'Other' should be selected and Medical Support Worker’ entered into the ’NTG Further Information’ field.
-
Can MSWs receive a CREST certificate through Horus?
The Certificate of Readiness to Enter Specialty Training (CREST) form is not available through Horus. The form and information about it is in the Specialty Training Resource Bank (under "Recruitment Documents").
Medical Support Workers should not complete a CREST unless the MSW has received their GMC registration and the Clinical supervisor feels confident and competent to assess the MSW's practice in line with the CREST assessor information.
-
Who has access to view an MSW's Horus account?
Access to MSWs' Horus accounts is the same as all foundation doctor/NTG Horus accounts. Learn more about who can view the data in Horus.
-
Generic NTG
-
What is a Generic NTG?
Generic NTGs are non-trainee grade individuals who can use Horus ePortfolio even though they work in an organisation (within England) that does not use/does not have access to Horus ePortfolio or do not allow their non-trainee grade individuals to use Horus ePortfolio. A Generic NTG rotation only allows users very limited functionality of Horus ePortfolio.
To be eligible to use Horus as an Generic NTG, users must already have a FD/NTG account. To learn how to create a Generic NTG rotation see here.
Please note: The Horus ServiceDesk will not create accounts for individuals to use as Generic NTGs
-
How do I use Horus ePortfolio as a Generic NTG?
To use Horus ePortfolio as a generic NTG you should:
- Log into your Horus ePortfolio account
- Select your name to access the 'My account' page
- Select the 'Generic NTG rotation' link
- Select a reason why you are setting up a Generic NTG rotation
- Add an end date (maximum of 1 years from the rotation is being created) for your Generic NTG rotation and select 'Add generic NTG'
-
How do I edit the start date/end date of my Generic NTG rotation?
The start date of a Generic NTG rotation cannot be amended. This is always set as the same date the Generic NTG rotation was created.
To end a Generic NTG rotation you should:
- Log into your Horus ePortfolio account
- Select your name to access the 'My account' page
- Select the 'Manage Generic NTG rotation' link
- Select the 'End rotation today' button
-
Can I extend my Generic NTG rotation after it has ended?
Yes - Generic NTG rotations can be extended but only after it has ended. To do this you can:
- Log into your Horus ePortfolio account
- Select your name to access the 'My account' page
- Select the 'Manage Generic NTG rotation' link
- Enter the new end date and select the 'Extend Generic NTG' button
-
Current data (August 2017 onwards)
-
What types of data are there in Horus?
Horus contains a number of different data sets. These can be split into the following categories:
- Reference data (drop-down / pick lists such as location, specialty and permission type)
- User data (for example names, reference numbers, email addresses)
- Portfolio data (for example completed forms (the number completed and the contents of each form), uploaded external documents, curriculum mapping)
Learn more about reference data in Horus.
-
What reference data is in Horus?
Horus contains the following reference data tables:
- NHSE location tree
- NHSE local offices
- NHSE foundation schools
- NHSE trusts
- NHSE hospitals / training sites
- Medical schools
- Specialties
- User permission types
- Supervisor types
- Training grades
- WTE percentages
Learn more about how the data these tables contain is decided.
- NHSE location tree
-
Who decides what reference data is in Horus?
Reference data in Horus is based on a variety of national reference tables and requirements.
- NHSE location tree
- This list represents main/lead employers of foundation doctors
- Learn more about how location names are decided
- Medical schools
- This list comes from the UK foundation programme application system "Oriel"
- Learn more about foundation recruitment on the NHSE medical recruitment web page
- Specialties
- This list comes from the GMC's list of approved specialties
- It is also aligned with the list of specialties available in Oriel
- User permission types
- This list was developed by the NHSE Horus team based on the requirements for foundation e-portfolios laid out in the FP Curriculum and Gold Guide
- See "Useful links" for further information
- Supervisor types
- See description for "User permission types" above
- Training grades
- See description for "User permission types" above
- WTE percentages
- There is agreement between the GMC, NHSE and NHS Employers as to the minimum percentage of training that can be undertaken when working less than full time.
- NHSE location tree
-
How are the names of locations available on Horus decided?
All trust and site locations on Horus must appear on the NHS Digital Organisation Data Service (ODS) list. Anyone can download the full list of NHS trusts and sites in England.
All NHSE local office and foundation school locations are agreed between Horus and local NHSE foundation teams.
Any changes to location information must be requested by the relevant local NHSE foundation team by contacting the Horus helpdesk. Trust and site administrators should therefore contact their relevant foundation team to request changes.
Remember that all sites in Horus must appear on the ODS list and the ODS code must be supplied when the change request is made.
-
Who can view the data in Horus?
Viewing permissions have been set up in Horus as per the requirements laid out in the Foundation Operational Guide 2019.
-
How long will data entered into Horus be available to users?
Data entered into Horus will be available to the relevant user(s) in read-only mode after the end of the relevant foundation doctor's foundation training programme up to a period of 6 years.
After this 6 year period, created content will be deleted and no longer be accessible to the creator or any users with administrator permissions. The data will also not be accessible by the Horus ePortfolio ServiceDesk.
Please note, subsequent NTG rotations that exist after archived foundation programme rotations will still be accessible as long as the end date of the final NTG rotation is with the 6 year period.
Data will not be deleted from Horus before the 6 year time frame unless it is proven to be incorrect (in which case it is likely to be amended, rather than deleted).
Note the UKFPO's policy on how long before/after a placement/rotation you can create a form for that placement/rotation.
-
Can short term absence be recorded in Horus?
Short term absence from work (for example due to short term sick leave, compassionate leave or study leave) cannot be recorded as a running log in Horus.
A summary / declaration of short term absence can be recorded in the following ways:
1. The CS end of placement report ('Foundation doctor absence' section)
2. The Form R ('TIME OUT OF TRAINING ('TOOT')' section)
3. The Summary of Evidence 'sign off' form ('Completion of 12 months F1 training (taking account of allowable absence)' section)
4. The ARCP outcome form ('No. of days of Time out of Training since last ARCP/Appraisal (from Form R):' section)
Note that facilitating the recording of absences outside of the official “Out of programme” (OOP) process is not a requirement within the foundation e-portfolio (as laid out in the Foundation Guide (2019). The recording of short term absences is of course a requirement of the foundation programme as a whole and LEPs should have local processes for keeping track of foundation doctor absence.Horus does have a dedicated place to record official OOP (parental leave, long term sick leave, OOPE/OOPC/OOPR). This can only be recorded by administrators, due to the official process that the approved leave goes through. This section should not be used to record short term absence.
Learn more about OOP.
-
Rotations and placements basics
-
What is a rotation?
A series of placements grouped together make either an F1 or F2 rotation.
- For example, one rotation could be 4 months General Practice, 4 months Cardiology, 4 months General Surgery at F2 level.
- Another rotation could be less than full time (say 50%) 4 months Gastroenterology, 4 months Cardiology, 4 months General Surgery, 4 months Acute Internal Medicine, 4 months Cardiology, 4 months General Psychiatry at F1 level (this would of course take 24 months instead of the usual 12 months).
In Horus, a rotation is the 'umbrella' for all the placements and content (forms, uploaded documents etc) that 'count' towards a foundation doctor's final ARCP for either their F1 or their F2 training year. (For example, all placements listed within a rotation will be pre-populated into the FD's ARCP outcome form.)
-
What is a placement?
A placement is one of a number of clinical components of an individual foundation programme; typically, part of a set of three in either an F1 or F2 rotation.
A placement has a specialty, a start and an end date (usually covering a 4 month period), an organisation and a foundation doctor - for example, Cardiology 01/08/2018 to 04/12/2018 at Queen Elizabeth Hospital Birmingham covered by Dr Smith, FY2.
(A training post is a job in a specialty at an organisation, without start and end dates, which will typically be covered by three foundation doctors during a training year.)
-
Who can manage rotations, placements and supervisor assignments?
In Horus, users with the following role permissions are able to create, amend and delete rotation, placement and supervisor assignment information for foundation doctors who are assigned to a location they have permission to:
- Administrator
- Foundation programme director
- Foundation school manager
- Foundation school director
You can see an overview of all rotations and placements in your location(s) in the "Placements overview / download" page from the 'Admin menu'.
Foundation doctors and trainers are not able to manage this information.
Learn more about what to do if your rotation, placement or supervisor/foundation doctor assignment information is incorrect and you are a
-
How do I create a new rotation?
Users with access to the admin menu need to:
1. Search for the foundation doctor/NTG and select ‘Rotations’.
2. Scroll to the bottom of the page and select ‘Create new rotation’.
3. Read the guidance on the page:
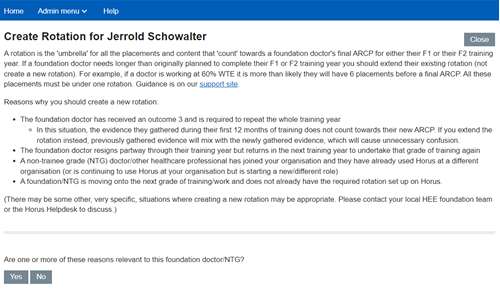
4. Answer the question “Are one or more of these reasons relevant to this foundation/NTG doctor?” by selecting ‘Yes’ or ‘No’.
- If you select ‘No’, you will be directed to go back to the ‘Rotations’ page and extend the rotation(s) and placement(s) accordingly. (Guidance)
5. If you select ‘Yes’, answer the question “Will their new rotation be as a foundation doctor, or a non-trainee grade (NTG) doctor?” by selecting ‘Foundation doctor’ or ‘NTG doctor’.

6. Select the grade of the rotation that is needed, ‘F1’ or ‘F2’.
7. Select ‘Configure new F1/F2 Rotation’.
8. Choose whether to create the rotation ‘based on a training year’ or ‘Custom’.
9. If you select ‘based on training year’ you will need to select the training year you need or if you have selected ‘Custom’ you will need to enter the start and end dates of the rotation.
10. Enter the details of each placement (start and end dates, specialty, organisation and WTE) within the rotation. Remember to add placements using the ‘Add placement’ link or delete placements using the ‘Delete’ button as necessary.
11. Once all details are complete select ‘Save changes’.
-
How do I delete a rotation?
Only rotations with no completed forms (including signed declarations) can be deleted. The most common reason to delete a rotation is for a prospective foundation doctor who was allocated a rotation and set up on Horus in advance of the new training year, but then did not start foundation training (for example, withdrew their application or failed finals).
Only administrators can delete rotations.
To delete a rotation:
- Admin menu > Foundation doctors
- Find the relevant foundation doctor in the list
- Select 'Rotations' to the right of the relevant foundation doctor

- Select 'Delete rotation' to the right of the relevant rotation. If the rotations contains content and cannot be deleted you will see a blue banner advise that this is the case.
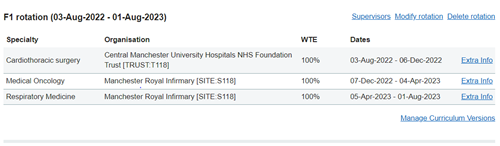
- If the rotation can be deleted you will see a confirmation - select 'Delete' if you are sure that you want to delete the rotation
- The rotation will disappear from the 'Modify rotations' page
-
How do I update a FD's rotation/placements if they need to extend their training?
In Horus, a rotation is the 'umbrella' for all the placements and content that 'count' towards a foundation doctor's final ARCP for either their F1 or their F2 training year.
So, if a foundation doctor needs longer than originally planned to complete their F1 or F2 training year (or they're working LTFT) you should extend their existing rotation (not create a new rotation):
- Admin menu > Foundation doctors
- Find the relevant foundation doctor in the list
- Select "Rotations" to the right of the relevant foundation doctor
- Select "Modify rotation" to the right of the relevant rotation
- If they have a future rotation already uploaded, you will need to edit that rotation first:
-- Rotation start and end dates cannot overlap each other
-- Placement start and end dates cannot overlap each other - Amend the end date of the rotation to the newly agreed end date
- Scroll to the bottom of the screen and select "Add placement"
- Enter the start date, end date, specialty, organisation and WTE for the placement
- The placement start and end dates must fit into the rotation start and end dates - Repeat step 7 for as many new placements as required
- Select "Save changes"
Reasons why you would need to extend a rotation instead of create a new one:- The foundation doctor has changed from working full time to working less than full time - their current grade of training will now take longer to complete than the standard 12 months (which is what was originally uploaded for them)
- The foundation doctor has taken significant time out of training (for example for parental leave) - their current grade of training will now take longer to complete than the standard 12 months (which is what was originally uploaded for them)
- The foundation doctor has received an outcome 3 and is required to complete an extra 4 or 8 months to achieve their competences
- In this situation, the evidence they gathered during their first 12 months of training counts towards their final ARCP, but was deemed insufficient at their first ARCP. If you do not extend the rotation, the previously gathered evidence will sit in a separate rotation and will not show on the summary of evidence report alongside the newly gathered evidence.
Reasons why you should not extend a rotation - that is, in these situations you would need to create a new rotation:- The foundation doctor has received an outcome 3 and is required to repeat the whole training year
- In this situation, the evidence they gathered during their first 12 months of training does not count towards their new final ARCP. If you extend the rotation instead, previously gathered evidence will mix with the newly gathered evidence, which will cause unnecessary confusion.
- The foundation doctor resigns partway through their training year but returns in the next training year to undertake that grade of training again
-
How do I add a FiY1 label to a placement?
The majority of Foundation Interim Year 1 (FiY1) doctors have been added using a central Horus import process. If any doctors have been added manually (or subsequently need to be), administrators must ensure that their FiY1 placement is correctly labelled.
1. Search for the doctor's account using Admin menu > Foundation doctors
2. Select ‘Rotations’
3. Select the link ‘Edit FiY1 status of foundation doctor’ link at the end of the page
4. Select the ‘Mark all 2019-20 placements as FiY1’ button
5. A green confirmation banner will be displayed, and the placement will now be labelled as FiY1.
**Note**
This process only works if the doctor also has a 2020-21 F1 rotation. If they don't (that is, they will not be undertaking F1 in August 2020 or they have not yet been allocated a rotation), please follow the steps below (or contact us for further guidance):
1. Search for the doctor's account using Admin menu > Foundation doctors (or create their account if they don't yet have one)
2. Select ‘Rotations’
3. Select ‘Modify rotation’ (or 'Create new rotation' if they don't yet have one)
4. Extend the end date of the rotation and placement to 05 August 2020 (that is, the first day of the 2020-21 training year) and select ‘Save Changes’
5. Select ‘Back to Rotations’
6. Select the link ‘Edit FiY1 status of foundation doctor’ link at the end of the page
7. Select the ‘Mark all 2019-20 placements as FiY1’ button
8. A green confirmation banner will be displayed, and the placement will now be labelled as FiY1.
9. Change the end date of the rotation back to 04 August 2020 (that is, the last day of the 2019-20 training year).
-
As a foundation doctor, what do I do if my placement information is incorrect?
If any of the information recorded against your placement(s) is incorrect or incomplete, you need to contact your local postgraduate centre e-portfolio administrator, who will be able to make any appropriate changes for you.
This includes situations such as last minute changes, placement swaps, missing sub-specialty information and incorrect or missing educational or clinical supervisor assignment.
Learn more about who can manage rotations, placements and supervisor assignments in Horus.
-
How do I view forms for a previous or future rotation?
When a foundation doctor's (FD) portfolio is opened (by either the FD or a trainer/administrator), it defaults to the FD's current rotation (or most recent rotation if not currently in one).
If the FD has more than one rotation (for example, a current F1 rotation and a future F2 rotation, or a current F2 rotation and previous F1 rotation), users can choose to view forms created (if there are any) for this(/these) non-current rotation(s).
Foundation doctor
1. Select a specific page within your portfolio
2. In the pink box on the right of your screen (on mobile devices this will be just under the main menu bar instead), your current rotation will be displayed:
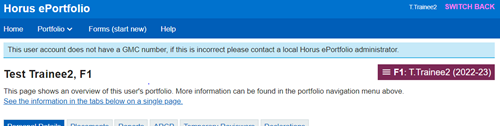
If you have more than one rotation, this will be a drop-down list. Hover over the pink box and then select the rotation you would like to view.
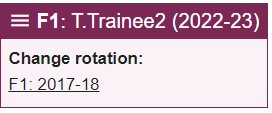
3. Your portfolio will switch to the rotation you have selected and you will be able to view all the forms completed for that rotation.
Trainer/administrator
1. Select 'Portfolio' for the relevant FD
2. In the right-hand menu bar, the FD's current rotation will be displayed in pink. Hovering over or selecting this will show the portfolio menu for the FD - at the end of that menu will be listed any previous or future rotations
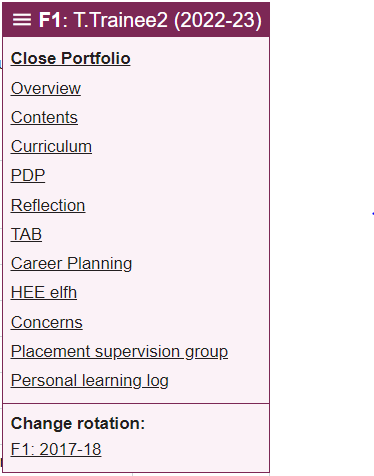
3. Select the rotation you would like to view.
4. The FD's portfolio will switch to the rotation you have selected and you will be able to view all the forms completed for that rotation.
-
Assigning supervisors
-
As a supervisor, what do I do if I haven't been linked to a foundation doctor or have been linked to an incorrect foundation doctor?
If you have not been linked to a foundation doctor you are supervising (that is, you can't see them in your "Supervising" main menu) or you have been linked to a foundation doctor you are not supervising, you need to contact your local postgraduate centre e-portfolio administrator, who will be able to make any appropriate changes for you.
Learn more about who can manage rotations, placements and supervisor assignments in Horus.
-
How do I assign a Educational/Clinical/Academic/Other supervisor to a foundation doctor's/NTG's placement?
Only administrators have permissions to update a foundation doctor’s/NTG’s supervisor assignments. To do this:
- Select Admin menu > Foundation doctors
- Search for the foundation doctor's/NTG's account
- Select ‘Rotations’
- Select ‘Supervisors’ against the appropriate rotation
- Select the ‘Add Educational supervisor’ or ‘Add Clinical supervisor’.
- Start typing the supervisors name/GMC in the field and select the supervisor from the list of suggestions
- Check the details of the selected supervisor are correct and select ‘Add’ (Please note for educational supervisors you can check the ‘Add this ES to all placements?’ box and select ‘Add’ to add the educational supervisor to all the placements in the rotation).
- Repeat steps 5-7 until all placements in the rotation contain the necessary supervisors.
To add an Academic/Other supervisor:
- Follow steps 1-4 above
- Select the ‘Show Academic / Other’ link to reveal the academic and other supervisor sections
- Follow steps 6-8 above
-
Do I have to add an educational supervisor to each foundation doctor placement?
Yes. Although usually an educational supervisor will be allocated to a foundation doctor for a whole training year, there are situations where this is not the case. To cater to all requirements Horus has been designed to require any supervisor to be allocated to each relevant placement.
-
How do I assign a foundation programme director to a foundation doctor?
See How are Foundation Programme Directors (FPDs) set up in Horus? in the User Management section.
If for some reason you would like to specifically assign an FPD to a foundation doctor's placement, you should follow this guidance and add them as an Other supervisor.
-
How do I delete an assigned supervisor from a foundation doctor’s/NTG’s placement?
- Select Admin menu > Foundation doctors
- Search for the foundation doctor's/NTG's account
- Select ‘Rotations’
- Select ‘Supervisors’ against the appropriate rotation
- Select the ‘Delete’ link underneath the name of the supervisor you are trying to remove
- Select ‘Delete’ to confirm
-
Placement details
-
I can't find the required placement specialty in the specialty drop-down list - what do I do?
The list of specialties available in Horus has been mandated by the General Medical Council, in association with NHS England. All foundation placements have to be described using one of the specialties in the available list. You can add extra information about a foundation doctor's placement using the "Extra Info" section of the placements manager.
For example, the main specialty may be Geriatric Medicine, but there is a special focus on Orthogeriatrics in the placement. "Orthogeriatrics" should be entered into the 'Specialty additional info' free-text box in the 'Extra Info' section.
-
Is it possible to add additional specialties to a placement?
Yes, it is possible to add additional specialties to a placement. Some Specialty Foundation Programme (SFP) foundation doctors complete an academic placement at a reduced WTE with the remaining time spent in a clinical environment. This can be managed by using ‘Specialised FP’ as the main specialty and adding the clinical specialty as the extra specialty.
Learn more about how to add additional specialties to a placement and how to remove an additional specialty from a placement.
-
How do I add additional specialties to a placement?
To add additional specialties to a placement:
- Search for the foundation doctor/NTG via Admin menu > Foundation doctors/NTGs
- Select ‘Rotations’
- Select ‘Manage extra specialties’ against the appropriate placement
- Select the specialty from the drop down list
- Type the percentage of the placement (Please note this field is optional)
- Select ‘Add extra specialty’
- Repeat steps 3-5 for the number of extra specialties needed
-
How do I remove an additional specialty that has been added to a placement?
To remove an additional specialty that has been added to placement:
- Search for the foundation doctor/NTG via Admin menu > Foundation doctors/NTGs
- Select ‘Rotations’
- Select ‘Manage extra specialties’ against the appropriate placement
- Select ‘Remove’ in the action column against the specialty that is being removed
-
How do I add a sub-specialty to a placement?
Sub-specialty should be entered into the 'Specialty additional info' free-text box in the 'Extra Info' section of the Placement Management screen.
-
What is the "WTE" field and how should it be used?
WTE stands for whole time equivalent. It represents whether a foundation doctor is working full time (WTE = 100%) or LTFT - less than full time (WTE > 100%).
In Horus, each placement must have a WTE assigned to it. The majority of foundation doctors work full time, therefore the default has been set to 100% and usually it will not need to be amended. If a foundation doctor has been granted official LTFT status by NHSE, this field should be amended to reflect the agreed WTE %. The options are 100%, 90%, 80%, 70%, 60%, 50%.
If a foundation doctor is out of programme (OOP) they are essentially working at 0% WTE. This is not an option in the WTE field as OOP placements should be recorded in the dedicated "Out of programme" section.
Learn more about what an out of programme placement is and how to create an OOP placement.
-
What is an out of programme placement?
An out of programme placement on Horus should be used to represents one of the following foundation doctor (FD) situations:
- FD on parental (maternity/paternity/adoption etc) leave
- FD on long term sick leave (should not be used for short term sick leave recording)
- FD on official OOP
- Other relevant situations may arise in exceptional cases
There are clear guidelines and processes for each of the above situations, outlined in the FP Reference Guide, the GMC website and employer HR procedures (see "Useful links" for further information).
The recording of an out of programme placement in Horus should only be undertaken once the relevant official process has been followed and is intended to be used as a way to avoid gaps in FD training records where possible.
Learn more about how to create an OOP placement.
-
How do I record that a foundation doctor is out of programme?
You should create an "Out of programme" placement (this is also known as "OOP").
Learn more about how to create an OOP placement.
-
How do I create an out of programme placement?
To create an out of programme (OOP) placement:
1. Go to the relevant foundation doctor's Rotation management page
2. Select "Modify rotation" next to the rotation during which the FD is OOP
3. Update the start and end dates of the rotation and existing placements if required (remember that start and end dates can't overlap)
4. Scroll to the bottom of the page - you will see a section called "List of out of programme placements"
5. Select "Add out of programme placement"
6. Complete the required fields (including an explanation of the type of OOP - for example parental (maternity/paternity/adoption etc) leave, long term sick leave, OOPR, etc)
7. Select "Save changes"
-
Can forms be attached to an out of programme placement?
No, nothing can be attached to/created for an "out of programme" placement. Learn more about what an "out of programme" placement in Horus is for.
-
Core content
-
Who decides what forms are in Horus?
The set of forms that are available to all users in Horus - the "core content" - is decided by the UK Foundation Programme Curriculum Delivery Group (CDG) and the content of many are mandated by the Academy of Medical Royal Colleges (AoMRC). Decisions are based on the Foundation Programme Curriculum (2021) and Foundation Guide (2019).
This group consists of representatives from the UK Foundation Programme Office (UKFPO), both e-portfolio providers for the UK Foundation Programme, Foundation School Directors, Foundation School Managers, Foundation Doctors/British Medical Association and the Academy of Medical Royal Colleges.
The Horus team does not decide on what forms are available in the e-portfolio - we have to develop the forms as requested by the CDG.
Learn more about who to contact if you have queries about the requirements of the foundation programme.
For further information please see the UKFPO's e-portfolio webpage.
-
Who decides how forms work on Horus?
Much of how forms work on Horus is decided by the CDG (see "Who decides what forms are in Horus" for an explanation of the CDG). These include, for example:
- who can create, edit or delete the form
- who can complete the form
- who can see the completed form
- how long before the start/after the end of a placement the form can be completed
Some of the functionality is designed by the Horus development and project teams and will be regularly reviewed and enhanced based on user feedback.
-
Where can I find guidance on how I should use the Foundation Programme e-portfolio forms?
On the UKFPO's Curriculum and Reflection webpages.
-
What are the Foundation Programme requirements?
The requirements are laid out in the following documents/websites:
- Foundation Programme Curriculum (2021)
- Foundation Guide (2019)
- the UKFPO's e-portfolio webpage
- the UKFPO's curriculum webpageAny changes to the requirements of the Foundation Programme will be communicated by the UKFPO.
The Horus team is not able to the advise Horus users on the requirements of the Foundation Programme.
Learn more about who to contact if you have queries about the requirements of the Foundation Programme.
-
Who should I contact if I have queries about the requirements of the Foundation Programme?
Queries about the requirements of the Foundation Programme should be directed as follows:
- If you are a foundation doctor or work in a local education provider (LEP), contact your local postgraduate centre manager or foundation training programme director/tutor (FTPD/T)
- If you are a postgraduate centre manager or FTPD/T, contact your local NHSE foundation school team (for example your foundation school manager/director)
- If you work in a local NHSE foundation school team, contact the UKFPO
Learn more about who decides what forms are in Horus.
-
What is the difference between the "Developing the clinical teacher" (DCT) form and the "Teaching others" form?
The "Developing the clinical teacher" (DCT) form is a form to record a supervised learning event (SLE). It must be signed by an appropriate trainer.
The "Teaching others" form is a form to record an 'additional achievement' - for example bedside, classroom, conference presentation/poster, grand round. It is not signed by a trainer and there is no recommended minimum number.
Both forms are available on the Blank Forms page.
Learn more about who decides what forms are in Horus.
-
Can the Quality Improvement form be signed by a supervisor?
No. The Quality Improvement (QI) form
- is a way for a foundation doctor to upload evidence of quality improvement activity they have been involved with, which they can map to the curriculum
- can only be generated by the foundation doctor
- cannot be signed by a supervisor
- is not an assessment
As with all relevant content in the e-portfolio, it is expected that educational supervisors review forms submitted by and for their foundation doctors on a regular basis and discuss any areas of excellence/improvement with their foundation doctors.
Learn more about who decides how forms work in Horus.
-
Horus-specific content
-
How do I show that I have completed the GMC National Training Survey (NTS)/Career Destination Survey (CDS)?
There is no mandated way to show these in Horus - your local education provider or NHSE foundation school team will explain what they require you to do.
Two of the options available in Horus are:
- Foundation doctors may want to evidence completion using the Quality Improvement (QI) form in Horus. If you choose to do this, make sure to give the form a clear title (in the "Achievement" field) such as "GMC NTS - Completion Code xxxxxxxxxxxx"/"Career Destination Survey".
Learn more about the QI form
- Administrators may choose to upload evidence of completion on behalf of each foundation doctor using this same section within the SoE 'sign off' form.
Learn more about how to create a SoE 'sign off' form
-
Is there a training version of Horus?
Yes, there is a training version of Horus, which is an exact copy of the live site but with made up users.
The site is designed to allow NHSE and LEP foundation administrators to try out activities and processes from the point of view of other users, so that they can support them to use the system. It is intended to be used alongside the Horus Support Site to show how the system works.
LEP foundation administrators may also wish to use the training site to deliver start of year training to foundation doctors (and supervisors) who are new to the Horus ePortfolio.
The training site is not intended for use by individual foundation doctors or supervisors.
How to get access to the training site
All NHSE foundation teams have access to the training site. If you require access to the training site, contact your local NHSE foundation school team.
If you are part of a local NHSE foundation team and are not sure who in your team has access, contact us.
-
Creating content basics
-
How long will Horus allow me to stay signed in if I'm inactive?
Horus will sign you out after 2 hours of inactivity. If you return to your device after 2 hours of inactivity, you will not be able to stay signed in or save any work you have not already saved. This is a security feature and helps to ensure that other users cannot access your account. Remember to save your work and sign out before you leave your device.
-
How do I request for a form to be signed in Horus?
A foundation doctor requests for a form to be signed in Horus by creating a new form and assigning a trainer or assessor. Some users may refer to this process as "sending a ticket".
Learn more about how to send a form to be signed.
-
Creating forms
-
How is an initial/induction meeting form created?
The following three forms need to be created by the relevant supervisor:
- Initial Meeting with Educational Supervisor
- Induction Meeting with Clinical Supervisor
- Combined Induction Meeting with Clinical Supervisor & Initial Meeting with Educational Supervisor
1. 'Forms (start new)' main menu
2. Near the top of the page, under the 'At the beginning of each placement', select the relevant form
3. 'Name of foundation doctor':
- Start typing the name of the foundation doctor with whom you had the meeting
(the first three or four letters of their first name or last name will be enough) - Wait for Horus to search your list of supervised foundation doctor - any names that match what you have typed will appear in a drop-down of search results
- Select the relevant foundation doctor's name from the list
If you don't see the relevant foundation doctor's name in the list, first check that you have been assigned to them as a supervisor. You can do this by going to the 'Supervising' main menu.
- If they appear in this list, you have been assigned --> make sure that you are typing their name in step 4 above exactly as it appears in this list.
- If they do not appear in this list, you have not been assigned --> ask your local e-portfolio/postgraduate centre administrator to update this.4. 'Placement': One or more options will become available once you have completed step 4. Select the placement for which you have held your initial/induction meeting (this may not be the current placement).
If you are completing this form at the end of a placement for the upcoming placement, you will see both placements - check that you are selecting the correct placement.
Learn more about how long before/after a placement you can create a form for that placement.5. Answer the questions in the rest of the form as appropriate
6. Select 'Save (and review before submission)'
7. Review your form (if there is something you want to change, select 'Make further changes' in the purple information bar) and when you're ready select 'Mark as complete'.
8. The form will now be available for the foundation doctor to view and sign.
Learn more about how to sign a form as a foundation doctor.
-
How do I create a Personal Development Plan (PDP) form in Horus?
Only foundation doctors/NTGs can create PDP forms in Horus. Supervisors and administrators can see existing PDP forms in foundation doctor/NTG portfolios.
To create a PDP form:
1. Select Portfolio > PDP
(Alternatively, select the 'Forms (start new)' main menu item and select 'PDP' in the 'At the beginning of each placement' section.)2. Any PDPs previously created will be shown here. Select 'Start new form' to start a new PDP
3. Work through the form by typing in the text fields
4. When you have completed the form select 'Save changes'
5. If all mandatory field have been completed:
- a green confirmation box at the top shows your changes have been saved
- a purple box part-way down shows that the form can still be edited and has not been marked as 'Achieved'.If required, select 'Make further changes' to edit the contents of your PDP (and then repeat steps 3-5).
6. Select 'Close' in the top right hand corner to return to the PDP overview page. The new PDP will be shown.
Once you have completed the items in your PDP (for example, 3 months later):
- select 'Open' next to the relevant PDP form
- select 'Make further changes'
- complete the final question in the form
('Evaluation and outcome (show how you have achieved your objectives)')
- select 'Save changes'
- select 'Mark as achieved'.Once you have marked the PDP as 'Achieved' you will not be able to make any further changes in the form.
When you return to the main PDP screen the PDP will be marked as achieved.
-
How do I create a reflection form in Horus?
Only foundation doctors/NTGs can create reflection forms in Horus. Supervisors and administrators can see shared reflection forms in foundation doctor/NTG portfolios.
To create a reflection form:
1. Select the 'Portfolio' and select 'Reflection' in the sub-menu.
(Alternatively, select the 'Forms (start new)' main menu item and select 'Reflection' in the 'Throughout each placement' section.)2. Any reflections previously created will be shown here. Select 'Start new form' to start a new reflection
3. Work through the form by completing the necessary fields
4. In order for a supervisor to see your reflection, you must share it by selecting 'Shared' for the last question in the form
- Shared reflections cannot be made private again. However, reflections can always be edited.
- You do not have to share your reflection straight away - you can keep it private until you are ready to share it.5. When you have completed the form select 'Save changes'
6. If all mandatory field have been completed, and you have chosen to keep your reflection private:
- a green confirmation box at the top shows your changes have been saved
- a purple box part-way down shows that the form can still be edited and has not been shared7. Select 'Make further changes' to edit the contents of your reflection (or to share it if it is currently private)
8. Select 'Close' in the top right hand corner to return to the 'Reflections' screen. The new reflection and whether it is shared will be shown.
For information on the principles of reflection, see the following resources
- Reflective practice guidance from AoMRC and COPMeD (September 2018)
-
Are PDPs and reflections linked to placements?
No - PDP and reflection forms are linked to a foundation doctor's whole FY1 or FY2 rotation. They can be completed at any time during the rotation and can relate to any placements or events within or out with the rotation.
To make counting of these forms easier, we report on the number of PDP and reflection forms in each foundation doctor's portfolio "Overview" based on
- PDP: the nearest placement to the date the form was created
- Reflection: the 'Start date of placement against which you want this form to count:' entered.
This is just to help quick checks and calculations - it does not definitively show whether a foundation doctor has/has not completed a PDP or reflection form for a specific placement.

Learn more about the categorisation of all the forms in Horus.
-
As a foundation doctor/NTG, how do I send a form to be signed by a trainer or assessor?
The following forms need to be 'approved' (that is, checked and signed) by a trainer or assessor:
Case Based Discussion (CBD)
Core Procedures (CPs)
Developing the Clinical Teacher (DCT)
Direct Observation Of Procedural Skills (DOPS)
Mini-clinical evaluation exercise (mini-CEX)
LEADER
LEARN
(Guidance for each type of experience is on the UKFPO website)Most of these forms will be created by the foundation doctor/NTG (and then added to and signed by a trainer/assessor).
(Local trainers and administrators can also create these forms for foundation doctors/NTGs, but they will automatically be assigned to that form as trainer/assessor.)To assign a trainer/assessor to one of the above forms, the foundation doctor/NTG needs to take the following steps:
1. Forms (start new) > select the relevant form
2. Select the placement/rotation against which the form should be listed
Learn more about completing fields in SLEs/CPs.3. Complete as much of the form as possible and scroll to the 'Trainer/Assessor details' at the end of the form
4. 'Nominate trainer/assessor' field:
- Start typing the first name or last name (or GMC number if applicable) of the required trainer/assessor
(the first three or four letters of their first name or last name will be enough) - Wait for Horus to search your list of available trainers/assessors - any names that match what you have typed will appear in a drop-down of search results
- Select the relevant trainer/assessor's name from the list
If you don't see the relevant trainer/assessor's name in the list, you can add them to Horus yourself.
Learn more about how a foundation doctor can add a trainer or assessor to Horus.5. You will now see with which email address the trainer/assessor is registered on Horus. If they have asked you to send the form to a different email address, you can add this by following the instructions in the sentence below their primary email address: 'If you wish to send this form to a different address, please click here'
6. Select 'Save (and review before submission)'
7. Select 'Send form for approval'
An email will be sent to your selected trainer/assessor and the form will no longer be editable by you.- Start typing the first name or last name (or GMC number if applicable) of the required trainer/assessor
-
Can I send an SLE/CP to a trainer/assessor using a different email address to the one they're registered on Horus with?
Yes, foundation doctors/NTGs can send an SLE/CP to a trainer/assessor using a different email address to the one they're registered on Horus with.
When a foundation doctor/NTG adds a trainer to an SLE/CP, they will see the email address that user is registered on Horus with.
To increase the likelihood of SLE/CPs being signed quickly and easily for foundation doctors/NTGs, Horus allows them to enter a different email email address for the user. This should not be used as a matter of course - it is for exceptional circumstances, such as
- The trainer may be registered on Horus with their official trust email address, but they may not have access to this temporarily (for example they're off-site or their inbox is full).
- The trainer could ask the foundation doctor to send it to another of their email addresses, one that at that point they can access more readily.
- The trainer's email address may be wrong or out of date on Horus.
- Using the alternative email address function allows the foundation doctor to get their SLE/CP signed without needing to wait for the administrative process of updating the registered email address.
- However, in this case the administrative process must follow - the trainer can update their own email address or the foundation doctor/trainer can contact a local e-portfolio administrator.
When a different email address is used, the following audit log is created:- The trainer receives an information email to their registered email address
- Subject: Horus: Signature request (alternative email used)
- Detail: registered email address, foundation doctor, type of form, alternative email address, guidance for what to do if this is incorrect
- The trainer receives a signature link to the alternative email address
- Once signed, the trainer receives a signature confirmation email to their registered email address
- The completed form shows "[Alternative email]" under the signatory's email address
- Trainer section in SLE/CP
Trainer details
Nominate trainer*
| Trainer, Jon (1234567) |
(N.B. a signatory is required for this form to count towards your ARCP)Primary trainer email address dr.trainer@nhs.net.
If you wish to send this form to a different address, please click here?- Selecting "click here" makes a new section appear:
Primary trainer email address dr.trainer@nhs.net.
| <enter alternative email address here> |
If you want to revert to the trainer/assessor's primary email address please click here- The trainer may be registered on Horus with their official trust email address, but they may not have access to this temporarily (for example they're off-site or their inbox is full).
-
As a foundation doctor/NTG, do I have to complete all the fields in an SLE/CP before sending it to a trainer/assessor to approve?
No - you can complete some, none or all of the form before you send it to a trainer/assessor to approve (you just have to confirm which placement/rotation you want the form to be listed against).
You should try to complete as much of the form as you reasonably can though, so your trainer/assessor knows exactly which event/experience you would like their written feedback on and what your thoughts about your experience are.
Your trainer/assessor will have access to edit the whole form before they approve it, so you're essentially writing a draft for them view, edit and approve as they see fit.
Note specific information about including reflection in your SLE.
-
As a foundation doctor/NTG, do I have to complete the "Reflection" section in SLE forms?
Foundation doctors are required to write down their reflections on their experiences as part of their education, training and development. There are a number of ways they can do this:
- Writing their reflections about a specific event into the 'Reflection' question in the SLE form before they send it to a trainer for their comments and signature
- Writing a reflection using the separate 'Reflection' form and referring to the specific SLE, if appropriate (this can be done before or after sending an SLE about the same event to a trainer)
- Using reflective tools and processes outside of the e-portfolio
The method or methods chosen should be dependent on the situation and foundation doctors should discuss their plans with their supervisors. Note the requirements for the number of written reflections in your e-portfolio for a successful ARCP outcome.The simple answer is, a foundation doctor/NTG does not have to include their reflection on the event within the SLE form itself, if this is appropriate for that specific situation. From a technical perspective, the SLE form can be saved and signed without the 'Reflection' box being completed.
If you have submitted your SLE form for signature but have forgotten to include a reflection within it, two options are to delete the SLE or to revert the form to draft. These will not be appropriate/possible in all situations. Other options are summarised in the bullet points above.
See 'How do I create a reflection form?' for further information and links to guidance on reflections.
-
I am a trainer or assessor who signs SLEs/CPs for foundation doctors/NTGs. Do I have to sign in to Horus?
No, trainers/assessors who have been asked by a foundation doctor/NTG to sign a supervised learning event (SLE) or core procedure (CP) do not need to sign in to Horus to do this. You do need to have a Horus account, but this can quickly be created by either a foundation doctor/NTG or an administrator. Following this, foundation doctors/NTGs will be able to add you as trainer/assessor to the relevant form.
You will receive an email giving you details of the foundation doctor/NTG and the SLE/CP they would like you to sign, and a link to follow. You will not be asked for login details to complete the form. However, any forms you do complete will be available in your Horus account, which you can access if you need to or want to.
Learn more about
- how a foundation doctor/NTG can add a trainer or assessor to Horus
- how to access your account for the first time
-
How long before/after a placement can I interact with content for that placement?
You can interact with (that is: create/edit/sign/delete/mark as complete) content up to 1 month before the start of a placement and up to 3 months after the end of a placement.
(1 month is counted as from x date in month 1 to x date in month 2, e.g. 4 February to 4 March)This includes but is not limited to the following content:
- SLEs
- QI
- Additional achievement forms
- ES/CS/AS start, mid and end of placement forms
- Mandatory certificates
- ES mid and end of year forms
- PSG individual feedbackThe same is true for content linked to a whole rotation - you can interact with these up to 1 month before the start of the rotation and up to 3 months after the end of the rotation.
This includes but is not limited to the following content:
- Reflection
- Career planning
- PDP
- PDP progress
- Mandatory certificates
- Form R
- TAB
- PSG summaries
- ARCPIf a form a foundation doctor/NTG has sent to an approver is not approved within this time limit, it will no longer be accessible to be approved. It will remain in the foundation doctor's/NTG's account as a form "requiring an additional signature". Forms that require a signature (such as SLEs and Core Procedures) will not count towards ARCP if they are not approved (that is, signed).
The time limit is not linked to when the content was started/completed - it is linked to when the placement or rotation it is linked to starts/ends.
-
As a CS/ES what do I do if I miss the 3 month deadline to complete my end of placement report?
The 3 month deadline for completing forms has been mandated by the UKFPO. The UKFPO and its operational partner, the UK Curriculum Delivery Group (CDG), have stressed the importance of timely assessments - a clinical supervisor's end of placement report completed more than 3 months after the end of the placement in question, for example, starts to lose its impact on and meaning for the foundation doctor. It is a requirement for both the foundation doctor and their educational and clinical supervisors to adhere to this time limit.
Therefore, supervisors will find that when they create a form in Horus only the following placements will be available to link the form to:
- Any placement that ended less than 3 months ago
- The current placement
- Any placement starting in less than 1 month
--> This could mean that only one placement shows - for example at the very start of the rotation.
The CDG is clear that the 3 month limit must be adhered to. Note that if the CS is not available to complete a timely end of placement report, the ES is responsible for completing the CS end of placement report (as well as the ES end of placement report).If the deadline has been missed, you should discuss the situation with your FTPD and/or local NHSE foundation school team. "Blank" versions of all the forms in Horus can be found in the Blank Forms section of this website. It may be appropriate to complete one of these and submit it to the ARCP panel alongside the information in the e-portfolio. Please note that the Horus team cannot offer guidance on whether this is appropriate in your situation or how the submission should be made.
-
Follow On Forms
-
What are "Follow On Forms"?
“Follow On Forms” are forms that are automatically created by Horus, with the foundation doctor's name and placement pre-entered, to help users create all required forms.
For example, when a joint educational and clinical supervisor completes a CS End of Placement Report, a “Follow On Form” is automatically created for the ES End of Placement Report (and vice versa if the ES EPR is created first). This is because a joint ES/CS is required to complete both of these forms for their supervised foundation doctor.
A "Follow On Form" does not show in your 'Drafts' until you save it as a draft.
-
Where do I find "Follow On Forms" that I need to complete?
“Follow On Forms” that you need to complete (if any) are under the “Follow On Forms” tab on your Horus home page. Note that many users won’t have any “Follow On Forms”.
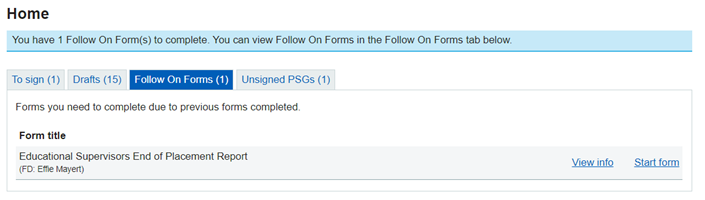
From this tab you can:
- View information about the “Follow On Form” by selecting the 'View info' button
- Start to complete the Follow On Form by selecting the 'Start form' button
-
I do not want to complete the suggested “Follow On Form”. Can a “Follow On Form” be dismissed/deleted?
Yes, a 'Follow On Form' can be dismissed:
- Home page > 'Follow On Forms' tab
- Select the 'View info' link again the appropriate form
- Read the information and note that it may not be necessary for you to dismiss the form
- Scroll to the bottom of the page and select 'Dismiss Follow On Form'
-
Forms in draft
-
Can I save a form as a draft?
Yes, you can save most forms as a draft in Horus. At the end of the form you will always see two buttons: 'Save (and review before submission)' and 'Save (and leave as draft)'.

The only exceptions are PDP and Reflection forms. These can be edited as if they were drafts, though. You will see all PDP and Reflection forms that have been started/completed on the relevant foundation doctor's portfolio 'PDP' or 'Reflection' page.
-
Can anyone else see forms that I've saved as a draft?
No, the contents of any forms that you save as a draft will only be visible to you.
The existence of some forms saved as draft, like end of placements reports, can be seen in administrator 'form count' reports.
-
Where do I see forms that I've saved as a draft?
You can see a list of all the forms that you've saved as a draft on your Home page, in the 'Drafts' tab.
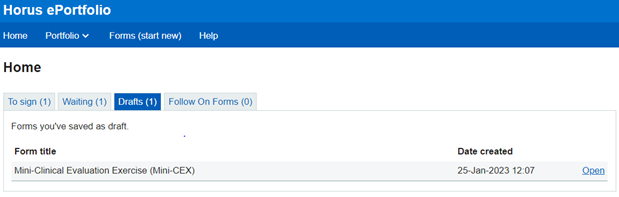
Learn more about who can see forms saved as draft.
-
How do I edit a form I've saved as a draft?
Forms that have been saved as draft can be found under the 'Drafts' tab on your Horus home page.
1. Open the form which you would like to edit using the 'Open' link.
2. Select the 'Make further changes' link.

The form is now editable.
After making the desired changes you can
- 'Close form (without saving)'
- 'Save (and review before submission)'
- 'Save (and leave as draft)'Note: a form can only be edited up to 3 months after the end of the placement that it is assigned to.
-
As a foundation doctor, how can I change the trainer/assessor on a form I have submitted for approval?
The assigned trainer/assessor can only be changed on forms that have not yet been signed. Signed forms cannot be amended.
To change the trainer/assessor on a form already submitted for approval:
- Find and select the form on your 'Contents' portfolio page.
- In the second purple bar, below your personal details, select the 'Reset trainer/assessor' button on the right.
--> Once you make this selection the original approval request link will no longer work. - You will see a green bar confirming 'Trainer/assessor removed. Please nominate a new trainer/assessor.' Just below that will be a purple bar with a link to 'Nominate new signatory' - select this link.
- Nominate a new person to sign the form.
--> As when you originally selected a trainer/assessor, type the first few letters of their first/last name OR the first few digits of their GMC number (if applicable). You can use an alternative email address if required. - Once you have selected a signatory, select the ‘Nominate new signatory’ button.
- You will see see a green bar confirming 'Thanks, your new signatory has been added.' An automatic email will have been sent to the new trainer/assessor, with a link to sign the form.
Learn more about how you send a form to be signed.
-
How do I delete an SLE/CP that is "awaiting signature"?
When a Supervised Learning Event (SLE) or Core Procedure (CP) form is awaiting a signature, you are able to delete the form. To do this:
1. Open the relevant SLE/CP from your portfolio 'Contents' menu
2. Select the 'Reset trainer/assessor' button
3. Scroll to the bottom of the page and select the 'Delete form' button.
4. Read the pop up carefully and if you are sure you wish to delete the form, select 'Delete this form now' to confirm deletion.
5. You will now be notified the form has been deleted and it will disappear from your portfolio.
Learn more about deleting forms.
-
Signing forms
-
As a foundation doctor, how do I sign a meeting form?
When you log in to Horus, you will see a list of "forms requiring your signature" under the 'To sign' tab on your home page.
You can sign a form in the following way:
1. Select "Open" next to the relevant form from the list on your home page
(You can also find the form in your "Portfolio contents" page)2. Read the contents of the form
3. Scroll back to the top of the page
4. Select "Sign this form"
Forms that require your signature in this way are
- Initial Meeting with Educational Supervisor
- Induction Meeting with Clinical Supervisor
- Combined Induction Meeting with Clinical Supervisor & Initial Meeting with Educational Supervisor
- ARCP outcome form
-
Who can approve/sign SLEs and Core Procedures in Horus?
Anyone who completes SLEs or Core Procedures for foundation doctors in England needs to have a Horus account. They do not need to access their account to complete the form though, as long as the foundation doctor creates the form. The form can be completed using the automatic email that will be sent when the foundation doctor sends the forms for approval.
Learn more about how:
- a foundation doctor sends a form to be signed by a trainer or assessor
- a foundation doctor can add a new trainer or assessor
- an administrator can add a new trainer or assessor
Learn more about why trainers and assessors need to have a Horus account.
Each type of form has guidance within it on what types of staff members are appropriate to complete it. This is core content, which is not set by the Horus team.
Learn more about foundation e-portfolio core content.
-
Does Horus send reminders to users to sign forms they have been assigned to?
Yes, Horus sends three automatic email reminders to users who have not signed forms they have been assigned to. The schedule is:
- Immediate email notification when the form is first submitted for signing
- 7 days after original submission
- 14 days after original submission
- 21 days after original submission
The link in each email expires after 7 days (when a replacement will be sent). Only the most recent will work.
No further reminder emails will be sent after this time period. Users who want to sign a form after the reminder period can still log in to their Horus account and sign it from the "Forms requiring your signature" list on their home page (provided the placement / rotation the form is assigned to is still active or finished less than 3 months ago).
Foundation doctors can send manual reminders to trainers/assessors who have not signed SLE/assessment forms they have been assigned to.
-
Can I send a reminder to a trainer/assessor to sign an SLE/assessment?
Yes, you can send a reminder from Horus to a trainer/assessor who has not signed an SLE/assessment for you yet. Note:
- Horus sends automatic reminders. You can only send a manual reminder once every 24 hours (either since the last automatic reminder or since your last manual reminder).
- Only the form completion link in the most recent reminder email will work. If your trainer/assessor selects a link in an old email, they will see a message explaining that the link has expired.
- Only foundation doctors can send manual reminders.
To send a reminder:
1. Portfolio > Contents
2. Select the relevant unsigned form
3. Select "Send Reminder Email" near the top of the form (remember, this button will only be available if it's been more than 24 hours since the last reminder email was sent)

-
How do I sign an SLE/Core Procedure for a foundation doctor?
Foundation doctors have to invite trainers to sign an SLE/Core Procedure for them.
You can sign a form EITHER using the email notification you received OR by logging in to your Horus account.
Email
1. Select the "Go to the form" link in the notification email
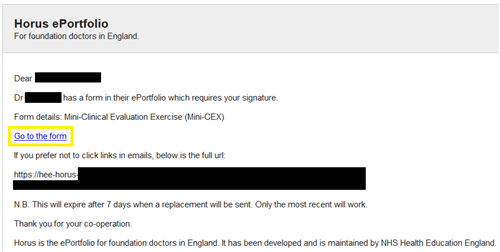
Horus login
1. The form will show on your home page, in the 'To sign' tab on the left. Select 'Open' next to the relevant form.
Both routes - continued
2. Either way, you will now be shown the basic form details (name, GMC number and placement details of the foundation doctor and the details they have entered for their trainer/assessor) and asked to confirm whether you are the named trainer/assessor:
3. Check that your name is correct and then select 'Yes'.
If you are not the named trainer, select 'No' and explain the issue in the free text box that appears (further details available here).4. You will now be able to view the whole form - scroll down, read what the foundation doctor has written and decide whether you would like to add / amend anything before signing the form.
You will most likely need to add information to the form - foundation doctors have been asked to complete as much of the form as they can, but some sections require your direct input.
You will not be able to sign the form until all the mandatory fields have been completed.5. To add / amend anything in the form, select 'Make further changes' in the purple bar just above the form. This will open up the form for you to complete.
6. Select 'Save (and review before submission)' at the end once you have completed the form.
7. You will then be taken back to the questions described in steps 2 and 3 above. Select 'Yes' for question 1, 'Yes' for question 2 and 'Sign this form' for question 3.
8. You will see a screen confirming the form has been signed.
-
How do I decline to sign an SLE/Core Procedure for a foundation doctor?
Trainers and assessors always have the option to decline to sign an SLE/Core Procedure for a foundation doctor.
You may not remember the interaction, you may not be the intended recipient or you may feel that you are not the appropriate person to sign the form.Whatever the reason, it's very helpful to the foundation doctor if you decline to sign the form (instead of not responding to it at all), so that they can re-send it to the correct/a more suitable trainer/assessor.
You can decline to sign a form EITHER using the email notification you received OR by logging in to your Horus account.
Email
1. Select the 'Go to the form' link in the notification email
Horus login
1. The form will show on your home page, in the 'To sign' tab on the left. Select 'Open' next to the relevant form.
Both routes - continued
2. Either way, you will now be shown the basic form details (name, GMC number and placement details of the foundation doctor and the details they have entered for their trainer/assessor) and asked to confirm whether you are the named trainer/assessor:
3a. If you are not the named trainer, select 'No' and explain the issue in the free text box that appears (for example, 'You have the wrong John Smith').
Then select 'Remove my name from this form'.
You don't need to do anything further.
3b. If you are the named trainer, select 'Yes' instead. You will now be able to view the whole form (scroll down).
You will be asked whether you are happy to sign the form. If you don't want to sign the form (for example, because you don't remember the interaction described in the form), select 'No' and explain the issue in the free text box that appears (for example, "I don't remember having this interaction with you").
Note that you can edit the contents of the form, so don't use this option if you do remember the interaction and just want to update some of the information provided by the foundation doctor.Then select 'Reject signature request'.
You don't need to do anything further.
-
Linking forms
-
Who can link forms on a Horus account?
Foundation doctors/NTGs can link completed forms to other completed forms on their Horus account. Administrators, supervisors and any other users cannot link forms on a foundation doctor’s/NTG’s Horus account.
-
How do I link a completed form to another in Horus?
To link a completed form to another in Horus you need to:
1. Access the form you want to link in the usual way.
2. Scroll to the bottom of the form to the ‘Form Links’ section and select ‘Add or remove links’.
3. Scroll to the ‘Forms available for linking’ section and find the form(s) you want to link.
4. Select ‘Make link’.
Once this button has been selected, the form against this button will be greyed out and the button will show as ‘Linked’. The form that has been linked will also be shown under the ‘Forms already linked’ section the top of the page.
5. Repeat steps 3 and 4 for as many forms as required. Do not link more than 5-10 forms, to be pragmatic.
6. Select ‘Close’ to return to the original form.
-
Where do I see the links that have been made for a form?
Any linked forms are displayed in the ‘Forms Links’ section at the bottom of each form. The linked form(s) will be displayed as a hyperlink and can be accessed through this link. The link between forms shows on both forms.
Form 1 (Mini-CEX):

Form 2 (Reflection):

-
How do I remove the link between forms?
1. Access one of the linked forms in the usual way.
2. Scroll to the Form Links section.
3. Select ‘Add or remove link’.
4. Locate the form you wish to unlink in the ‘Forms already linked’ section and select ‘Remove link’.
If successful you will receive a notification banner stating the link has been removed.
5. Select ‘Close’ to return to the original form.
-
I am trying to link a form on Horus but it is not being displayed in the ‘Forms available for linking’ section, why?
Reasons why a form can’t be linked:
Status – Only ‘completed’ forms can be linked. Forms in draft or awaiting signature(s) cannot be linked.
Rotation – Only forms in the same rotation can be linked to each other.
Reflections – Only shared Reflections can be linked.
Career Planning – Only shared Career Planning forms can be linked.
Team Assessment of Behaviour – Only TAB summary forms can be linked.
-
I have mapped a form to the curriculum and then linked this form to another form. Will the linked form also now be mapped to the curriculum?
No, linked forms are not automatically mapped to the curriculum if they are linked to a form that is already mapped to the curriculum. Each required form needs to be mapped to the curriculum separately.
-
Managing completed forms
-
Where are completed forms in a foundation doctor's portfolio?
In the foundation doctor's portfolio menu (top menu if you are a foundation doctor, right hand drop-down sub-menu if you are a supervisor or administrator), select "Contents".
FD: Portfolio > Content
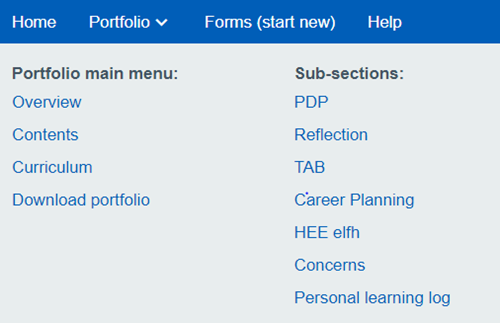
Admin/trainer: Portfolio drop down menu > Contents
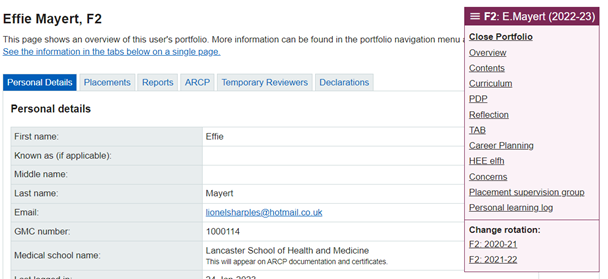
All forms completed for the foundation doctor will be listed here, as well submitted forms awaiting either approval by a trainer/assessor or signature by the foundation doctor. Some forms are listed against the whole rotation (for example, reflections, core procedure and the educational supervisor's end of year report) and some against specific placements (for example, SLEs, additional achievements and clinical supervisors' end of placement reports).
-
How do I check if a submitted form has been signed?
Foundation doctors will receive an email notification when a form they have sent for approval (SLE) has been signed by their selected trainer or assessor.
Submitted forms that have not yet been signed show in the portfolio 'Contents' list with a yellow triangle next to them. If you hover over the triangle you will see the description 'this form requires an additional signature'.
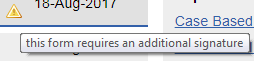
Learn more about how to send a form to be signed.
-
As a supervisor, trainer or assessor, can I see the forms I have signed for foundation doctors?
Yes, there is a ‘My Activity’ section in the 'Trainer menu', where all trainers can see forms they've signed for foundation doctors.
Supervisors are also able to view forms that they and others have signed for their foundation doctors on the relevant doctor’s portfolio ‘Contents’ page.
-
Can I revert a submitted form to draft?
Any form that has been submitted on Horus can only be reverted to draft by an administrator who has access to the portfolio of the foundation for/by whom the form has been completed. This is to ensure there is an audit trail and verification before a form is deleted (most forms have to be in draft to be deleted).
- Access the "Contents" portfolio menu of the relevant foundation doctor
- Select the form that needs to be reverted to draft from the list
- Scroll to the bottom of the form - there will be 3 options:
• Revert to draft (admin only)
• Change placement (admin only)
• How to delete a form
- Select "Revert to draft"
- You will see the following pop up - please note it:
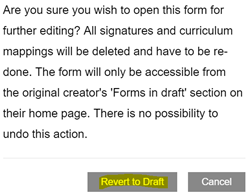
- Select "Revert to Draft" - the form will then only be accessible to the original creator. There is no possibility to undo this action.
-
Can submitted forms be reverted to draft in bulk?
Only submitted Personal Learning Log forms can be reverted back to draft in bulk. The 'Revert to draft mode' for Personal Learning Log forms can only be used by those with administrator permissions. To do this:
1. Access the Personal Learning Log overview page of the relevant foundation doctor.
2. Scroll to the bottom of the page and select ‘Enable Revert to Draft’.

3. Select the tick boxes of the forms you wish to revert to draft and select ‘Revert selected forms to draft’.
4. Select ‘Revert selected to draft’ on the pop up warning.
Please note: Once forms have been reverted to draft it cannot be un-done and draft forms can only be accessed by the creator.
-
How do I delete a form?
Any form that has been submitted on Horus (except TAB and Reflection forms) can only be deleted by the user who originally created the form. Follow the steps below to delete a form you created:
- Revert the form to draft
- Only an administrator can do this to. See "Can I revert a submitted form to draft?" for what to do.
- If you are not an administrator, contact your local postgraduate centre administrator and ask them to complete this action.
- Once the form has been reverted to draft, you will find the form on your Horus Home page ("Forms in draft" tab).
- Select the form you wish to delete by selecting "Open".
- Scroll to the bottom of the form - you will find a ‘Delete form’ button.
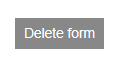
- Select "Delete form".
- You will see the following pop up - please note it:
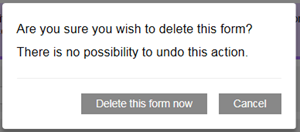
- Select "Delete this form now". There is no possibility to undo this action.
For details about deleting TAB forms, see the Reviewing TAB section.For details about deleting Reflection forms, see "Can a reflection form be deleted?".
- Revert the form to draft
-
Can a reflection form be deleted?
A reflection form marked "private" can be deleted - follow the instruction in "How do I delete a form?".
A reflection form marked as "shared" cannot be deleted (or made private again). It can, however, be edited indefinitely. This is functionality requested by the CDG.
-
How do I ‘move’ a form between placements/rotations?
Administrators can amend the placement/rotation that a form has been listed against by following the steps below:
(NOTE: Placement-based forms can only be moved between placements belonging to the same rotation. Rotation-based forms can be moved between any rotation assigned to the foundation doctor.- Access the 'Contents' portfolio menu of the relevant foundation doctor
- Select the form that needs to be amended from the list
- Scroll to the bottom of the form - there will be 3 options:
- Revert to draft (admin only)
- Change placement (admin only)
- How to delete a form
- Select 'Change placement'
- You will see a list of placements assigned to the foundation doctor. Select 'Move here' next to the placement you want to move the form to. The move will happen as soon as you select this option.
A form can be moved as many times as required.
Note that placement-based forms cannot be moved to a different rotation.
-
Can I download my whole portfolio from Horus?
Foundation doctors/NTGs can download most of their portfolio using the 'Download portfolio' function in their 'Portfolio' main menu.
Step by step instructions to download portfolio
The following items are not/not yet available as part of this download: F1CC, FPCC, declarations, curriculum mapping, curriculum progress rating, uploaded documents attached to forms, reflections and career planning forms marked as 'private'. Meanwhile, all of these forms can be downloaded individually using the web browsers 'Print to PDF' function.
-
How can I download my portfolio from Horus?
This functionality is available to all foundation and NTG doctors using Horus.
1. Portfolio > Download portfolio
2. The 'Portfolio downloads' page you land on will show any previous downloads you've requested. To request a new download, select the 'Start new download' button
3. Read the guidance on the page.
4 Select the order in which you want your download sorted. This can either be by 'Form created date' or 'Form type'
5. Select from the list the form types you want included in your download. Note that if you select a form type under which you do not have any complete forms, the 'Total forms selected' counter will not change.
6. Select 'Start Download'.
7. Wait 5-10 minutes, then refresh the page (or just navigate away from the page and come back later). You will see your new download in the list. During quiet times of the day a download will take under 5 minutes. Please allow longer during peak hours.
8. Select 'Download PDF'
-
External documents
-
How do I upload an external document to my Horus account?
External documents (for example, presentations, projects, audits, screenshots, certificates) can be uploaded to Horus - by foundation doctors/NTGs only - in the following way:
1. Forms (start new)
2. Scroll down the page to the 'Mandatory forms for each training year (rotation)' or the 'Additional Achievement' section
3. Select the form that best describes the type of document you want to upload
- External documents can be uploaded to the QI form, the mandatory certificate form, the mandatory teaching log and any of the forms in the 'Additional Achievement' section.4. Give the form an appropriately descriptive title
5. Upload your external document(s)
Tips:
Convert documents to pdf to make it easier for others reviewing your portfolio (and to reduce the file size).
Maximum size per file is 4MB for PDFs and 1MB for other documents - compress files to save space.
The following file types are accepted: .pdf, .png, .jpg, .gif, .doc, .docx, .ppt, .pptx.
File names can be a maximum of 75 characters and can only contain letters, numbers, spaces, dashes and underscores.You can upload as many files as you want to a form, but they must each be less than 1MB (or 4MB if pdf).
6. Complete the other free text parts of the form as appropriate
7. Save the form
8. Check the contents and 'Mark as complete' when you're ready
-
What files can be uploaded to forms?
Things to note when uploading files:
- The following file types are accepted: .pdf, .png, .jpg, .gif, .doc, .docx, .ppt, .pptx.
- Maximum size per file is 4MB for PDFs and 1MB for other documents - compress files to save space.
- Where possible you should convert files to pdf or take a screenshot of the file to reduce size.
- You can upload as many files as you want to a form, but they must each be less than 1MB (or 4MB if pdf).
- File names can be a maximum of 75 characters.
Learn more about uploading external documents.
-
What is the size limit for external documents uploaded to Horus?
The size limit for external documents uploaded to Horus is:
- 1MB for .png, .jpg, .gif, .doc, .docx, .ppt, .pptx.
- 4MB for .pdf.
Note that:- you can upload up to 5 files / 5MB at a time to a Horus form (Additional Achievement, QI or Mandatory Certificate) - you can keep saving and adding more files though
- there is no limit to the number of external documents you can upload to your Horus account
You should compress files to make them as small as possible. The easiest way to do this is to convert files to "minimum size" pdf (most computers will have the option to "print to pdf" to do this). You can also take screenshots of documents and/or upload documents in smaller sections (e.g. 1 or 2 pages at a time), depending on their size.Learn about how to upload an external file to Horus.
-
What should I do if I get an error when trying to upload an external document?
We are receiving a small number of reports of documents failing our file-type checks. The reason tends to be unique for each affected file, although in a few recent cases the issue was caused by the use of an older version of Office for Mac. When we re-saved that file on the latest version of Office on Windows 10, it uploaded successfully.
If you get an error when trying to upload an external document, please try the following before trying to upload the file again:
- Ensure you are using an accepted file type and size
- Re-save the file on the latest version of Office
- Save (or re-save) the file as a pdf
If this still doesn't allow you to upload the file, please contact the Horus Helpdesk with the relevant document, explaining the situation and what remedial actions you have tried.
-
Curriculum basics
-
What is the curriculum?
The foundation programme curriculum sets out the framework for educational progression that will support the first two years of professional development, following graduation from medical school. The "Curriculum" portfolio menu item is the e-portfolio version of the '3.6 Higher Level Outcomes and the Foundation Professional Capabilities' section of the curriculum.
2021 Foundation Programme Curriculum
The syllabus is organised into three Higher Level Outcomes:
HLO 1: An accountable, capable and compassionate doctor
HLO 2: A valuable member of healthcare workforce
HLO 3: A professional, responsible for their own practice and portfolio development2016 Foundation Programme Curriculum
The syllabus is organised into four sections:
Section 1: Professional behaviour and trust
Section 2: Communication, team working and leadership
Section 3: Clinical care
Section 4: Safety and qualityLearn more about the curriculum in Horus.
-
What is a foundation professional capability (FPC)?
2021 Foundation Programme Curriculum
- There are 13 foundation programme training ‘outcomes’ to be achieved within the curriculum; these are termed ‘foundation professional capabilities’ (FPCs) and are fully explained in the curriculum (2021).
- The 13 FPCs are split into 3 Higher Level Outcomes, describing the key clinical and professional aspects of medical practice. FPCs are the outcomes of foundation training and indicate what the doctor in training is expected to be able to do.
2016 Foundation Programme Curriculum
- There are 20 foundation programme training ‘outcomes’ to be achieved within the curriculum; these are termed ‘foundation professional capabilities’ (FPCs) and are fully explained in the curriculum (2016).
- The 20 FPCs are split into 4 syllabus sections. FPCs are the outcomes of foundation training and indicate what the doctor in training is expected to be able to do.
In order to progress from F1 into F2 and from F2 into GP or specialty training the foundation doctor has to be signed off for each FPC as having met or exceeded the minimum levels of performance required for sign off.
Within the e-portfolio foundation doctors must provide evidence of how their achievements related to each FPC meet or exceed the expected minimum standard of performance for their year of foundation training. This is done by mapping relevant portfolio content to each FPC. Look out for the "map to curriculum" link by each completed form.
-
Where can I find guidance on Foundation Programme requirements?
On the UKFPO curriculum webpage – there is guidance about the curriculum, meetings, assessments, supervised learning events and other activities foundation doctors and their supervisors need to engage with. The information on this page is updated regularly.
-
What is the purpose of curriculum mapping?
See the UKFPO website for detailed information about the purpose of curriculum mapping in the foundation e-portfolio.
Learn about mapping portfolio items to the curriculum and un-mapping portfolio items from the curriculum in Horus.
-
Where is the curriculum in Horus?
The curriculum is found in each foundation doctor's portfolio menu item called "Curriculum". Open this portfolio menu item to view the curriculum.
Anyone who has access to the foundation doctor's portfolio has access to this section, which shows:
- The three Higher level Outcomes of the syllabus, broken down further into the 13 FPCs for those foundation doctor on the 2021 curriculum or the four sections of the syllabus, broken down further into the 20 FPCs for those foundation doctor on the 2016 curriculum.
- A list of any e-portfolio content that has been mapped as evidence to each FPC
- F1 and F2 descriptors for each FPC
- e-LfH courses that are considered particularly relevant to each FPC
- Note that this section will not show which courses the foundation doctor has completed - it will show which courses they may consider completing to add to the evidence base for achievement of a specific FPC
- Educational supervisor rating for each HLO or section of the syllabus
- Summary narratives for each HLO for those on the 2021 curriculum
Learn more about
- which e-LfH courses are relevant to each FPC
-
How do I map a portfolio item to the curriculum as evidence?
2021 Foundation programme Curriculum
- Portfolio items can be mapped as evidence to a maximum of 3 foundation professional capabilities (FPCs) - further information.
2016 Foundation Programme Curriculum
- Portfolio items can be mapped as evidence to a maximum of 5 foundation professional capabilities (FPCs) - further information.
The process for evidence mapping to the curriculum is:
1. Portfolio > Contents
2. Find the portfolio item (that is, the form) that you want to map
3. To the right of the form, underneath the date it was submitted, select "map to curriculum"
4. The curriculum will pop up, showing the three Higher Level Outcomes or the four sections depending on which curriculum your rotation is assigned to:
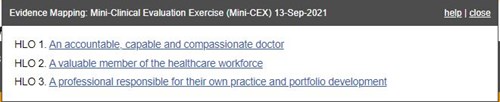
5. Select the HLO/section under which you want to map the portfolio item
6. Select the FPC against which you want to map the portfolio item:
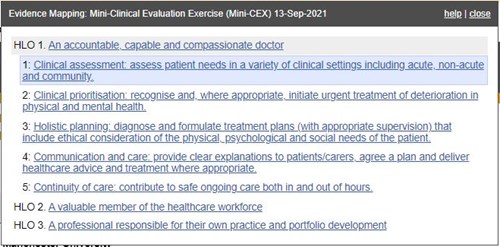
7. The item is now mapped. Select more FPCs if required:
8. Select "close" in the top right-hand corner of the pop-up when you're finished.
Learn about how to "un-map" a portfolio item.
-
How do I "un-map" a portfolio item to the curriculum as evidence?
To remove a curriculum mapping from a portfolio item:
1. Follow the mapping process - selecting an existing mapping will un-select that mapping (see below for an example).
2. Portfolio item mapped to the curriculum:
3. Select the highlighted FPC - this is now "un-mapped":
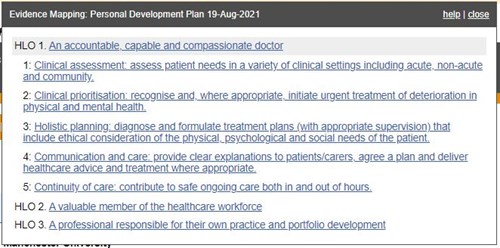
4. Select "close" in the top right-hand corner of the pop-up when you're finished.
-
How does mapped evidence show in the curriculum?
Any evidence that has been mapped to the curriculum will show as a list of items in Portfolio > Curriculum Overview, when the "Mapped evidence" toggle is selected.
Next to each Foundation Professional Capability (FPC) is a count of the number of the items mapped to it, in [square brackets].
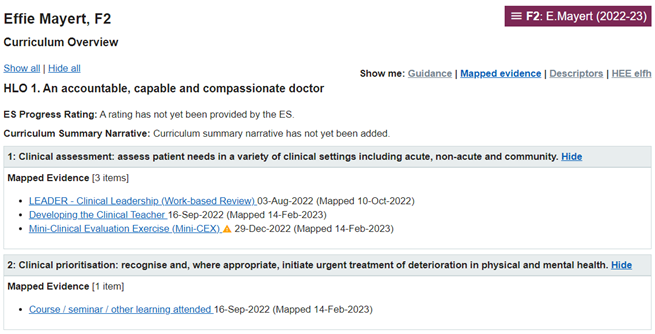
-
How can forms that have been mapped to the curriculum be identified?
Forms that have been mapped to the curriculum can be identified by the blue bookmark icon next to them in the portfolio "Contents" page.

-
Are there any limits associated with curriculum mapping on Horus?
Foundation doctors can map:
- a maximum of 10 portfolio items to a foundation professional capability (FPC)
- each portfolio item to a maximum of 3 FPCs
Learn about- mapping portfolio items to the curriculum
- un-mapping portfolio items from the curriculum
- the purpose of curriculum mapping
-
Can I download a report showing how each FD's rotation is progressing towards the minimum requirements of the curriculum?
As of April 2024, a new report was introduced to Horus ePortfolio. This report allows a user with administrator permissions to run the report at site/trust level. The report displays all foundation doctors (NTG rotations will not be included) within the selected site/trust, grade and academic year and shows how their rotation is progressing towards the minimum requirements of the curriculum.
User will only be able to run this report containing the same filters (same trusts/site, same grade and same academic year) every 3 hours.
Please note this report cannot be run at foundation school level. It can only be run at site or trust level.
-
Rating the curriculum
-
What is the curriculum progress rating form?
The curriculum progress rating form provides a simple and clear way for educational supervisors to support foundation doctors in monitoring achievement of the following ARCP requirement:
“Satisfactory completion of all FP curriculum outcomes” – “The F1/F2 doctor should provide evidence that they have met the foundation professional capabilities, recorded in the e-portfolio”
It is available to download as a blank form.
Learn about where the curriculum progress rating form is.
-
Who should complete the curriculum progress rating form?
Educational supervisors, foundation training programme directors and ARCP panel chairs have access to the "Curriculum progress rating" form for each foundation doctor they're assigned to/have location-based access to.
It is expected that in most cases the educational supervisor will complete the rating.
Learn more about
- what the curriculum progress rating form is
- where the curriculum progress rating form is
- who can view submitted curriculum progress ratings
- how to rate the curriculum
-
Who can view submitted curriculum progress ratings?
The educational supervisor's completed curriculum progress ratings can be viewed by anyone who has access to the foundation doctor's e-portfolio.
The ratings can be viewed in 3 places:
- Portfolio overview
- Summary of evidence report
- Curriculum
Learn more about
- who has access to a foundation doctor's e-portfolio
- what the curriculum progress rating form is
- where the curriculum progress rating form is
- how to rate the curriculum
-
Are educational supervisors required to rate the curriculum?
It is expected that educational supervisors will rate each of the 3 higher level outcomes of the curriculum or each section of the curriculum (depending on whether the foundation doctor is on the 2021 curriculum or the 2016 curriculum) as either satisfactory, partially met or not yet met [requirements] as part of their evidence for the ARCP panel to consider.
This is the simplest and clearest way for educational supervisors to confirm that foundation doctors have sufficiently evidenced their FP curriculum coverage.
Ratings appear in the "Summary of evidence report" for ARCP.
Learn more about
- what the curriculum progress rating form is
- where the ES rates an FD's curriculum
- what the "Summary of evidence report" is
-
Where is the curriculum progress rating form?
Only assigned educational supervisors have access to the "Curriculum progress rating" form for each foundation doctor.
There are 3 ways to access the form:
1. Portfolio Overview
1.1 FD portfolio > Overview > Select the ‘Reports’ tab and Scroll to the ‘Curriculum’ section
1.2.1 [For those on the 2021 curriculum] Under the ‘Curriculum progress ratings by Educational Supervisor:’ title and the list of the 3 higher level outcomes, select the ‘curriculum overview’ link and select ‘Rate progress now’ against the appropriate HLO.
1.2.2 [For those on the 2016 curriculum] Under the "Curriculum progress ratings by Educational Supervisor:" title and the list of the 4 curriculum sections, select the ‘curriculum overview’ link and select ‘Rate progress now’ against the appropriate HLO.
2. Summary of evidence report
2.1 FD portfolio > Overview > Select the ‘ARCP’ tab
2.2 Select the ‘Summary of evidence’ link
2.3 Scroll down to the ‘REQUIREMENT: Satisfactory completion of all FP curriculum outcomes’ section
2.4.1 [For those on the 2021 curriculum] Under the ‘Curriculum progress ratings by Educational Supervisor:’ title and the list of the 3 higher level outcomes, select the ‘curriculum overview’ link and select ‘Rate progress now’ against the appropriate HLO.
2.4.2 [For those on the 2016 curriculum] Under the "Curriculum progress ratings by Educational Supervisor:" title and the list of the 4 curriculum sections, select the ‘curriculum overview’ link and select ‘Rate progress now’ against the appropriate HLO.
3. Curriculum
3.1 FD portfolio > Curriculum
3.2.1 [For those on the 2021 curriculum] Under each HLO heading you will see an ‘ES progress rating’ section - select the ‘Rate progress now’
3.2.2 [For those on the 2016 curriculum] Under each curriculum section heading you will see an ‘ES progress rating’ section - select the ‘Rate progress now’
-
How does the curriculum progress rating form work?
The curriculum progress rating form is short and simple, it asks the educational supervisor to select one of the following four ratings:
- Not yet rated
- Satisfactory
- Partially met
- Not yet met
Select ‘Save changes’ when you have made your selection.
For those on the 2021 curriculum each HLO has a separate form and a rating needs to be provided for each HLO.
The form can be edited throughout the rotation (subject to the usual time limits).- The date the form was last saved and by whom is shown next to each rating.
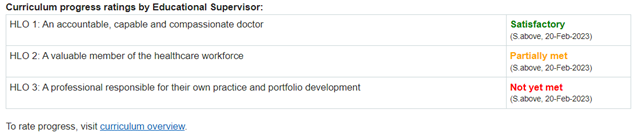
Learn more about
- what the curriculum progress rating form is
- who can rate the curriculum
- where the curriculum progress rating form is
- who can view submitted curriculum progress ratings
-
Curriculum summary narrative
-
What is the curriculum summary narrative?
The curriculum summary narrative is a form of written reflection that will help the foundation doctor to demonstrate to their Educational Supervisor that they have achieved the higher level outcomes of the curriculum.
Further guidance regarding the curriculum summary narrative can be found on the UKFPO website.
Learn more about how to add a summary narrative to a higher level outcome.
-
As a foundation doctor how do I add a summary narrative to a higher level outcome (HLO)?
Please note: summary narratives can only be added by the foundation doctors themselves.
To add a summary narrative, you should:
- Navigate to your curriculum overview page, Portfolio > Curriculum.
- Select the ‘Add summary narrative’ link against the necessary HLO.
- Type your narrative text into the text field.
- Select ‘Save changes’.
Repeat the above steps for each individual HLO.
-
As a foundation doctor how do I expand on or edit a summary narrative for a higher level outcome (HLO)?
To expand on or edit a curriculum summary narrative you should:
- Navigate to your curriculum overview page, Portfolio > Curriculum.
- Select the ‘Edit’ link against the necessary HLO.
- Add/edit your narrative text in the text field.
- Select ‘Save changes’.
-
Does the Foundation doctor complete a summary narrative for every placement or just once for the year?
The curriculum summary narrative is a live/working document and foundation doctors should start/update the summary narrative towards the end of each post. It is for the foundation doctor to critically appraise their post/year. The summary narrative is not pass/fail but formative, it is another form of reflection.
-
TAB basics
-
What is team assessment of behaviour (TAB)?
TAB is the Multi-Source Feedback tool that is used in the foundation programme. TAB comprises collated views from a range of multi-professional colleagues. It is mapped to the self-assessment tool with identical sections. Guidance is available on the UK Foundation Programme Office (UKFPO) website.
TAB is anonymous from the foundation doctor's perspective - they cannot see which ratings / comments were submitted by each assessor. Supervisors and administrators are able to see who submitted which ratings / comments but must not share this with the foundation doctor.
Learn more about
-
When and how often should TAB be done?
- TAB must take place at least once a year. Foundation schools have the option of increasing the frequency.
- TAB feedback must be gathered during a single placement and by the date specified by the educational supervisor
- TAB will normally be performed within 1st placement in order to allow time for any required remedial action. However if there are insufficient assessors within a placement to allow this the TAB should be completed within the first 6 months of the year of training.
- If there are any concerns about a foundation doctor which need to be addressed TAB should be repeated. Foundation schools have the option of altering the periodicity of TAB to satisfy local needs.
IMPORTANT NOTE: Local offices/foundation schools may issue specific windows of time during which they expect foundation doctors to complete TAB. Please refer to specific foundation school guidance to check whether any such windows apply to you.
-
What are the possible TAB outcomes?
The possible TAB outcomes are:
- Satisfactory
- Incomplete (within time limit)
- Invalid (incorrect number or mix of assessors)
- Unsatisfactory: anything other than trivial minor concern which does not require action will necessitate a repeat TAB
The educational supervisor will meet to review the TAB responses with the foundation doctor and if necessary arrange any additional support required to address concerns.
- Satisfactory means that this TAB will satisfy the ARCP TAB requirement. Where any other option is chosen a further TAB will need to be undertaken.
- Incomplete means fewer than 10 responses received within the time limit.
- Invalid means incorrect number or mix of assessors.
- Unsatisfactory means that the TAB contains non-trivial minor or major concerns (anything other than trivial minor concerns which do not require action will necessitate a repeat TAB).
Some trusts will require multiple TABs regardless of the TAB outcome - please consult local postgraduate centre for details.
Learn more about what TAB is.
-
What are the requirements for a valid TAB?
In order to be valid TAB must be completed at the correct time, with feedback from a sufficient number and mix of assessors.
Required mix of assessors
To ensure quality, a valid TAB requires a minimum of 10 assessors including at least four senior assessors comprising consultants / trained GPs and senior nurses. The named clinical supervisor will normally be one of the assessors.
The mix of assessors must include at least:
- 2 consultants or trained GPs. The named clinical supervisor should normally be used as an assessor. However, there may be occasional circumstances where this is not possible, hence, inclusion of the CS is not mandatory.
- 1 other doctor more senior than F2.
- 2 senior nurses (band 5 or above)
- 2 allied health professionals / other team members including ward clerks, secretaries and auxiliary staff.
The foundation doctor must complete a self-assessment of behaviour before inviting assessors to contribute to the TAB process. Self-TAB will include reflection on personal performance.
For each TAB, the foundation doctor should approach 15 assessors. Up to two foundation doctors may be used but attention must be paid to ensure an appropriate mix of assessors or the TAB will be invalid.
- Foundation doctors will count towards the 'allied health professional / other team member' category.
-
Are the requirements for a valid TAB different if I am in a placement with few colleagues?
No, the requirements for a valid TAB are not dependent on the placement you are in. The requirements for a valid TAB are as published and derogation is not allowed.
Learn about how TAB work in Horus.
-
Can other foundation doctors contribute to a TAB?
Yes - up to two foundation doctors may be used to contribute to the allied health professionals / other team members category but attention must be paid to ensure an appropriate mix of raters or the TAB will be invalid.
Horus has been programmed to only count up to two foundation doctors in the total number of responses. This means that if three foundation doctors are requested and all three respond, one will not count towards the overall total.
All responses will be available in the TAB results report.
Learn more about the
- requirements for a valid TAB
-
Starting and reviewing TAB
-
How does TAB work in Horus?
General principles for how TAB works in Horus:
- TAB is an anonymous multi-source feedback tool - foundation doctors cannot see which ratings / comments were submitted by each rater.
- TAB can technically be started at any point as long as the foundation doctor has a rotation assigned to them
- Local NHSE foundation school teams / local education providers may issue guidance as to when they expect foundation doctors to start TAB
- Only 1 TAB can be 'open' per foundation doctor at any one time
- TAB must be started by the foundation doctor
- The foundation doctor must complete their self-TAB before they can start the feedback process
- Once the foundation doctor has completed and submitted their self-TAB, they will have 45 days to gather responses.
- The foundation doctor can add assessors to their TAB before or after they submit their self-TAB
- They can continue to add / edit assessor details until either the relevant assessor has completed the TAB form, the TAB has expired or the TAB summary has been completed.
- Assessors will receive an automatic email from Horus with details about TAB and a link to complete the form
- Assessors don't need a Horus account to complete a TAB form
- The foundation doctor picks the assessor category; the assessor picks their position within that category.
- If the category is incorrect, the assessor should "decline to take part" using the link in the automatic email. They should select from the drop-down list which category they actually belong to.
- The foundation doctor will receive an automatic email with this information and will need to create a new entry for the assessor with the correct category.
- Assessors will receive an automatic reminder every week for 3 weeks to complete the TAB
- Foundation doctors can manually generate a new reminder every 24 hours
- Assessors cannot submit a TAB form once the TAB has expired or the TAB summary has been completed
- Administrators, foundation programme directors and supervisors can see the contents of submitted TAB forms.
- Educational supervisors are expected to complete the TAB summary at the end of the TAB process (but this can also be done by administrators and foundation programme directors).
- Foundation doctors cannot see the TAB summary until it has been completed
- Foundation doctors cannot see submitted ratings / comments until the TAB summary is released
- Foundation doctors cannot see who submitted which TAB rating / comment
- Foundation doctors can see who submitted ratings / comments
Learn more about
-
How do I start TAB?
TAB must be started by the foundation doctor.
- Select "Forms (start new) from your main menu and select "Team Assessment of Behaviour (TAB)" from the 'Mandatory forms for each year' section
- Select "Start new TAB"
- Complete your self-TAB
- If you already know the details of some/all of your assessors, enter their details below your self-TAB
- Select "Save (and review before submission)"
- Check you're happy with the contents of your self-TAB (if not, select "Make further changes")
- Select "Start TAB"
- On your Portfolio "TAB" you will see a summary of the TAB you have just started
Learn more about
- what to do if you start TAB by accident/when you didn't mean to
-
What should I do if I have started a TAB by accident/when I didn't mean to?
It is not possible to delete a TAB once it has been started. If a foundation doctor (FD) has started a TAB at a time they're not actually intending to complete a TAB (for example, by accident / through a misunderstanding in August, right at the start of their training year), we suggest the following steps are taken:
1. FD informs a local administrator/their educational supervisor (ES)
2. Admin/ES completes the TAB summary form with the following selections:
• Do you want to release the TAB summary to the foundation doctor? --> No
• Did the foundation doctor request at least the minimum range of TAB assessors as available within the placement? --> No
• Comment --> TAB started by mistake - please ignore
• TAB outcome --> IncompleteThe FD will be able to start a new TAB at any time once the TAB summary form for the previous TAB has been completed.
-
Can I edit my self-TAB once I've started a TAB?
Yes, foundation doctors can edit their self-TAB until the TAB expires or the TAB Summary form is completed - whichever is sooner.
To edit your self-TAB:
1. Portfolio > TAB
2. In the 'Actions' column on the right, select 'Self-TAB'
3. Select 'Make further changes' in the purple bar
4. Make the required edits
5. Select 'Save'
-
How do I see a foundation doctor's self-TAB?
Foundation doctors can see their own submitted self-TAB as follows:
- Portfolio menu > select 'TAB'
- In the 'Actions' column on the right, under 'Manage Assessors', select 'Self-TAB'
Educational supervisors, foundation programme directors and administrators can see the contents of a foundation doctor's self-TAB via the foundation doctor's TAB overview page
-
How do I see TAB forms submitted about a foundation doctor?
Administrators, foundation programme directors and educational supervisors can see the contents of submitted TAB forms:
1. Admin menu > Overviews > TAB. In the 'Actions' column on the right, select 'Assessors'.
OR
1. Foundation doctor's portfolio > TAB. In the 'Actions' column on the right, select 'Manage Assessors'.
2. Scroll to the 'Assessors who have completed a TAB form' section.
3. In the 'View answers' column on the right, select 'View' in the required assessor's row. (If the TAB has expired, assessors who did not submit a TAB form will also show in this list but will not have a 'View' option.)
-
How do I see the mix and number of assessors who have been requested and/or responded to a TAB?
A TAB 'assessor analysis' report is generated automatically when a foundation doctor starts a TAB.
It can be accessed in three ways:
1. Foundation doctor's portfolio > TAB - in the 'Assessors' column
2. Admin menu > Overviews > TAB - in the middle columns (between 'Date' and 'Satisfactory')
3. Admin menu > Overviews > TAB. In the "Actions" column on the right, select "Results". The assessor analysis is the first column.
The assessor analysis report
- is always visible to the foundation doctor (through their portfolio only), ES, FPD and administrators
- shows list of basic TAB assessor number and mix requirements and whether they have been met
- does not indicate a satisfactory TAB - this can only be done by completing the TAB summary form
Key to the assessor analysis report
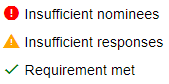
Learn about the TAB summary form.
-
In the TAB assessor analysis table, why does the "Total" not always tally with the number of responses in the different categories?
The "Total" number of responses received will equal the sum of responses received within each category UNLESS more than 2 foundation doctors have responded.
Horus has been programmed to only count up to two foundation doctors in the total number of responses. This means that if three foundation doctors are requested and all three respond, one will not count towards the overall total.
All responses will be available in the TAB results report.
Learn more about other foundation doctors contributing to TAB.
-
Can I send a reminder to a TAB assessor to complete TAB feedback?
Yes, you can send a reminder from Horus to a TAB assessor who is yet to complete feedback that has been requested. Note:
- Horus sends automatic reminders. You can only send a manual reminder once every 24 hours (either since the last automatic reminder or since your last manual reminder).
To send a reminder:
- Portfolio > TAB.
- Select 'Manage Assessors' for the relevant TAB.
- Scroll down to the 'Assessors who have not yet completed a TAB form' section and select 'Send reminder email' next to the relevant assessor (remember, this button will only be available if it's been more than 24 hours since the last reminder email was sent).
-
How do I add more TAB assessors and edit or remove existing TAB assessors?
More TAB assessors can be added to an open TAB (that is, not yet expired, TAB summary not yet completed):
- Portfolio > TAB
- Select "Manage Assessors" in the right hand 'Actions' column
- Scroll down to the list of "Assessors who have not yet completed a TAB form"
- Select "Add new assessor", enter their details and select "Save Changes".
The details of existing TAB assessors can be edited in an open TAB (that is, not yet expired, TAB summary not yet completed), as long as the assessor has not yet completed their TAB form:- Portfolio > TAB
- Select "Manage Assessors" in the right hand 'Actions' column
- Scroll down to the list of "Assessors who have not yet completed a TAB form"
- Find the relevant assessor and edit their details as required
- Select "Save Changes"
- The assessor will receive a new email inviting them to complete the assessment.
The details of existing TAB assessors can be removed in an open TAB (that is, not yet expired, TAB summary not yet completed), as long as the assessor has not yet completed their TAB form:- Portfolio > TAB
- Select "Manage Assessors" in the right hand 'Actions' column
- Scroll down to the list of "Assessors who have not yet completed a TAB form"
- Find the relevant assessor and select "Remove the item above"
- Select "Save Changes".
-
How are TAB results displayed in Horus?
A TAB results report is generated automatically when a foundation doctor starts a TAB. It can be accessed in two ways:
- FPDs/ADMINISTRATORS ONLY:
Admin menu > Overviews > TAB. In the "Actions" column on the right, select "Results". - ALL USERS:
Foundation doctor's portfolio > TAB. In the "Actions" column on the right, select "Results".
The results report
- is not automatically visible to the foundation doctor
- is always visible to the ES, FPD and administrators
- shows:
- assessor analysis (list of basic TAB assessor number and mix requirements and whether they have been met)
- assessor list (name and role of all assessors who have been sent a TAB request and the status of their feedback ([Date completed] OR [Not completed]))
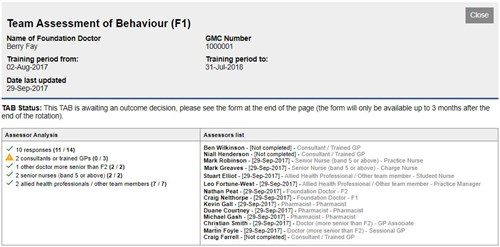
- for each of the four domains of TAB:
- the foundation doctor's self-rating and comments (if any)
- anonymised team ratings (RAG-coloured bar chart)
- anonymised team comments
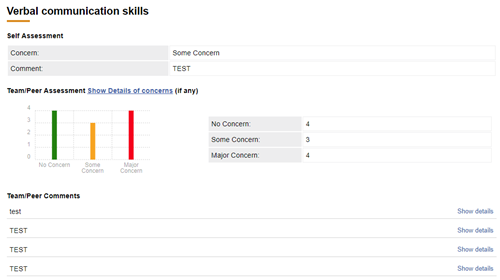
- can be released to the foundation doctor by completing the "TAB summary" form
- Until this has been done, foundation doctors will not have access to the results.
In exceptional circumstances the ES may choose to not release the TAB results report to the foundation doctor.
Learn about the TAB summary form.
- FPDs/ADMINISTRATORS ONLY:
-
What happens if an assessor submits a TAB form with errors or inappropriate content?
If an assessor submits a TAB form with errors or mistakes (for example, for the wrong foundation doctor or with a wrong option selected - "major concern" instead of "no concern"), there are two options to rectify the issue - administrator permissions are required for both.
Option 1: It is possible to "exclude feedback" from the TAB summary.
- The TAB form will remain on the foundation doctor's e-portfolio but the anonymised contents will not be available to the foundation doctor and will not be included in the TAB summary.
- This can be done/undone at any point before or after the TAB summary has been released.
- Excluding forms should only be used in exceptional circumstances; that is, if the feedback received is genuinely out of line with all other feedback and is considered to not contribute constructively to the foundation doctor's development.Option 2: If the TAB summary has not yet been completed, it is possible to "clear answers".
- This will essentially delete the TAB form and should the assessor / foundation doctor want the form completed again, the foundation doctor will need to send a new request to the assessor using the standard process.
- Once cleared, the original form cannot be recovered.
- The assessor and the foundation doctor will receive an email confirming that the TAB form has been cleared.
- If the TAB summary has been released, it is not possible to clear any TAB forms.
- Clearing answers should only be used in exceptional circumstances; that is, if a genuine mistake has been made. It is not intended for this process to be used to delete unfavourable responses.Note: This option is available to administrators only - if you are a supervisor, please contact your local postgraduate centre e-portfolio administrator.
Method: (either option)
1. Navigate to the relevant foundation doctor's TAB "Assessors" list through the foundation doctor's Portfolio > TAB section (administrators can also access this through the TAB Overview in the Admin menu).
2. Select "View" next to the relevant assessor's name in the "Assessors who have completed a TAB form" section of the page.
3. Scroll to the bottom of the page - you will be presented with the option to "Exclude feedback" (if you are a supervisor) and to "Clear answers" (if you are an administrator).
4. Select the relevant option. You will be presented with a pop-up message - please read this and ensure that you understand the consequences of proceeding.
5. If you are certain you want to continue, select "Exclude form from summary" (if you selected option 1) or "Clear the answers" (if you selected option 2). You also have the option of cancelling your request at this stage.
6. Forms excluded from the TAB summary will be labelled as "Excluded" in the 'Date completed' column in the "Assessors" screen. They can be included in the summary again by following the same method (the button will now say "Include form in summary).
-
As an administrator, how do I move a foundation doctor’s TAB from one rotation to another?
If a foundation doctor (FD) has accidentally started a new TAB in an incorrect rotation (for example, an F2 doctor starting TAB in their previous F1 rotation), administrators can move the whole TAB:
- The FD has to have completed their self-TAB and 'started' the TAB (so the 45 day countdown starts).
- Find the TAB in the previous rotation (see how to view forms for a previous rotation) - the date the TAB was started should make it obvious that it's in the wrong rotation.
- Select 'Manage Assessors' on the right.
- Scroll to the bottom of the page that appears. You will find the 'Change rotation' option here, in grey font.
- Select 'Change rotation'
- You will see a list of all the rotations assigned to that FD. Select the rotation to which the TAB actually belongs (that is, the current one, in most cases).
- You will see a green notification confirming the change has been made.
-
Completing TAB
-
What happens when a TAB expires?
Foundation doctors have 45 days to collect all TAB responses once they have submitted their self-TAB. Once the 45 days are up, the TAB will be shown as "expired".
When a TAB is expired:
- further responses cannot be requested
- further responses cannot be submitted
- the TAB summary can be completed
- the TAB can be extended (see terms and conditions for this)
Learn more about the TAB summary form.
-
When I click on the link in my email to complete the TAB assessment, the page that is opened reads “Sorry, this link is no longer valid”. What does this mean?
When you have received a TAB request and, upon clicking the link, you are sent to a Horus page with the text ‘Sorry, this link is no longer valid’, this could be for a number of reasons:
- The email you have opened may be older than 1 week.
- Each Horus assessment / SLE request link is valid for 1 week only.
- If so, check your inbox and/or spam and junk folders for a more recent TAB request - Horus sends a new request every seven days and all previous links will no longer work.
- You may be attempting to respond to a TAB that has expired and/or has been completed.
- If so, you will not be able to respond to this TAB.
- The foundation doctor may have removed you as an assessor and no longer requires you to complete a TAB assessment.
- If so, you will not be able to respond to this TAB.
If you wish to clarify why the link does not work, please contact the Foundation Programme/postgraduate centre administrator at the foundation doctor’s trust. They are able to check the status of the relevant TAB.
- The email you have opened may be older than 1 week.
-
Can TAB be extended beyond the original 45 days?
Yes, in exceptional circumstances TAB can be extended beyond the original 45 day time limit. This can only be done by an administrator or FPD. It is expected that the majority of foundation doctors will complete their TAB within the original 45 days. Extensions should be agreed between the ES and the FPD.
TAB can be extended only if:
- the original 45 days have passed
- the TAB summary has not been completed
To extend a TAB, the administrator / FPD should:
- Access the "TAB Overview" page from the Admin menu
- Find / search for the relevant foundation doctor
- If an extension is possible (see parameters above), in the "Date" column there will be a hyperlink option to "extend time limit" - select this
- TAB can be extended by 7, 14 or 21 days - select the required option from the drop-down list
- Select "Save changes"
Note: TAB can only be extended once the original 45 days has ended
TABs can be extended as many times as required, as long as the required parameters are in place.
Note that this feature is designed for use only in exceptional circumstances. If the foundation doctor simply ran out of time and there are no extenuating circumstances, they should receive a TAB outcome of "incomplete" and be asked to complete a new TAB in their next placement.
Learn more about
-
What is the TAB summary form?
The TAB summary form is the educational supervisor's assessment of a foundation doctor's TAB. See a blank version of the form.
Learn about who should complete the TAB summary form.
-
Who should complete the TAB summary form?
The educational supervisor will meet to review the TAB responses with the foundation doctor and if necessary arrange any additional support required to address concerns.
In Horus, the TAB summary can be completed by the educational supervisor, foundation programme director or administrator. In most cases it will be the educational supervisor who completes the TAB summary. Colleagues should agree in advance who will review the TAB feedback and complete the TAB summary form.
Learn more about
-
Where is the TAB summary form?
If it has not yet been completed, the TAB summary form is found at the end of the TAB results report.
If it has been completed, the answers given in the TAB summary form are found at the start of the TAB results report.
Learn about the TAB results report.
-
When can a TAB summary form be completed?
A TAB summary form can be completed at any time
- from when the foundation doctor starts the TAB
- until 3 months after the end of the rotation in which it was started
The TAB summary does not have to be completed during the 45 days that the TAB is open. In fact, it is advisable to wait until the TAB has expired to complete the TAB summary, to ensure that all awaited responses have been received.
Learn about how to complete a TAB summary form.
-
Can the TAB Summary be completed after the TAB has expired?
Yes - in fact, it is advisable to wait until a TAB has expired before completing the TAB Summary. This is to give the foundation doctor the maximum chance to gather responses.
The TAB Summary can be completed up to 3 months after the end of the rotation during which it was started - that is, up to 3 months after the end of for example foundation year one (FY1).
Learn more about how long before/after placements and rotations forms can be completed.
-
How do I complete a TAB summary form?
Completing the TAB summary will close the TAB and no further changes will be possible.
To complete a TAB summary form:
- Access the relevant foundation doctor's TAB results report. Instructions available here.
- Review the report.
- Scroll to the bottom of the page until you see the "TAB summary form" heading.
- Complete all the mandatory fields in the form, paying careful attention to the guidance, "i" info text and notifications (pop-ups) within the form.
- Check all of your entries to ensure you are happy with them.
- IMPORTANT NOTE: Once you select "Save changes" you will not be able to make any further changes to this TAB Summary and the foundation doctor will not be able to receive any further TAB responses. Please ensure no further changes are expected to this TAB before you save this TAB Summary.
- If you are sure, select "Save changes".
-
What rules allow TAB feedback to be released to the relevant foundation doctor?
TAB feedback can only be released to the relevant foundation doctor if 8 or more responses have been received. Any TABs with fewer than 8 responses cannot be released to the foundation doctor.
Selecting "Yes" to the question 'Do you want to release the TAB summary to the foundation doctor?' in the TAB summary form does not automatically indicate a satisfactory TAB.
The educational supervisor may choose to release an unsatisfactory TAB with 8 or 9 responses if they feel the feedback received will be useful for the foundation doctor's personal development, even though they will be required to complete another TAB in their next placement.
See a blank version of the TAB summary form.
Learn more about
-
What rules allow the "Satisfactory" outcome to be selected in the TAB summary form?
NOTE the requirements for a valid TAB.
Conditions that allow the selection of “Satisfactory” for the 'TAB Outcome' in the TAB summary form are:
- at least 10 responses
- at least 2 consultants or trained GPs
- at least 2 senior nurses (band 5 or above)
- at least 2 AHPs/others
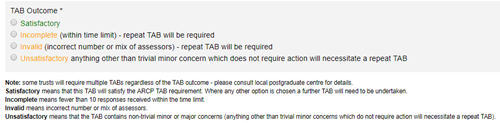
Learn more about how to complete a TAB summary form
-
Can TAB be edited once the summary has been completed?
No, for the most part TAB can't be edited once the summary has been completed. Once the summary has been completed, the following are no longer possible:
- Adding more responses
- Editing responses
- Changing the contents of the summary form (e.g. outcome or comments)
This is to make sure all the TAB responses remain anonymous.
The only change that can be made to TAB once the summary has been released is:
- Feedback submitted before the TAB closed can be excluded (or included again)
Learn more about
-
My TAB has expired - why can't I see my results?
You can only see your TAB results if your TAB summary form has been completed by your educational supervisor, foundation programme director or postgraduate centre administrator.
Note that you can only see the feedback you received from your colleagues if your supervisor has chosen to release these to you. It is not possible to release feedback unless at least 8 individuals have responded.
Learn more about
-
What do I do if a foundation doctor has not got enough TAB responses and needs to repeat TAB in the next placement?
Only 1 TAB can be 'open' per foundation doctor at any one time. To allow a foundation doctor to start a repeat TAB, their ES (or FPD/administrator in some trusts) must complete their TAB summary form.
If the only reason that the foundation doctor has to repeat TAB is because they did not receive enough responses in the preceding TAB, the following options should be selected in the TAB summary form:
- Do you want to release the TAB summary to the foundation doctor?
If 8 or 9 responses received and they are appropriate for the foundation doctor to view - Yes
If less than 8 responses received - No- Did the foundation doctor request at least the minimum range of TAB assessors as available within the placement?
Yes/No as appropriate- TAB outcome
IncompleteIMPORTANT NOTE: Once you select "Save changes" you will not be able to make any further changes to this TAB Summary and the foundation doctor will not be able to receive any further TAB responses. Please ensure no further changes are expected to this TAB before you save this TAB Summary.
If you are sure, select "Save changes".
-
Can I map my TAB Summary to the curriculum?
A completed and released TAB Summary can be mapped to the curriculum.
A TAB Summary that
- has not been completed (that is, the form has not been filled in and submitted) OR
- has been completed but was not released (that is, 'No' was selected for the question 'Do you want to release the TAB summary to the foundation doctor?')
cannot be mapped to the curriculum.1. Portfolio > TAB
2. If your TAB Summary has been completed and released, you will see the 'map to curriculum' option just under the 'Results' button
3. Select your mappings as with any other form
Learn more about curriculum mapping.
-
What are the mandatory certificates for the Foundation Programme?
Foundation doctors are required to
- upload the following certificates using the 'Mandatory Certificates' form (one form for each certificate) in their e-portfolio and
- have each one 'approved' by a supervisor or administratorto be eligible for a successful ARCP outcome:
2021 Foundation Programme Curriculum
- PSA (F1 only)
[Prescribing Safety Assessment]
2016 Foundation Programme Curriculum
- PSA (F1 only)
[Prescribing Safety Assessment] - ILS / Equivalent (F1 only)
[Immediate Life Support] - ALS / Equivalent (If completed in F1, ILS not required)
[Advanced Life Support]
All other certificates and achievements should be uploaded using one of the 'Additional achievement' forms:
- Course / seminar / other learning attended
- Exam
- Extra-curricular achievement
- Interesting Case
- Procedure (non-core)
- Publication
- Research
- Taster
- Teaching others
Blank versions of these forms can be found here.
- PSA (F1 only)
-
How do I upload a mandatory certificate?
Only foundation doctors/NTGS are able to upload mandatory certificates to their portfolio.
1. Forms (start new) > scroll down to 'Mandatory forms for each training year (rotation)' > select 'Mandatory certificate'
2. Select 'Create' against the appropriate rotation and complete the fields in the form
3. Select 'Choose File' in the 'Certificate' field > find the relevant file on your computer > select 'Open'.
You can only upload 1 document to each 'Mandatory certificate' form.
You don't have to upload a document to submit the form, but your trust may require you to do so to be able to approve your completion of the relevant certificate.4. If you have selected a document of the correct format and size (see the 'Tips' section in this form or here), you will see the title of your uploaded document within your form.
5. You can replace this document by selecting the 'Choose File' button again (or remove it after saving as draft by using the tick box just below the 'Certificate uploaded' field).
6. You can leave the form as draft by selecting 'Save (and leave as draft)' or complete it by selecting 'Save (and review before submission)' and then 'Mark as complete' on the next page (as with all other forms).
7. Once you have marked your form as complete, your supervisor or administrator can approve your certificate.
Mandatory certificates can only be mapped to the curriculum and will only show as completed in the summary of evidence report for ARCP if they have been approved.
Mandatory certificates are listed on your portfolio 'Contents' page, along with all your other forms.
Learn more about
- what mandatory certificates in Horus are
- time limits for adding documents to Horus
-
What should I record for my PSA expiry date?
The "expiry date" field in the Mandatory Certificate form is a required field - you have to enter a value.
For the PSA (Prescribing Safety Assessment), you should enter the last date of the F1 year, as per the advice on the PSA website (go to the "FAQs" tab in 'Resources' and select the question "How long is passing the PSA valid for?").
-
How do I approve or reject a mandatory certificate?
Mandatory certificates can only be mapped to the curriculum and will only show as completed in the summary of evidence report for ARCP if they have been approved.
They can only be uploaded by foundation doctors/NTGs and can only be approved or rejected by educational supervisors, administrators and FPDs.
1. FD > Portfolio Overview > Scroll down to the 'Mandatory Certificates' section almost at the end of the page
Or
FD > Portfolio Contents > Filter for 'Mandatory Certificates'
2. Select the relevant form
3. Check the uploaded certificate (it will either open in a new browser tab or download to your computer)
4.1 If it is correct and valid, select the 'Approve' button
--> This certificate will be considered 'valid' up until the expiry date specified.
4.2 If it is not correct or valid, select the 'Reject' button.
Enter a message to the foundation doctor explaining why you have rejected the certificate.
Select 'Reject' again.--> Rejecting the certificate will allow the foundation doctor to edit the form and make the required corrections.
-
Where are completed mandatory certificate forms listed?
Mandatory certificates are listed on the FD Portfolio 'Contents' page, along with all other forms.
They can also be found
1. Near the bottom of the FD Portfolio 'Overview' page
2. Linked to the ARCP summary of evidence report
-
Can administrators see an overview of all mandatory certificates?
Yes - Admin menu > Overviews > Mandatory Certificates.
The filters and sorting work in the same way as all the other report and overview pages.
Certificates can be approved from this screen as follows:
1. Find the relevant foundation doctor
2. Select the name of the relevant certificate
3. You will be taken to the certificate itself - now follow the approval process
-
Can a mandatory certificate be mapped to the curriculum?
Mandatory certificates can only be mapped to the curriculum and will only show as completed in the summary of evidence report for ARCP if they have been approved.
Learn about how to approve mandatory certificates.
-
Personal learning log (formerly mandatory teaching log)
-
What is the personal learning log?
Please refer to the UKFPO website for a full explanation of the personal learning log.
Please note: the personal learning log was previously named mandatory teaching log.
-
Who should I contact if I have a question about the logging of personal learning?
If you are a foundation doctor: Contact your local Horus ePortfolio administrator (this will usually be your local postgraduate centre administrator).
If you are a postgraduate centre administrator: Contact your local foundation school administrator.
If you are a foundation school administrator: Contact your local foundation school manager/director.
-
How do I log personal learning on Horus?
Information about what the personal learning log is.
- Portfolio > personal learning log [or Forms (start new) > personal learning log]
- Select 'Start new form'
- Complete the fields in the form
- Log learning hours rounded to the nearest half hour
- Add any notes and attachments (these are optional and it is not required to upload evidence of attendance) - Select 'Save changes'
- Select 'Make further changes' to edit the form or select 'Mark as complete' if you want to add the form to your log
-
Does personal learning need to be verified by an administrator before it is added to the personal learning log?
Personal learning does not need to be verified by an administrator. When a foundation doctor creates and completes a personal learning form it is automatically added to the log and total learning hours are calculated accordingly. The total amount of hours logged will often be cross-checked against trust records though.
-
Can I log completed e-LfH modules as part of my personal learning?
Yes, completed e-LfH modules can be added to your personal learning log.
There are two ways to log completed e-LfH modules:
A) Directly from your list of completed e-LfH modules (if you have linked your Horus account to your e-LfH account)
- Portfolio > e-LfH
- Select 'Add' in the "Add to teaching log" column next to the required e-LfH module
- Follow steps 3-6 here (please check the accuracy of any pre-populated fields)
B) As a general learning log (if you haven't linked your Horus account to your e-LfH account)
Any other e-learning can be logged in this same way.
-
How do I see how much personal learning has been logged?
Horus counts the number of hours (core, non-core and total) logged, visible to all users with access to the relevant FD's account, on the following pages:
- Portfolio Overview
- Portfolio 'Personal learning log' landing page
- Summary of evidence report

Users with administrator permissions (including FPDs and FSDs) also have access to the Personal learning log "form count" report.
- Can I edit or delete any logged learning?
-
Can I map a personal learning log to the curriculum?
Yes - personal learning logs can be mapped to the curriculum:
- Portfolio > Personal learning log
- Select 'map to curriculum' in the 'Details' column next to the relevant log
- Follow steps 4-8 here
-
Where can I see personal learning logs?
Completed personal learning logs can be seen on the 'Personal learning log' portfolio landing page. They do not show on the 'Contents' portfolio landing page.
Personal learning logs in draft can be seen on the foundation doctor's/NTG's home page (by the FD/NTG only - administrators and trainers will not see this).
-
Can I upload evidence to my personal learning log?
Yes, you can upload evidence in the same way you can to other forms.
Uploads are optional and it is not required to upload evidence of attendance.
Learn more about uploading an external document
-
Do teaching hours logged during a FiY1 placement count towards the minimum amount needed for F1?
Whilst mandatory teaching during a FiY1 placement is considered valuable towards your foundation training, the hours logged do not count towards the minimum amount of hours needed during F1. This will be reflected in the mini reports on the mandatory teaching log overview page and the portfolio overview page.
Please note that whilst the mini reports mentioned above have been updated to reflect this change, the mandatory teaching log form count report has not and will show all teaching hours logged during an F1 year (including any FiY1 placements).
-
NHSE elearning for healthcare - Technical
-
Is there a link between Horus and NHSE elfh?
Yes - Horus can connect to your NHSE elearning for healthcare (NHSE elfh) account and import information about any courses you complete within NHSE elfh. These can then be mapped to the curriculum as part of your evidence for the achievement of a specific foundation professional capability (FPC).
Learn more about how to link Horus and NHSE elfh.
-
How do I link my Horus account to my NHSE elfh account?
Horus to NHSE elfh account linking can only be performed by foundation doctors/NTGs (that is, administrators or supervisors cannot do this on behalf of FDs/NTGs).
Until FDs/NTGs make this link, their "NHSE elfh" portfolio page will show

1. Portfolio > elfh
2. Read the guidance and tick the checkbox to confirm you have read and taken the appropriate steps before connecting the two accounts
3. Select 'Continue to elfh account linking'
4. Select the 'Link accounts' option
5. You will be taken to the NHSE elfh website - login using your NHSE elfh login details
6. Give your permission for data to be shared by NHSE elfh with Horus.
7. Your account will now show
**If you are a FD working in England you should have login details for NHSE elfh. If you have not received login details please visit the NHSE elfh support site for further information.**
Learn more about
- linking to Horus if you have an OpenAthens account
- which NHSE elfh courses are relevant to each curriculum outcome
-
Can I link my NHSE elearning for healthcare account to Horus if I access the NHSE elfh Hub using OpenAthens?
If you have an OpenAthens account you will need to contact the NHSE elfh helpdesk, who will convert it to an NHSE elfh account for you. When it has been converted, your NHSE elfh account can be linked to Horus.
Learn more about the link between Horus and NHSE elfh.
-
Which NHSE elfh courses can be viewed in Horus?
Any courses you have attempted in NHSE elfh:
- during your current rotation
- up to 1 month before the start of that rotation
[No courses completed before July 2017 can be viewed.]
See the NHSE elfh support site for information about how to create a report of all of your NHSE elfh activity through NHSE elfh.
New data is imported from NHSE elfh to Horus every day between 06:30 and 08:00. This means you may need to wait up to 24 hours to see your recent NHSE elfh activity in Horus.
-
Which NHSE elfh courses can be mapped to the curriculum?
You can map to the curriculum any NHSE elfh courses that appear in your Horus account that
- you have marked as "complete" in NHSE elfh
And
- you completed in more than 5 minutes
-
I'm experiencing technical issues linking my NHSE elearning for healthcare account to Horus. Who should I report this to?
If you experience any technical issues linking your Horus and NHSE elfh accounts (or any other technical issues regarding your NHSE elfh information in Horus), first check other FAQs on this support site - we may already have answered your question.
If, after checking the support site, you think you have completed courses that should have appeared in Horus but you can't see them, or you cannot link your accounts, please send full details to the Horus Helpdesk (not NHSE elfh). NHSE elfh are not able to help with queries that are related to Horus.
Learn more about linking to Horus if you have an OpenAthens account.
-
My NHSE elfh modules aren't syncing correctly with Horus ePortfolio
There are many reasons that your NHSE elfh modules aren’t syncing correctly with your Horus account. The main reasons for this could be:
- Your NHSE elfh account and your Horus ePortfolio account have not been connected. Learn more about how to connect your NHSE elfh account to your Horus account here. You can check if your accounts are linked by navigating to the NHSE elfh page of your Horus account (Portfolio > e-LfH). Linked accounts will show as 'e-LfH account status: Connected'.
- The NHSE elfh activity was completed on the same day you're checking Horus. Any new NHSE elfh content is only transferred to Horus once every 24 hours.
- The NHSE elfh content was completed more than 1 month before the start date of your rotation (find out more here). If the modules were completed more than 1 month before the start of your rotation, they will not be synced with your Horus account.
- You have multiple NHSE elfh accounts and Horus is connected to one and the modules have been completed in another. You should contact the NHSE elfh helpdesk (https://support.e-lfh.org.uk/home/) and they will be able to merge the two NHSE elfh accounts into a single account. Once this has been done you should allow 24 hours for the content to start syncing with your Horus account. If this does not happen you should contact the Horus ePortfolio Servicedesk and they will be able to remove the link between your NHSE elfh account and your Horus account.
If you have ruled out the above reasons you should contact the Horus ePortfolio Servicedesk with a copy of your activity report from NHSE elfh.
-
As a trust administrator, how do I report on NHSE elfh modules completed by FDs?
You can see the NHSE elfh modules an individual foundation doctor (FD) has completed by going to the FD's portfolio and selecting the "elfh" sub-menu. Note which NHSE elfh courses can be viewed in Horus.
To report on NHSE elfh modules completed by all your FDs, you should use the reporting at organisation level functionality in NHSE elfh itself.
Horus does not offer reporting of NHSE elfh module completion for all FDs at a hospital or trust.
-
HEE elearning for healthcare - General
-
Which NHSE elfh courses are relevant to each curriculum outcome?
The NHSE elfh courses considered specifically relevant to each curriculum outcome ('foundation professional capability' or 'FPC') are shown on each foundation doctor's Horus ePortfolio 'Curriculum' page.
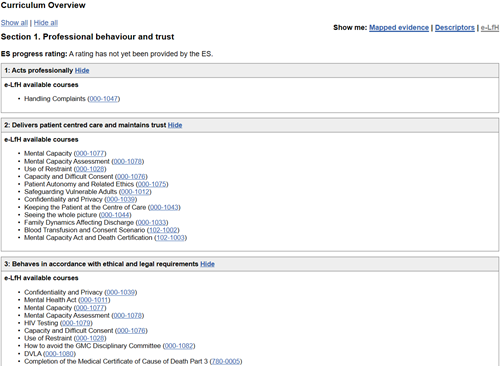
You can select the link next to each FPC and you will be taken directly to the course on the NHSE elfh website.
Many other NHSE elfh courses may also be relevant and useful to support learning during the foundation programme.
Learn more about how to link your Horus account to NHSE elfh
-
How do I evidence achievement of other e-learning (not in NHSE elfh)?
Any courses that you complete within NHSE elfh can be viewed in Horus. Learn more about how to link your NHSE elfh account to Horus.
Any courses that you complete on other e-learning platforms (for example, SCRIPT) can be evidenced in Horus in the following way:
1. Forms (start new)
2. Scroll down the page to the "Additional Achievements" section
3. Create a new "Course / seminar / other learning attended" form
4. Give the form an appropriately descriptive title
5. Upload your e-learning certificate / evidence of completion
6. Complete the other free text parts of the form as appropriate
7. Save the form
8. Check the contents and 'Mark as complete' when you're ready
9. (Optional) Map the form to the relevant section of the curriculum
-
Concerns management
-
What are "concerns" in Horus?
Assessors/supervisors can raise concerns ("some concern" or "major concern") about a foundation doctor in the 7 assessment forms on Horus: Core Procedures; Self-TAB; TAB feedback form; PSG feedback form; CS end of placement report; ES end of placement report; ES end of year report
Foundation doctors, supervisors and administrators (as appropriate in each individual case) need to review any concerns raised and deal with them as required. In January 2019 a "concerns management" feature was added to Horus, to allow users to easily spot any forms where concerns have been raised and thereby support the relevant foundation doctor in a timely manner.
-
How are "concerns" displayed in Horus?
Concerns are displayed on a number of Horus pages (visible to users with the relevant permission(s)):
- Admin menu > Foundation Doctors - next to the FD doctor's/NTG's name
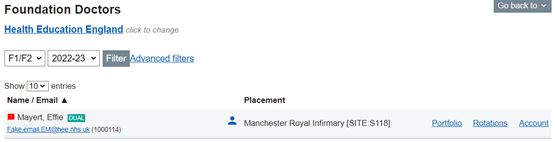
- Trainer menu > Supervising - to the right of the FD's/NTG's name
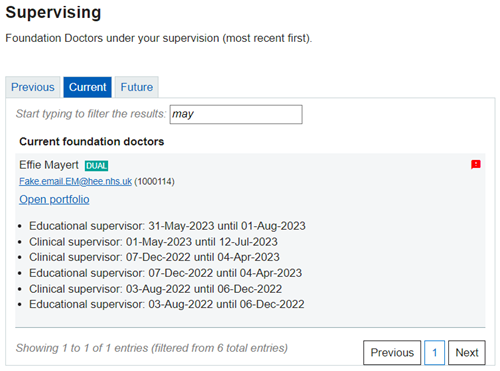
- Portfolio > Contents - next to the form that contains the concern(s)

- Portfolio > Concerns - each concern is listed individually, grouped against the form in which it was raised

- ARCP Panels - Next to the individual foundation doctor's name
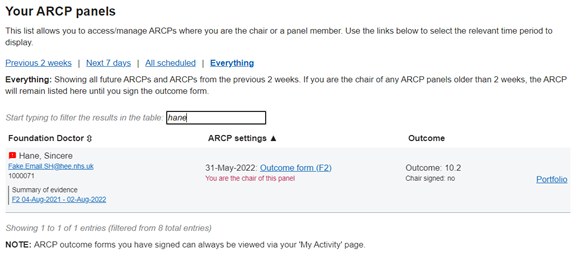
-
How do I view a list of only Foundation Doctors/NTGs who have concerns?
1. Admin menu > Foundation doctors
2. Advanced filters
3. ‘Concerns?’ drop down > select "Only concerns"
4. Select "Filter"
Foundation doctors/NTGs can also be filtered by concerns on the following pages:
- Mandatory Certificates
- Overview page
- TAB Overview page
- ARCP Overview page
- Foundation Doctors Account Activation page
Learn more about What should happen if a foundation doctor receives a "concern" in Horus? and Who can 'manage' concerns in Horus?.
-
What should happen if a foundation doctor receives a "concern" in Horus?
The UKFPO and the foundation programme curriculum describes in detail how to manage foundation doctors (FDs) about whom concerns are raised. This section describes the administrative actions that can be taken in Horus if concerns are raised about a foundation doctor in one of the seven assessment forms.
IMPORTANT NOTE: The information below is not intended to be an educational support guide to managing concerns.
When a concern is raised in Horus, it will be visible to the FD/NTG, their supervisor(s), foundation programme director(s) and administration team (in the local postgraduate centre and in the local NHSE office). See how concerns are displayed in Horus.
Once concerns have been discussed with the relevant FD/NTG and an action plan/resolution is agreed, the relevant supervisor or administrator should 'follow up' the concern(s) in the concerns management page.
- FD's/NTG's portfolio > Concerns (second option from the bottom)
- Select "View/Update" next to the relevant concern
- Enter notes (mandatory) - could be to describe the discussion, the action plan, the outcome; whatever is most useful to the individuals involved.
- Decide on a new status for the concern - your options are
- unresolved
- resolved
- deferred
To leave the concern as unresolved, don't check the box or enter a date to defer until - just select "Save Changes".
To resolve the concern, check the box next "Resolve this concern" and select "Save Changes".
To defer the concern, select a date from date widget next to "defer this concern until" and select "Save Changes".
Each 'follow up' is recorded as a separate entry against the concern. The latest follow up overrides the previous ones.
-
Who can 'manage' concerns in Horus?
Concerns can be managed by any user (except FDs/NTGs themselves) who has access to the portfolio item in which the concern was raised.
In effect this means any previous or current supervisor, foundation programme director or administrator (trust or foundation school).
All concerns management activity is logged in the FD/NTG's portfolio and can be viewed by all with authorised access (see above).
-
Is there a time limit to 'manage' concerns in Horus?
No, concerns can be 'managed' (that is, their status changed by adding a 'follow up') at any time.
-
Can a concern follow up be edited or deleted?
Currently, no - once you submit a concern 'follow up' it cannot be changed. It can always be overridden by a new follow up though.
-
Why are some concerns marked as "auto-resolved"?
Concerns labelling and management functionality became available in NHSE Horus in December 2018. All concerns raised since the launch of NHSE Horus are now labelled, including any raised during the 2017-18 training year. To reduce administration time, we have marked all concerns raised in rotations ending before August 2018 as "auto-resolved". If required, these concerns can be 'opened' again.
Note that any rotations that started during 2017-18 but end during 2018-19 have not had their concerns auto-resolved.
-
PSG basics
-
What is the placement supervision group (PSG)?
Information about what the placement supervision group (PSG) is and what their responsibilities are can be found in the foundation programme curriculum (pages 39-40). The importance of gathering and considering PSG feedback is explained on the UKFPO website.
Learn more about how to run the PSG feedback process in Horus.
-
Who can request PSG feedback in Horus?
Clinical supervisors, educational supervisors, foundation programme directors and administrators/foundation school staff can all request and view feedback for foundation doctors/NTGs they have access to.
It is generally expected that the clinical supervisor identifies the members of the PSG and requests feedback from them before completing their end of placement report. However, other staff (as listed above) are able to request feedback on the clinical supervisor's behalf.
Learn more about
- how to run the PSG feedback process in Horus
- the PSG in the curriculum
-
How do I get feedback from a foundation doctor's PSG using Horus?
1. Once you have logged in to Horus, open the foundation doctor's/NTG portfolio.
2. Open the "Placement Supervision Group" section in the portfolio menu (the last option in the list).
3. You will see the list of placements attached to the FD's/NTG's selected rotation. Select "Manage PSG Feedback" next to the relevant placement.
4. You will see any PSG feedback already requested or completed. To request PSG feedback, select the blue "Request feedback" button near the top right of the page.
Gathering PSG feedback from a registered Horus user
5a. Start typing the PSG member's last name, first name or GMC number into the 'PSG member' field.
6a. Wait for options to appear.
7a. If the person you're looking for appears in the options, select their account.
If they don't, see step 5b below.
8a. Select 'Send feedback request'.
Gathering PSG feedback from a member not registered with Horus
5b. Select the ‘nominate using a name and email address’ link.
6b. Type the full name and email address of the PSG member into the boxes.
7b. Select 'Send feedback request'
All PSG members will receive an email notification with a link to complete the PSG feedback form. PSG members who are registered on Horus (and have been added using steps 5a-8a) can also access and complete the PSG feedback form through the ‘Unsigned PSGs’ tab on their homepage.
Learn more about
- who can run the PSG feedback process
- how many PSG members can be asked for feedback
- who can view the submitted feedback
You can view a full pdf user guide here.
-
How many PSG members can be asked for feedback?
You can ask as many PSG members for feedback as required - there is no limit.
-
How do I track feedback from a foundation doctor’s PSG?
- Access the relevant foundation doctor’s/NTG's PSG sub-menu. See steps 1-3 here.
- You will see on the "PSG feedback" page how many responses have been requested and how many have been received.
- A completed PSG individual feedback form has a "View" button in the last column.
- A requested but not yet completed feedback form can have one of two entries in the last column - "Recent reminder sent" if the recipient was last emailed less than 24 hours ago and "Send reminder email" if it was more than 24 hours ago.
When you complete the CS end of placement report for the relevant foundation doctor, the names of the PSG members who have completed the PSG individual feedback form will appear in the form. You can add the names of any PSG members who did not complete a form (but did give you feedback) manually
-
Who can view feedback collected through the PSG feedback process on Horus?
Clinical supervisors, educational supervisors, foundation programme directors and administrators/foundation school staff can all view feedback for foundation/NTG doctors they have access to.
The names of the PSG members who submitted feedback are auto-populated into any CS end of placement reports completed for the relevant placement and these names will be seen by the foundation doctor, their supervisors and administrators once the report has been submitted.
All relevant users, plus the foundation/NTG doctor themselves, can view anonymised (see disclaimer below) feedback if a PSG summary is created.
NOTE: The PSG summary can be released at the discretion of the supervisor, with no minimum number of responses needed. Although your name will not be shown to the foundation doctor, note that this means your responses will not necessarily be anonymous."
Learn more about
-
Can PSG feedback be deleted?
Yes, PSG individual feedback forms (IFFs) can be deleted by administrators.
To delete a PSG IFF:
- Find the relevant form in Portfolio > Placement supervision group > Manage PSG feedback > View
- Scroll to the end of the form and select "Delete feedback"
- Read the notification in the pop-up carefully
• Once you have deleted a form, it cannot be recovered.
• Deleting a PSG IFF will not remove it from any PSG summaries it may have been released in. - Select "Delete" - if you are sure of this action. Otherwise, select "Cancel" - the form will remain unchanged.
PSG IFFs can be deleted up till 3 months after the end of the placement they belong to.Learn more about how to delete a PSG summary.
-
Someone has been incorrectly nominated to provided PSG feedback. Can their details be removed?
Yes. A PSG nominee's details can be removed from a foundation doctor/NTG's PSG:
1. Log into Horus and open the foundation doctor/NTG's ePortfolio.
2. Open the 'Placement supervision group' section in the portfolio menu.
3. Select 'Manage PSG Feedback' next to the relevant placement.
4. Select the 'Delete nominee' link against the PSG nominee which you would like to remove.
This process cannot be un-done - if a PSG member is deleted in error they will need to be re-nominated.
-
PSG summary
-
What is a PSG summary report?
A PSG summary report collates and displays anonymised feedback from members of the placement supervision group (PSG). It is not automatically created – a supervisor or administrator can create the report.
Learn about where to find the PSG summary report.
-
Where is a PSG summary report?
A PSG summary report can be accessed from the following foundation doctor portfolio sub-menus:
- ‘Contents’ (listed as “Placement Supervision Group Summary”)
- ‘Placement supervision group’ > 'Manage PSG Feedback' next to the relevant placement > Scroll to under the list of individual PSG feedback forms
Learn about how to create a PSG summary report.
-
How do I create a PSG summary report?
A PSG summary report can only be created when at least one PSG member has submitted feedback. An unlimited number of PSG summary reports can be created following this.
Learn more about who can view the summary.
To create a PSG summary report:
1. Access the relevant foundation doctor’s/NTG's PSG sub-menu. See steps 1-3 here.
2. Check the box next to the response/responses you want to include in the PSG summary report.
IMPORTANT NOTE: the minimum number of feedback forms that can be ‘summarised’ is one. Releasing one feedback form only will remove the anonymity of this feedback. See disclaimer.
3. Select ‘Preview PSG summary’.
4. Check the responses to ensure you are happy to release them to the foundation doctor/NTG.
If not, select ‘Close’ towards the top right screen to return to the previous page.
5. Select 'Satisfactory' or 'Unsatisfactory' from the Outcome drop down.
6. Complete the 'Comment' field.
7. Select ‘Release PSG Summary’.
IMPORTANT NOTE: Once a PSG summary has been released it can only be deleted by a user with administrator permissions.
8. You will see confirmation that the PSG summary has been released.
Please note, a Clinical Supervisor and administrator can only create a PSG Summary report up to 3 months after the end of the placement that the PSG feedback belongs to. After this time they will no longer be able to complete the report. However the PSG Summary report can be completed by the Educational Supervisor up to 3 months after the end of the rotation that the placement belongs to.
Learn more about where to find the PSG summary report.
-
Why can some PSG feedback not be added to a PSG summary?
PSG feedback gathered before the PSG feedback functionality was updated on 14 December 2018 cannot be added to a PSG summary. This is because from 14 December 2018, PSG individual feedback forms carry a disclaimer (see below), whereas the previous version did not.
Any forms completed before 14 December 2018 have the code "SNA" next to them in the PSG feedback list (in each FD's e-portfolio).
Disclaimer:
"NOTE: The PSG summary can be released at the discretion of the supervisor, with no minimum number of responses needed. Although your name will not be shown to the foundation doctor, note that this means your responses will not necessarily be anonymous."Learn more about
-
If I delete an PSG individual feedback form, will it be removed from any PSG summaries it has been released in?
No. Deleting a PSG IFF will not remove it from any PSG summaries it has been released in.
If required, the whole PSG summary can be deleted.
-
Can a PSG summary be deleted?
Yes, PSG summaries can be deleted by administrators.
To delete a PSG summary:
- Go to Portfolio > Placement supervision group > Manage PSG feedback (for the relevant placement)
- Scroll to the end of the page and find the relevant summary in the "Placement Supervision Group Summary" list
OR go to Portfolio > Contents and fine the relevant summary in that list - Scroll to the end of the form and select "Delete summary"
- Read the notification in the pop-up carefully
• Once you have deleted a summary, it cannot be recovered.
• Deleting a PSG summary will not delete any of the PSG individual feedback forms (IFFs) within it. - Select "Delete" - if you are sure of this action. Otherwise, select "Cancel" - the summary will remain unchanged.
PSG summaries can be deleted up till 3 months after the end of the placement they belong to.Learn more about how to delete a PSG IFF.
-
Can I add extra feedback to a released PSG summary report?
Extra feedback cannot be added to a released PSG summary report. You can delete the original PSG summary report and create a new summary report that includes the extra feedback. Note that this may remove the anonymity of the extra feedback.
-
PSG summary linked from clinical supervisor end of placement report
Released PSG summaries are quickly accessible from completed CS end of placement reports from the same placement:
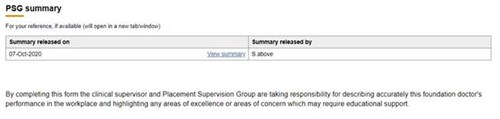
This is to assist educational supervisors reviewing CS reports before completing their own report and ARCP panel members reviewing portfolios.
The CS should release the PSG summary before completing their end of placement report if they want it to be quickly accessible in this way. Any PSG summaries released after the CS end of placement report is completed will not be accessible from here. All PSG summaries will remain available in the PSG portfolio menu (and the portfolio ‘Contents’ page).
Find out more about the Placement Supervision Group (PSG).
-
ARCP basics
-
What is ARCP?
The ARCP provides a formal process that reviews the evidence presented by the FD and their supervisors, relating to the trainee’s progress in the training programme. It enables the trainee, the postgraduate dean/deputy, and employers to document that the capabilities required are being gained at an appropriate rate and through appropriate experience.
The decision about whether or not an FD’s performance in each of the 13 FPCs has met or exceeded the minimum required standard for satisfactory completion of F1, or the foundation programme as a whole, will involve an overall judgement based on the ES end of year report, a review of the other summative assessments, and the contents of the e-portfolio presented to the ARCP panel. The ARCP panel judgement will include review of any concerns that have been raised, submitted by the FD via ‘Form R’ or equivalent, and the attendance record. (FP Curriculum (2021), p. 47)
The ARCP panel is convened by the Foundation Programme Director and their judgement will form the basis of the Foundation Programme Director/Tutor's recommendations regarding satisfactory completion of F1 or and the foundation programme as a whole.
Learn more about
- ARCP in the FP Curriculum (external link)
-
What are the requirements for satisfactory completion of F1/F2?
The requirements for satisfactory completion of F1/the foundation programme are displayed in the "Summary of Evidence report", found on the 'Overview' page of each foundation doctor's portfolio. The layout of the report is taken directly from the above document, which is also on the UKFPO ARCP webpage.
Learn more about
- how to see the "Summary of Evidence report"
- core content in Horus.
-
How does Horus support ARCP?
Horus has the follow features and functionality to support ARCP:
- Summary of evidence report - 2021 curriculum (and 2016 curriculum F1 and F2)
(available through each foundation doctor's portfolio "Overview" page) - Form R - F1 and F2
(available to be completed by foundation doctors only - other employees can see the published blank forms) - ARCP overview / management page
(available to administrators only) - Summary of evidence report 'sign off' form
(allows administrators/FPDs/panel chairs to add comments to the report) - ARCP outcome form - F1 and F2
(available to be started by administrators only - other employees can see the published blank forms) - End of year certificate - F1CC and FPCC
(available to be created by foundation school-level administrators only - other employees can see the published blank forms)
- Summary of evidence report - 2021 curriculum (and 2016 curriculum F1 and F2)
-
How is an ARCP completed in Horus?
The following steps are required to complete an ARCP in Horus:
- The summary of evidence report is reviewed by the foundation doctor, their educational supervisor and, depending on local process, their postgraduate centre administrator and/or FPD.
- Optionally, an administrator can create the summary of evidence report 'sign off' form in the ARCP overview / management page and add comments / confirm compliance. IMPORTANT: this step is not mandatory.
- The foundation doctor completes their Form R (in some cases - for example, out of synch foundation doctors not due for sign off at the standard time - the Form R may not be required. Foundation doctors in this position should confirm requirements with their educational supervisor / postgraduate centre administrator / FPD).
- The ARCP panel membership is set up by an administrator by starting and 'saving as draft' the ARCP outcome form.
- Any panel members who are not already administrators or trainers in the trust / hospital where the foundation doctor has trained will need to be assigned the "ARCP panel member" permission at the relevant location.
- The ARCP panel members review the foundation doctor's portfolio.
- The ARCP panel chair / administrator completes the ARCP outcome form.
- The ARCP panel chair signs the ARCP outcome form.
- The foundation doctor signs the ARCP outcome form.
- If an outcome 1 or 6 is awarded, the foundation school administrator issues the F1CC or FPCC by adding the relevant foundation school director's signature to the certificate, which becomes available once all signatures are present on the ARCP outcome form.
(NHSE foundation school teams have been sent guidance on how to do this.)
- The summary of evidence report is reviewed by the foundation doctor, their educational supervisor and, depending on local process, their postgraduate centre administrator and/or FPD.
-
What is the summary of evidence report?
The "Summary of evidence" report in Horus is based on the 'ARCP checklist' (2021 curriculum), which is on the UKFPO ARCP webpage.
These tables set out the requirements for satisfactory completion of F1 and F2, with guidance notes. The table is available to view at any time during the training year through each foundation doctor's portfolio "Overview" page.
Learn more about how to view the summary of evidence report.
-
Is there a deadline for submitting forms on Horus for ARCP?
There is no official national deadline enforced in Horus and there is no technical 'lock down'. All deadlines and virtual lock downs are decided locally and should be adhered to by foundation doctors.
It is expected that the majority of ARCPs will take place in June of each year. Information should be ready for review by this time.
-
Reviewing content for ARCP
-
How do I see my/my FD's summary of evidence report?
The summary of evidence report is available to view at any time during the training year:
- (If trainer or administrator) Search for / select the relevant foundation doctor
- In the portfolio menu, select "Overview"
- Select the "ARCP" tab
- Select the "Summary of evidence" link
- The summary of evidence report will load - scroll through the form to review your/the foundation doctor's progress to date
Learn about how the summary of evidence report works.
-
How does the summary of evidence report work?
The summary of evidence report is available to view at any time during the training year (learn about how to view it).
In Horus, as well as the requirements (and guidance for each of these) published in the FP Reference Guide, you will see, where possible, 'mini-reports' showing the foundation doctor's progress against each item. For example, educational supervisor's end of placement reports:
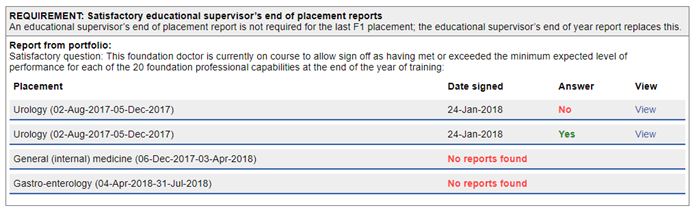
For any items in the list that are not recorded in Horus, you will see the comment "Horus is not able to provide any additional data for this requirement."
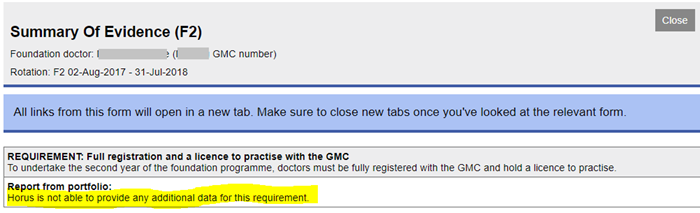
This report is read-only and all the information comes from the portfolio itself.
Administrators and ARCP panel chairs are able to add their own comments and assessments of how the foundation doctor has met these requirements using the summary of evidence report 'sign-off form'.
-
As an administrator, how do I see an overview of ARCPs in my location?
Administrators need to use the "ARCP" overview page to view, create and manage ARCPs in their location:
- Admin menu > Overviews > ARCP
- As in other overview and list pages, you can filter and search by location, grade, training year, GMC number, name and email address
- The page by default shows 10 entries - you can change this to 25 or 50 if required
The entries are shown spread across four columns:
- Foundation doctor (Last name, First name, email address, GMC number)
- ARCP settings (shows whether any ARCP outcome forms have been started and if so whether panel members have been set up)
- Outcome (shows the outcome/s that has/have been awarded and whether the outcome form has been signed by the panel chair and the foundation doctor)
- Certificate (shows, if an outcome 1 or 6 has been awarded, whether the F1CC or FPCC has been signed by the FSD; allows download of the certificate)
The entries can be sorted alphabetically by last name (either A-Z or Z-A).
Just above the results, there is the option to "Create SoE" or "Create new Outcome Form".
Just below the results, there is the option to "Download csv" (an Excel spreadsheet showing most of the contents of each completed outcome form).
-
How do ARCP panel members/chairs review a foundation doctor's portfolio?
1. An administrator/FPD has to assign the panel member to a foundation doctor's ARCP.
2. The panel member/chair has to sign in to Horus.
3. Select the 'ARCP panels' main menu item.
4. You will see a list of foundation doctors to whom you've been assigned as panel member/chair.
5. You have three options:
i. View a started Summary of evidence 'sign off' form, if it exists - select the link under the 'Summary of evidence' label under the foundation doctor's name ('F[1/2] [Rotation start date] - [Rotation end date]')
ii. View the draft / completed ARCP outcome form - select the 'Outcome form (F[1/2])' link in the 'ARCP settings' column (panel chairs can edit the outcome form from here)
iii. View the foundation doctor's portfolio - select the 'Portfolio' link in the 'Portfolio' column
6. Once you have selected the 'Portfolio' button, you will see the foundation doctor's portfolio 'Overview' page. From here you can review their portfolio.
-
What is a temporary reviewer?
A temporary reviewer is a user who requires access to a foundation doctor's ePortfolio but only for a specified period. A temporary reviewer will be able to view the whole of a doctor's ePortfolio.
Learn more about who can add temporary reviewers and how to add temporary reviewers.
-
Who can add temporary reviewers to a foundation doctor's account?
Temporary reviewers can only be added to a foundation doctor's ePortfolio by users with administrator permissions that have access to both the foundation doctor's and user's accounts.
Learn more about how to add a temporary reviewer.
-
How do I add a temporary reviewer to a foundation doctor's account?
To add a temporary reviewer to a foundation doctor's ePortfolio you need to:
1. Search for the foundation doctor's account using Admin menu > Foundation doctors.
2. Select 'Rotations'.
3. Scroll to the bottom of the page and select 'Manage temporary reviewers'.
4. Select 'Add new'.
5. Input user details.
6. Select 'Date from' and 'Date to'. (Note: the begin date of the temporary reviewer access can only be set from the date creating the access plus 1 year. This date cannot be set in the past).
7. Select 'Add temporary reviewer'.
You will be redirected to the temporary reviewer page where you will see a confirmation banner and details of the temporary reviewers added.
-
Will a temporary reviewer's access to a foundation doctor's account automatically end or do I need to end it manually?
When a temporary reviewer is added to a foundation doctor's ePortfolio the administrator is required to set an end date for the access. Once the end date has passed the temporary reviewer will no longer be able to access that foundation doctor's ePortfolio.
-
I have added a temporary reviewer to a foundation doctor's account in error. Can it be deleted?
Temporary reviewers can be deleted from a foundation doctor's ePortfolio but only if their access has not yet started. Once a temporary reviewer session has started it cannot be deleted.
To delete a temporary reviewer you need to:
1. Access the foundation doctor's 'Manage temporary reviewers' page (steps 1-3 here).
2. Select 'Delete' next to the reviewer you wish to remove.
3. Select 'Delete' on the pop-up warning.
-
As temporary reviewer how do I access a foundation doctor's account?
Those with trainer permissions need to:
1. Select Trainer menu > Temp. reviewer.
2. Select ‘Open Portfolio’.
Those with only temporary reviewer permissions need to:
1. Select Temp. Reviewer.
2. Select ‘Open Portfolio’.
-
I have been added to a foundation doctor's account as a temporary reviewer in error. Who do I contact regarding this error?
Temporary reviewers can see when their access to a foundation doctor's ePortfolio was granted and who it was that granted the access.
To view this information:
1. Access the temporary reviewer page (Follow step 1 here).
2. Select the 'Show / hide further details about the above' link
-
Creating content for ARCP
-
How do I complete my Form R?
As a foundation doctor, you should only complete your Form R when advised to do so by your postgraduate centre team. For the majority this will be in either April or May of each year, in advance of the national ARCP period in June. If you are working out of synch with this standard timeline, you will be advised when to complete your Form R in advance of your ARCP.
Note that the Horus team cannot advise you when to complete your Form R. You must discuss this with your postgraduate centre team.
To complete your Form R:
- Forms (start new) menu
- Mandatory forms for each training year (rotation) section > At the end of each training year (rotation) table
- Select 'Form R'
- Select 'Create' next to the rotation for which you need to complete the Form R (usually you will only have one option)
- Read the important guidance at the start of the form and the instructions throughout carefully
- Complete all mandatory fields in the form - or you can 'Save (leave as draft)' if you're not sure of some of the information
TIP: Enter any dates either in the correct format (dd-Mmm-yyyy) in the text box or select from the date widget directly. - You must save and submit the form before your ARCP panel meets (exact deadline to be confirmed by your postgraduate centre team)
-
How do I create a summary of evidence report 'sign off' form?
Administrators, FPDs and ARCP panel chairs are able to create a 'sign off' version of the 'summary of evidence' (SoE) report for ARCP.
This is NOT MANDATORY, but is designed to help administrators prepare information in advance of ARCP panels and thereby aid the panel review process. Horus will never automatically declare any foundation programme requirement 'met' or 'not met' - it will display which forms have been completed and what assessment judgements have been made. The decision of whether requirements have been 'met' or 'not met' must be made directly by the ARCP panel.
To create a summary of evidence report 'sign off' form:
- Admin menu > Overviews > ARCP (learn more about how the ARCP overview works)
- Find the foundation doctor (FD) for whom you want to create an SoE (either by scrolling down the list or using the usual filters)
(Alternatively, you can select 'Create SoE' next to 'Create new Outcome Form' and search for the FD - you will then arrive at step 5.) - Select 'More' just under the FD's details
- Select 'Start new SoE'
- The summary of evidence report will load - it will have all the same information as the read-only version that can be accessed through the FD's portfolio 'Overview' page plus two extra editable sections for each listing:
- Requirement met? (Yes / No)
- Further notes / comments (free-text field) - You can complete as many of these sections as appropriate
- When you're ready, select 'Save changes' at the end of the form - you will see a confirmation screen and your entry, labelled with your name and the date and time you made the entry.
- The information you have added will now be available to the FD and their supervisors through their portfolio 'Overview' page and to the ARCP panel (once they're appointed) through their 'ARCP panels' menu.
- The SoE report 'sign off' form will remain editable until 3 months after the end of the rotation it is attached to - the same as all other forms in Horus.
- Only one SoE report can be created for each rotation.
- You can't edit your entries, but you can add new entries and delete old entries.
If there is more than one entry for a listing, you will see the most recent one by default and can view previous ones by expanding the comments section.
-
How do I view a summary of evidence report 'sign off' form?
The creation of the summary of evidence report 'sign off' form ('SoE 'sign off' form') is explained in a previous FAQ.
There are three ways to view a previously created 'SoE 'sign off' form'.
1. All users with access to a specific foundation doctor's portfolio can view the form on the FD's portfolio overview. The entries made by the administrator / FPD / ARCP panel chair will be visible.
2. Administrators and FPDs can view the form under the foundation doctor's name in Admin menu > Overviews > ARCP
3. ARCP panel chairs and other panel members can view the form under the foundation doctor's name in their 'ARCP Panels' main menu item (it will look the same as above).
-
Does extra information have to be uploaded to Horus to prove GMC registration in the summary of evidence report?
It is not expected that foundation doctors upload additional evidence to their portfolio showing provisional/full registration and there is no specific place in Horus to do this. As always, foundation doctors should follow local guidance and requirements. It is employers’ responsibility to ensure all staff hold the appropriate professional registration for the role they’re undertaking.
Note that all foundation doctor accounts are linked to information from the GMC LRMP. Each doctor's GMC number is shown in brackets after their name in the summary of evidence report. This shows that the doctor holds a registration with the GMC.
-
How do I create an ARCP outcome form?
Administrators and FPDs are able to create ARCP outcome forms from the ARCP management page. ARCP outcome forms can be created individually or in bulk.
ARCP outcome forms cannot be created from the "Forms (start new)" page.
Creating ARCP outcome forms individually:
An administrator / FPD has to create an ARCP outcome form and set up ARCP panel members in the form before it can be completed by the ARCP panel.
To create an ARCP outcome form:
1. Admin menu > Overviews > ARCP (learn more about how the ARCP overview works)
2. Select "Create new Outcome Form" just above the "Outcome" column
3. Select the 'Single outcome form' button.
4. Start typing the name of the foundation doctor, select their name from the list of results and select the rotation for which you want to create the outcome form (for most foundation doctors you will only have one option - the current rotation)
5. Select "Next step"- the ARCP outcome form will load.
6. Complete as much of the form as required (see how to set up ARCP panel members), then scroll down to the end of the form and select "Save (and leave as draft)".
Creating ARCP outcome forms in bulk:
1. Follow steps 1-2 above.
2. Select the 'Multiple outcome forms' button.
3. Select the 'New panel' button.
4. Input the panel member details and select the 'Add to panel' button. Repeat for as many panel members as necessary and select the 'Create panel' button. Please note that a minimum of at least 1 panel member in addition to the panel chair must be provided.
5. Input the meeting date using the date picker.
6. Select the appropriate foundation doctors using the check boxes.
7. Review the 'Create ARCP Outcome forms' summary to ensure all the details are correct and select the create button. The ARCP outcome forms will now have been created and will be saved as draft.
8. Navigate back to the ARCP overview page to complete as much of each form as required then scroll down to the end of the form and select "Save (and leave as draft)".
Learn about how to complete an ARCP outcome form.
-
Why can I not select some foundation doctors when creating ARCP outcome forms in bulk?
Only foundation doctors without an ARCP outcome form (in draft or completed) for a rotation can be selected when creating ARCP outcome forms in bulk. If the system detects that an ARCP outcome exists for a foundation doctor then they will be greyed out and un-selectable. Hovering over the greyed out foundation doctor will reveal this reason.
-
How do I add placements completed in another country/on another system to an ARCP outcome form?
All the placements entered under a rotation for a foundation doctor in Horus are automatically populated into the ARCP outcome form. Whenever possible, administrators should update incorrect/incomplete placement information in the rotation management part of the system before the ARCP outcome form is completed.
If this has not been done/is not feasible (for example, some placements that contribute to the ARCP have been undertaken by the foundation doctor in a part of the UK where Horus is not the e-portfolio used), an administrator or the panel chair can take the following steps:
- Open the ARCP outcome form
- In the "Additional Placements" section at the start of the form, select "Add Additional Placement"
- Complete all the fields that appear
- Repeat steps 2 and 3 as many times as required
- Save (and leave as draft) --> if not yet ready for the form to be signed OR Save (and review before submission) --> if the chair is ready to sign the form
- Check that the placements all look correct - you will see first the placements you have just added manually, then the auto-populated placements from the Horus rotation manager.
-
How do I set up ARCP panel members for a foundation doctor's ARCP?
- An administrator / FPD has to create an ARCP outcome form and complete the following sections in it before it can be viewed and completed by the ARCP panel:
Foundation school
Name and role of all foundation ARCP Panel members
Date of Review- The administrator needs to "Save (and leave as draft)" to allow the panel chair to complete the rest of the form.
To set up ARCP panel members:
- Create the outcome form for the relevant foundation doctor.
- The "Foundation doctor" and "Foundation training" sections will be pre-populated by Horus (name, GMC number, medical school, placements). Check that these details are correct.
--> If they are not correct, close the ARCP outcome form without saving it (use the "Close" button in the top right corner, just below "Log out") and correct the details in foundation doctor's account - then redo steps 1 and 2. - You can add any additional placements (for example, those undertaken before the foundation doctor started using Horus if they are working out of synch and/or less than full time) using the "Add Additional Placement" link just under the "Foundation Training" section.
--> In most cases you will not need to use this section. - Check the foundation school against which the foundation doctor is listed - in most cases there will only be one (pre-selected) option and you will not need to do anything.
--> In case the foundation doctor trained in more than one foundation school, select the foundation school under which this ARCP is being run. - Start typing the name of the ARCP panel chair and select their name from the list of results.
--> If they don't appear, you may need to assign them the "ARCP panel member" permission to your location. All users with permission to your location can be added as ARCP panel chairs or members - they don't need to be assigned the "ARCP panel member" permission. - Select their job role from the drop-down list.
- Select 'Add panel member'
- Start typing the name of the panel member and select their name from the list of results. (see step 5 for what to do if they don't appear).
- Select their panel role and job role from the drop-down lists.
- Repeat steps 7-9 for additional panel members (you must have at least 2, plus the panel chair).
- Enter the ARCP date into the 'Date of Review' field.
- Scroll down to the end of the form and select "Save (and leave as draft)".
Alternatively, you can copy panel members from another ARCP outcome that already has panel members.
- The ARCP outcome form will be available to view by the panel chair and other panel members from 3 weeks before the 'Date of Review' and for 2 weeks after it. The panel chair will be able to complete the ARCP outcome form in this same time frame.
- The ARCP outcome can also be completed by an administrator (for example, someone who is scribing during the ARCP panel meeting). The panel chair will need to log in and sign the form from their own Horus account to fully submit the form.
- The foundation doctor will not be able to see the ARCP outcome form until the panel chair has signed it.
-
How do I copy an ARCP panel from one ARCP outcome form to another?
Administrators can copy ARCP panel members from any ARCP outcome form in their organisation where panel members have already been added (the original form has to be at least "saved as draft").
- Create the outcome form for the relevant foundation doctor (FD).
- Select "Copy panel members" just after the "Foundation School" selection box:
- Read the pop-up information - "We'll save all your changes first, then take you to a new page where you can select a Chair and Panel members from an existing ARCP. Any panel members you've already added to this ARCP will be over-written."
- If you're happy with this, select "OK" (otherwise, select "Cancel").
- ARCP panels that have been already been set up will be listed. Select the name of the FD whose panel you want to copy:
- Select 'Copy panel'.
- You will be taken back to the ARCP outcome form - the new panel will be displayed and already saved in the form.
- Continue editing the form (select "Make further changes" in the purple information bar) or close the form.
You can continue making changes to the panel members, and any other part of the form, until the panel chair has signed it.
-
Why is one of the panel members highlighted in red?
Anyone who is assigned as a supervisor to any of the foundation doctor's placements within the rotation being reviewed is highlighted in red and the type of supervisor is specified:
It is possible to save/complete the ARCP outcome form this way, but it is strongly recommended that the ARCP panel member in question is changed.
The Foundation Guide (2019) says:
4.50 When arranging panels, it is important to ensure that members are not part of a panel for a trainee for whom they have fulfilled the role of either educational supervisor or named clinical supervisor.
-
How do I add an ARCP panel member to my location?
IMPORTANT: You can add any user already assigned to your location with other permissions (trainer, FPD or administrator) to ARCP panels - you don't need to assign them an additional permission.
Some panel members may not already have permission to (A) your location (for example, an FPD from a neighbouring trust) or indeed to (B) Horus (for example, a lay member or medical school colleague).
In such cases, you need to assign the user the "ARCP panel member" permission at your location.
(A) If the user already has access to Horus but not to your location:
1. Admin menu > Users
2. Scroll to the bottom of the page and select the "Search across all organisations" link
3. Search for the user (if they don't appear, follow the instructions in section B below)
4. Select "Edit" in the 'Permissions' column
5. Start typing your organisation's name in the text box, wait for a list of options to appear and select the appropriate one
6. Tick the "ARCP Panel Member" box
7. Select "Save Changes"
(B) If the user does not already have access to Horus:
2. On the "Add permissions" page, start typing your organisation's name in the text box, wait for a list of options to appear and select the appropriate one
3. Tick the "ARCP Panel Member" box
4. Select "Save Changes"
-
How do I complete an ARCP outcome form?
1. The steps to create an ARCP outcome form must be followed.
The outcome form can be completed by the following user types (with relevant location permission):
- Administrator
- FPD
- FSM
- FSD
- ARCP panel chair2. Users can find the ARCP outcome form in the Admin menu > Overviews > ARCP page (and panel chairs in the "ARCP Panels" main menu item)
--> select the "Outcome form (F[1/2])" link in the "ARCP settings" column.3. Fill in the form as required.
4. As with all forms in Horus, you can either "Save (and review before submission)" or "Save (and leave as draft)". To complete the form, you must select "Save (and review before submission)" (you can leave it as draft if required temporarily though).
5. You will have the option to "Make further changes" until the panel chair has signed the form.
6. The outcome form can be signed only by the user designated as the ARCP panel chair within the form. The panel chair should log in, find the form as described in step 2 and sign it by selecting "Sign this form".
7. Once the panel chair has signed the form, no further changes can be made within the form. The form will now be available for the foundation doctor to view and sign.
-
How does the ARCP panel chair sign the ARCP outcome form?
See step 6 in How do I complete an ARCP outcome form?
-
What do I do if I find an error in a completed ARCP outcome form?
NHSE local office/foundation school administrators, foundation school managers and foundation school directors are able - at their discretion - to edit and delete ARCP outcome forms. There are specific criteria they have to follow to do this.
If an ARCP outcome forms need to be edited (or deleted), please contact your NHSE foundation school team.
-
How do F1CCs/FPCCs get created?
F1CCs (Foundation year 1 certificate of completion) and FPCCs (Foundation programme certificate of completion) can only be created if the following conditions have been met:
- The ARCP outcome form has been submitted
- The following have signed the ARCP outcome form:
- The panel chair
- The foundation doctor
- The ARCP outcome is 1 (F1) or 6 (F2)
Once all of these conditions have been met, the relevant foundation school administrator has to create a certificate for each eligible foundation doctor (can be done in bulk). Foundation school teams have been sent guidance on how to do this.Eligible foundation doctors will be able to download their certificate from Horus once all of the above actions have taken place.
-
How do I view and download an F1CC/FPCC?
A completed F1CC/FPCC can be viewed and downloaded from the relevant foundation doctor's portfolio "Overview" page.
It can be found under the "ARCP" tab.
-
Reporting
-
What reports are available in Horus?
There are a number of different kinds of reporting available in Horus. Learn more about how reports work in Horus.
In individual foundation doctor (FD)/Non-trainee grade (NTG) portfolios:
- Form completion count for a specific FD/NTG
- All users with access to the relevant FD's/NTG's portfolio (including the FD/NTG themselves) can see on the Portfolio Overview how many SLEs/CPs/Reflections have been completed for that FD/NTG.
In the "Admin menu":
- User search reports
- Administrators can search for a specific FD/NTG / trainer / other administrator or view a list of all users within a specified location.
- Trainers can view a list of all FDs/NTGs they have supervised, are supervising or are due to supervise (from the "Supervising" menu).
- Form completion count for a specific location (listed by FD/NTG)
- Administrators can view a list of all FDs/NTGs in a specified location they have access to (eg a hospital) and how many of a specific type of form each has completed/has had completed for them.
- Specific user lists
- Supervisors: Administrators can view a list of all trainers who are assigned as supervisors to FDs/NTGs and see details of who/where/when. Learn more about how the Supervisor list works.
- NTGs: Administrators can view a list of all NTGs
- Overviews
- Administrators can manage a number of processes from this section as well as get an overview of FD/NTG progress
- Placement overview/Download
- Mandatory certificates
- TAB
- ARCP
- ARCP's needing signatures
- ARCP's blocked by missing CS
- Curric. Summary Narratives
- Administrators can manage a number of processes from this section as well as get an overview of FD/NTG progress
- Form completion count for a specific FD/NTG
-
How do the reports in Horus work?
All reports in Horus have a variety of filters and search functions.
- All administrator reports in Horus have a location filter. The options are dependent on the location permission(s) of the logged in user.
View a short video tutorial showing how to manage locations. - Most reports have a
- foundation grade filter (F1 / F2 / All)
- training year filter (e.g. 2017-18 or 2018-19)
- type of learner filter (FD / NTG / All)
- "Start typing to filter the results in the table" search - for example you could search for a specific foundation doctor's name or GMC number
- Most form count reports have a "status" filter (completed / awaiting approval / draft / all)
- The Reflections and Personal Development Plans reports don't have this filter, as these statuses don't apply to them.
- Most reports can be sorted alphabetically and/or numerically
- You sort by selecting the column heading by which you want to sort
- Examples of useful sorting are A-Z by surname or ascending by number of forms completed - those who have completed 0 of a particular type of form will come at the top of the list.
- Most reports will be downloadable to Excel.
- Currently this is only available for the "Placements overview / download" report
- Learn more about how to manage placements.
- We will be adding this to other reports later on during 2018. Meanwhile, you can easily copy and paste on-screen report results into Excel.
- Currently this is only available for the "Placements overview / download" report
Learn more about what reports are available in Horus.
- All administrator reports in Horus have a location filter. The options are dependent on the location permission(s) of the logged in user.
-
How do I view a list of trainers who are supervisors in my location?
All supervisors on Horus are created as either "doctor" or "other user". To assign a trainer as a supervisor, an administrator needs to set up and manage a rotation and placements for the relevant foundation doctor/NTG. Learn more about rotation and placement management.
Once trainers have been assigned to foundation doctor/NTG placements, they will show up in the "Supervisor list":
1. Select "Admin menu" > "Supervisor list".
2. If required, change the location where you want to search for supervisors. Learn more about location management.
3. You will see a list of trainers (last name, first name, email address, GMC number (if applicable)), the type(s) of supervisor they are and an option to see more details about a specific supervisor.
4. You can use the "Start typing to search..." box to look for, for example, all trainers who are educational supervisors, or to find a specific trainer. Learn more about how reports work in Horus.
5. For details about the foundation doctor(s)/NTG(s) assigned to a specific supervisor, select "Show History" next to the relevant supervisor's name.
-
How do I view a list of NTG doctors in my location?
All trust and foundation school administrators should be aware of whether there are any NTGs listed at their location on Horus.
Administrators should ensure that non-foundation doctors using Horus to record their own competences are listed as NTGs.
The "NTGs" report in the "Admin menu" allows you to check this has been done.
1. Select "Admin menu" > "NTGs".
2. If required, change the location where you want to search for NTGs. Learn more about location management.
3. You can filter the results by training year (the current will show as default), grade and NTG type. The report can display 10 (default), 25 or 50 results per page.
4. You will see a list of NTGs (last name, first name, email address, GMC number), the grade and type of NTG they are and placement(s) location and dates.
5. You can use the "Name / Email" heading to sort A-Z (default) or Z-A by last name.
-
How do I view a list of doctors undertaking a FiY1 placement in my location?
Administrators can view a list of doctors undertaking a FiY1 placement by:
- Admin Menu > Foundation doctors
- ‘Training year’ drop down > Select ‘2019-20’
- Advanced filters
- ‘FiY1 Inclusion?’ drop down > Select ‘FiY1s only’
- Select ‘Filter’
-
How do I check that no NTGs have been listed as FDs at my location?
There are a number of options. Two of the easiest are:
1. The "Placements overview / download"
- There is a count of results at the bottom of the screen (eg "Showing 375 entries")
- Select "Exclude NTGs" - note the count of everyone listed as an FD at your location and compare with what you were expecting
- "Export to CSV" this list - compare with your main FD list (eg in TIS)
2. The "Foundation Doctors" list- As above, view the count at the bottom of the screen when you've filtered for "Exclude NTGs" (found in "Advanced filters")
Note that in both cases, just the count may not be enough to verify everyone has been listed correctly.
Learn more about NTGs in Horus.
-
What do the headings in the TAB form count report mean?
Open for feedback - Number of TABs currently open and within the time-limit, so feedback can be obtained.
Closed for feedback - Number of TABs that have expired and are no longer accepting further feedback.
Released - Number of TABs that have been summarised and released to the foundation doctor/NTG.
Unreleased - Number of TABs that have been summarised and have not been released to the foundation doctor/NTG.
Satisfactory - Number of TABs that have met the requirements of a TAB and been marked as satisfactory in the TAB summary.
Incomplete - Number of TABs that did not meet the requirements of a TAB and have been marked as incomplete in the TAB summary.
Invalid - Number of TABs that did not meet the requirements of a TAB and have been marked as invalid in the TAB summary.
Unsatisfactory - Number of TABs that did not meet the requirements of a TAB and have been marked as unsatisfactory in the TAB summary.
Note: the number shown under each headings may not always calculate as expected - they are, however, correct (based on the explanations above). For example, when a TAB has expired but has not yet has its summary form completed, 1 will show in 'closed for feedback' and will not be shown in any other columns.
-
Help contacts
-
As a foundation doctor, how do I know who to contact if I need help with my e-portfolio?
Foundation doctors can view a list of Horus ePortfolio administrators and foundation programme directors (FPDs) in their hospital/trust:
- Sign in to Horus
- Select "Help" from the main menu along the top
- Scroll down past the "Horus support website" link to see a list of local administrator contact details
- Scroll past this to see a list of local FPDs
-
Is it possible to add a default organisation contact for Foundation doctors/NTG who need help with their portfolio?
It is possible to add a default organisation contact to the Help page for foundation doctors, this will replace the list of automatically generated administrator email addresses. This is intended for use by organisations who would like their foundation doctors/NTGs to contact them using a generic centralised inbox.
If your organisation wishes to nominate a default contact please email the Horus ePortfolio ServiceDesk (servicedesk.horus@hee.nhs.uk) and provide the below details.
Trust/Site (including ODS code) - Example: Manchester University NHS Foundation Trust [R0A]
Name of default contact - Example: Postgraduate team
Email Address - Example: Example.GenericInbox@FakeEmail.nhs.uk
Description (if applicable) - Example: 'For F1 and F2 use only' (note this field can be left blank if required)
Please note multiple default contacts can be provided so it is possible to nominate a specific contact for foundation doctors and then another for your non-trainee grade users.
-
Notices
-
Does Horus have a Notices section?
No. Horus ePortfolio does not support user created notices and there are currently no plans to introduce one.
Administrators can use the 'Placements overview / download' page to download a list of all foundation doctors in their area with the email address they are registered on Horus with. This can be used as the basis for an email distribution list.
Horus-registered email addresses for all other types of users can be copied in batches of 50 from the 'Users' admin list (this list can also be filtered by location and type of user).
-
Messaging
-
Does Horus have an internal messaging system?
No, Horus does not have an internal messaging system.
Users are able to see the email address of other users as follows:
- Administrators can see the email address of all foundation doctors and other users in their area
- Supervisors can see the email address of all foundation doctors they supervise and all their other supervisors
- This can be clicked to directly open a message in the user's own email client
- Foundation doctors can see the email address of all of their supervisors
- This can be clicked to directly open a message in the user's own email client
Administrators will also be able to communicate with users in their location(s) using the Notices feature.
-
Archive basics
-
The HEE FP E-portfolio Archive was closed down on 31 July 2025
The HEE FP E-portfolio Archive was launched in August 2017 as part of the HEE e-portfolio transition to Horus (HEE has since merged with NHS England (NHSE)). NHSE’s health education data retention policy required the data in this system to remain accessible to all its current users until 6 years after the last record on the system. This means that it came to the end of its active life on 31 July 2024 and was fully decommissioned one year later, on 31 July 2025. Information held in the Archive is no longer accessible to users.
-
What was the HEE Foundation Programme E-portfolio Archive?
In August 2017, HEE (now merged with NHS England (NHSE)) changed its foundation e-portfolio from the NES ePortfolio (and the "NW Horus" ePortfolio in the north west of England) to the Horus ePortfolio. Active user accounts were transferred from the NES ePortfolio/NW Horus to Horus; however, portfolio contents were not transferred.
Instead, a separate online system was created to hold all information collected in the NES ePortfolio at HEE locations between August 2008 and July 2018. This was called the HEE Foundation Programme E-portfolio Archive ("the Archive"). This system has now been closed.
Information collected in the NW Horus ePortfolio in the north west of England between August 2005 and July 2017 is no longer accessible to users. Further details can be found here.
-
North West of England e-portfolio archive
-
How long will my historic e-portfolio data be available through NW Horus Archive?
As of 02 August 23, data in the NW Horus Archive will no longer be available to users as the retention period has been exceeded. As a result of this, the system has been taken offline and can no longer be accessed.